Events
Creating an Event
Let's start with the basics. If you're creating it from your…
UNATION app: Open the app, click "My Apps" icon on the bottom menu, select "Create Event +", and get started
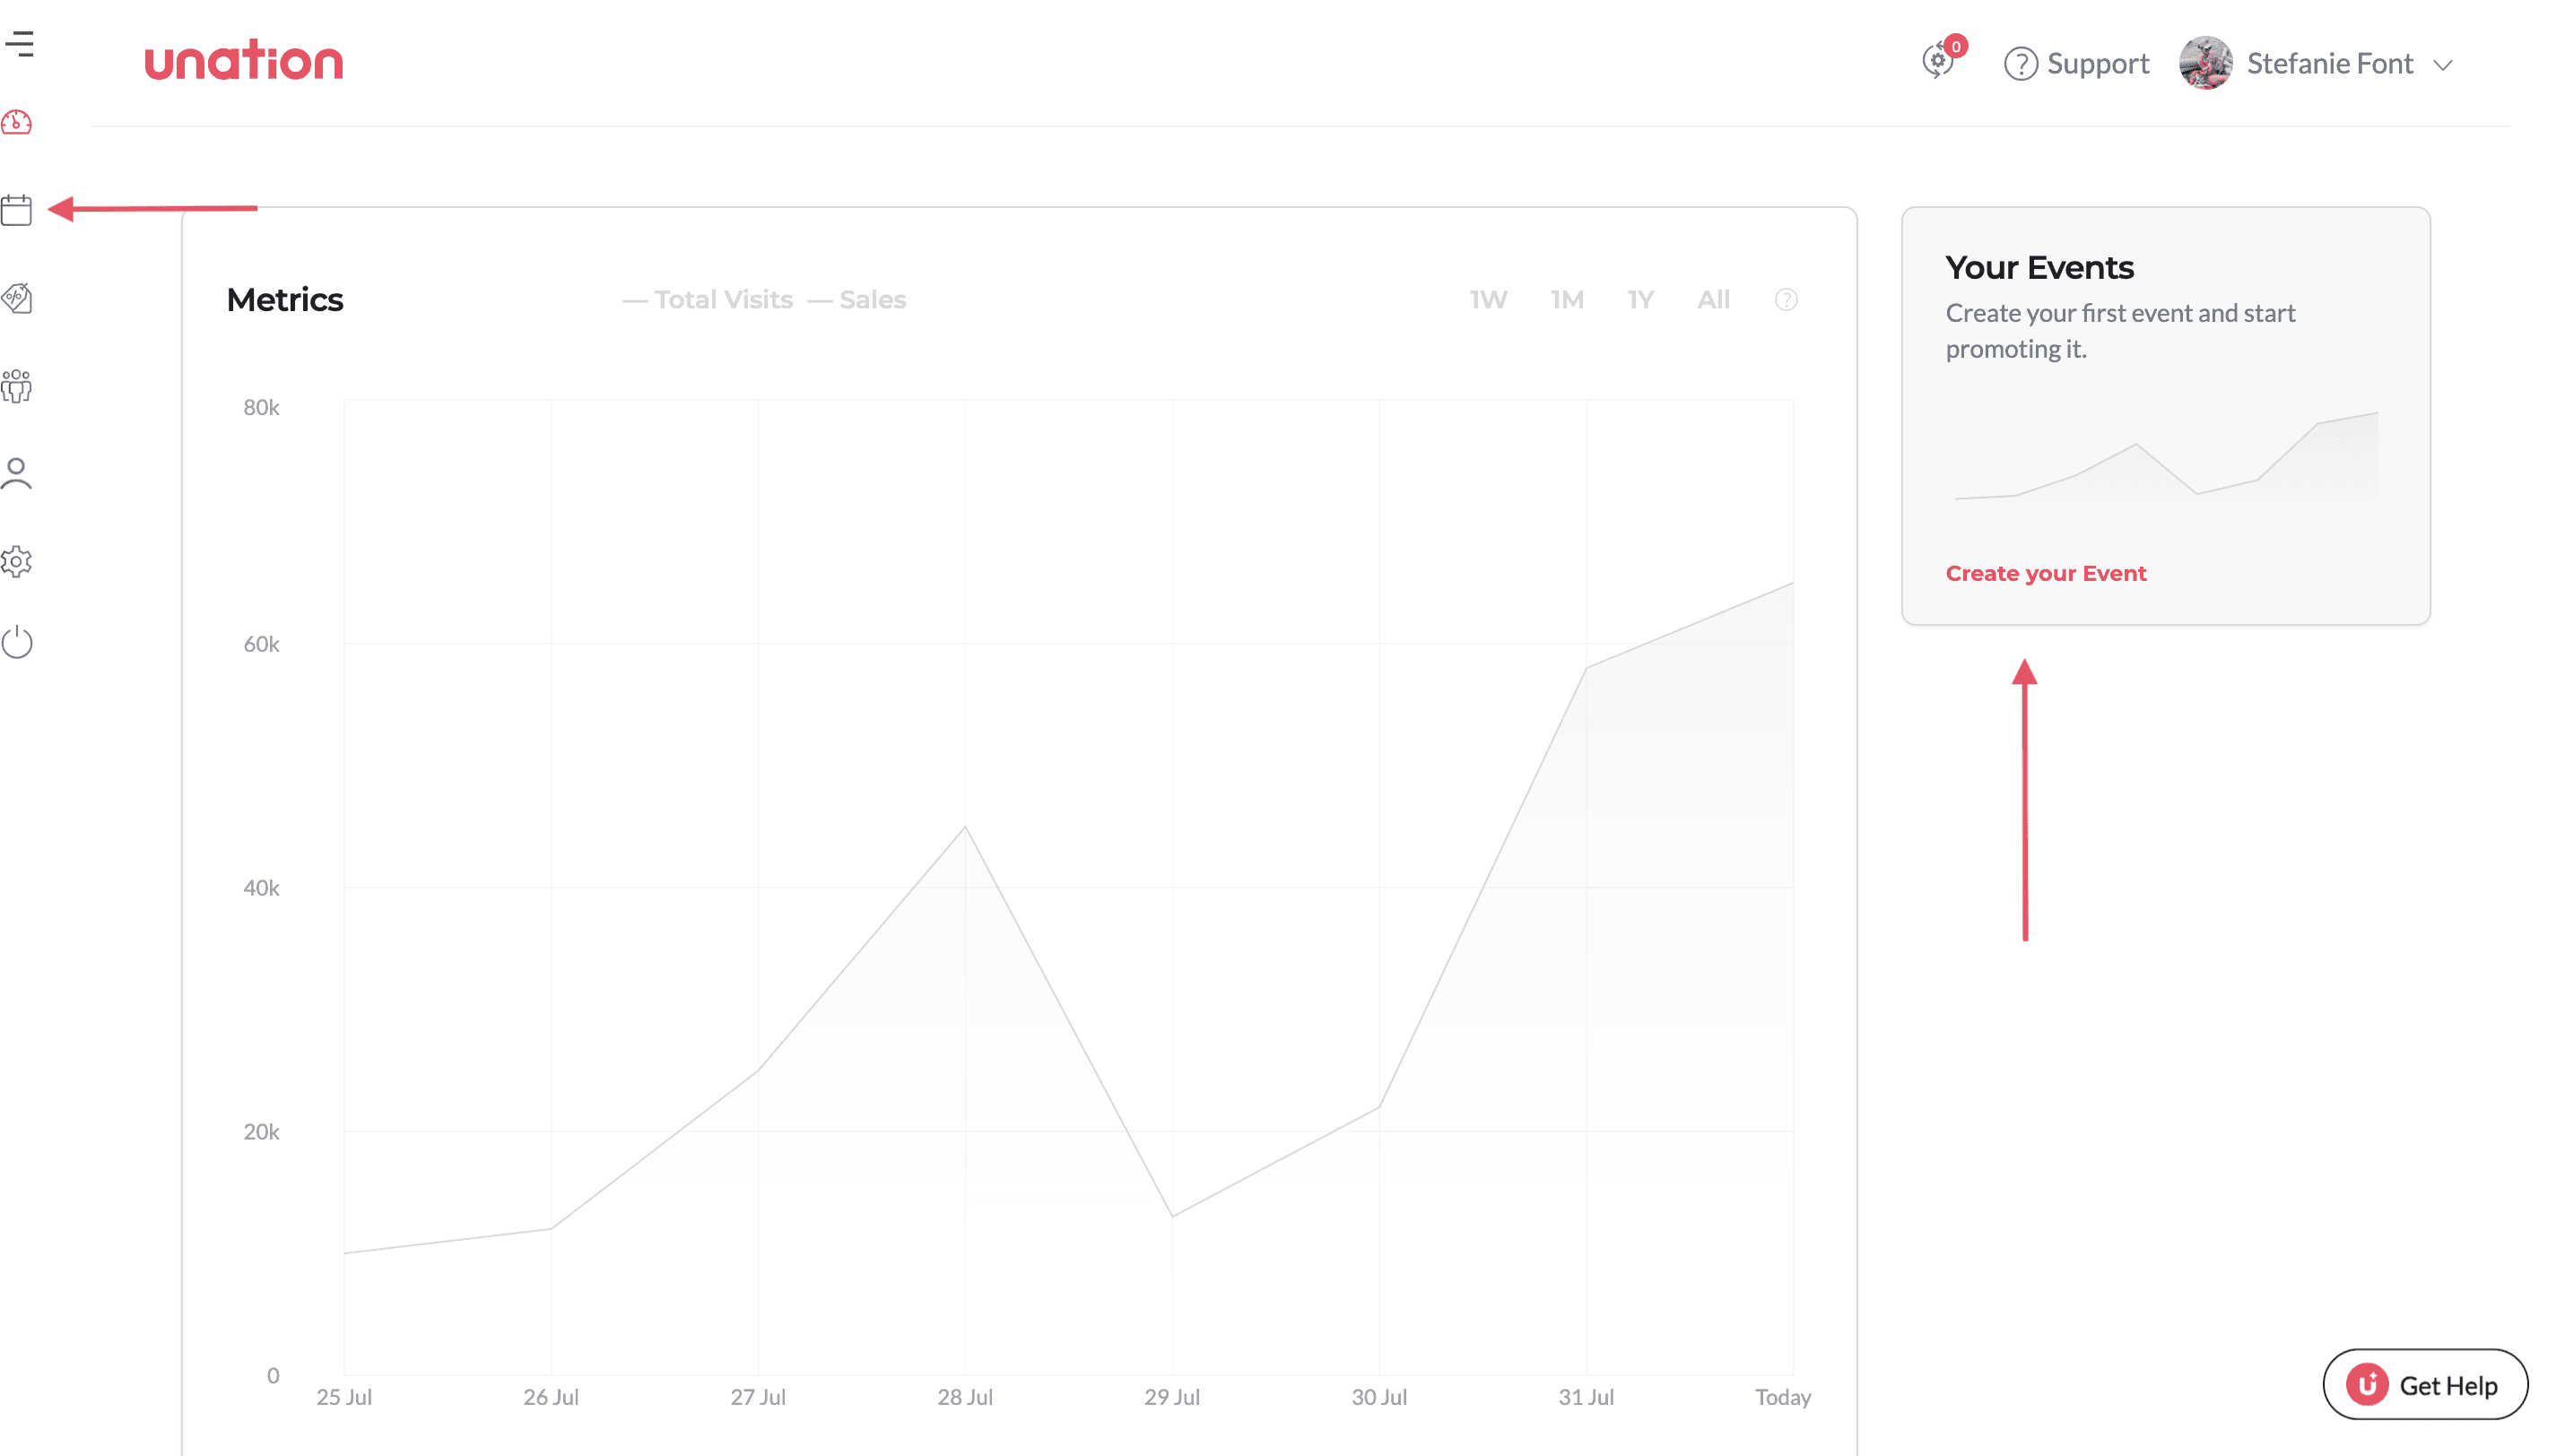
Computer: Click the Create Event button. This can be found in the main dashboard or left column on your screen
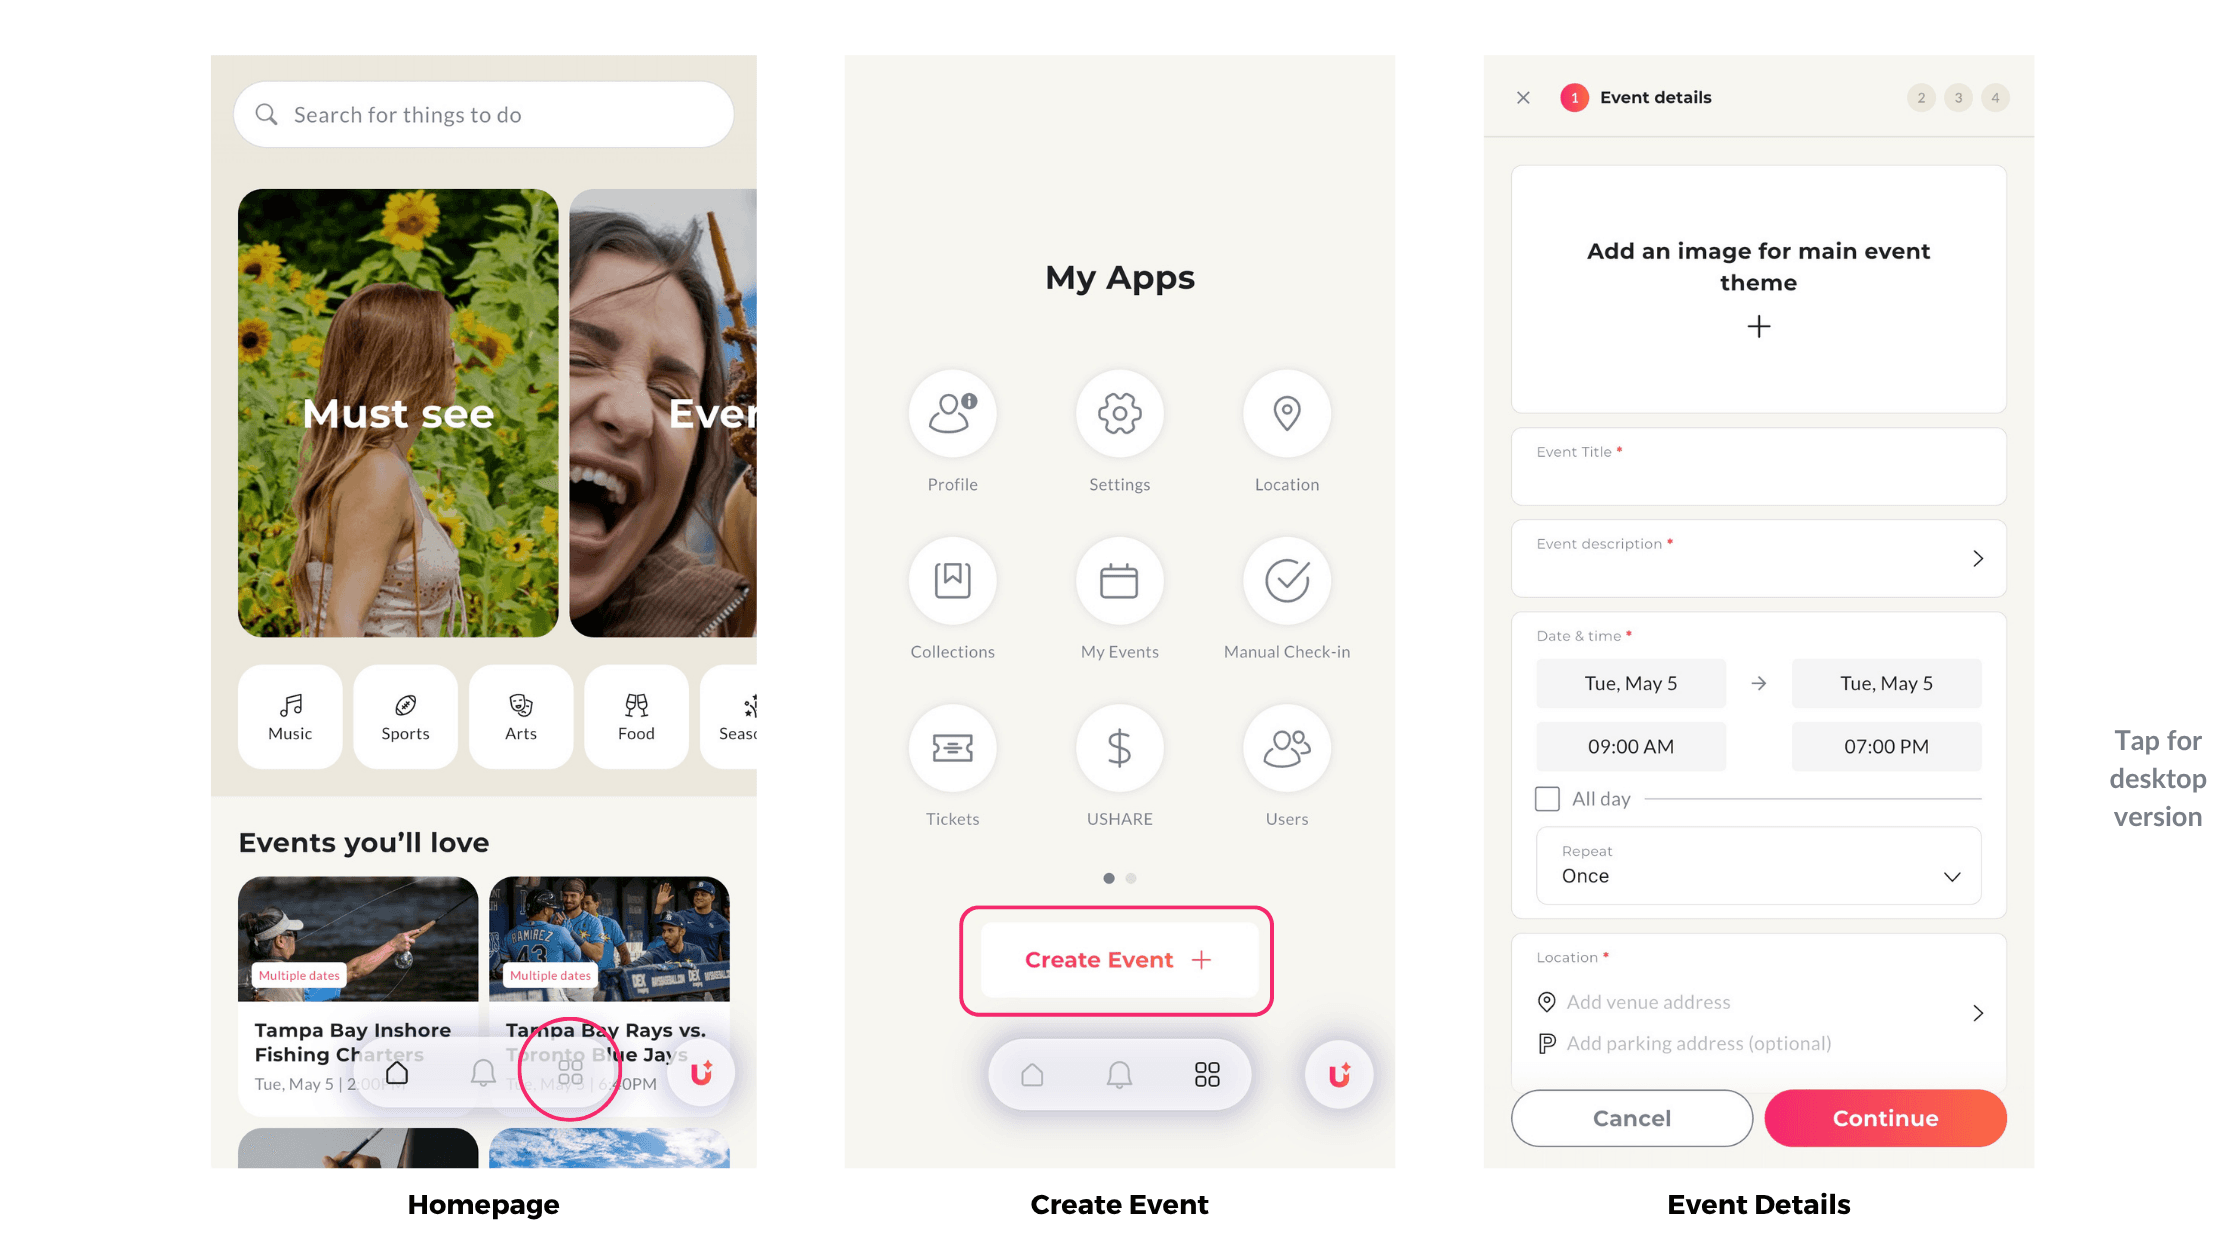
Now it's time to start creating your Event by entering the necessary details!
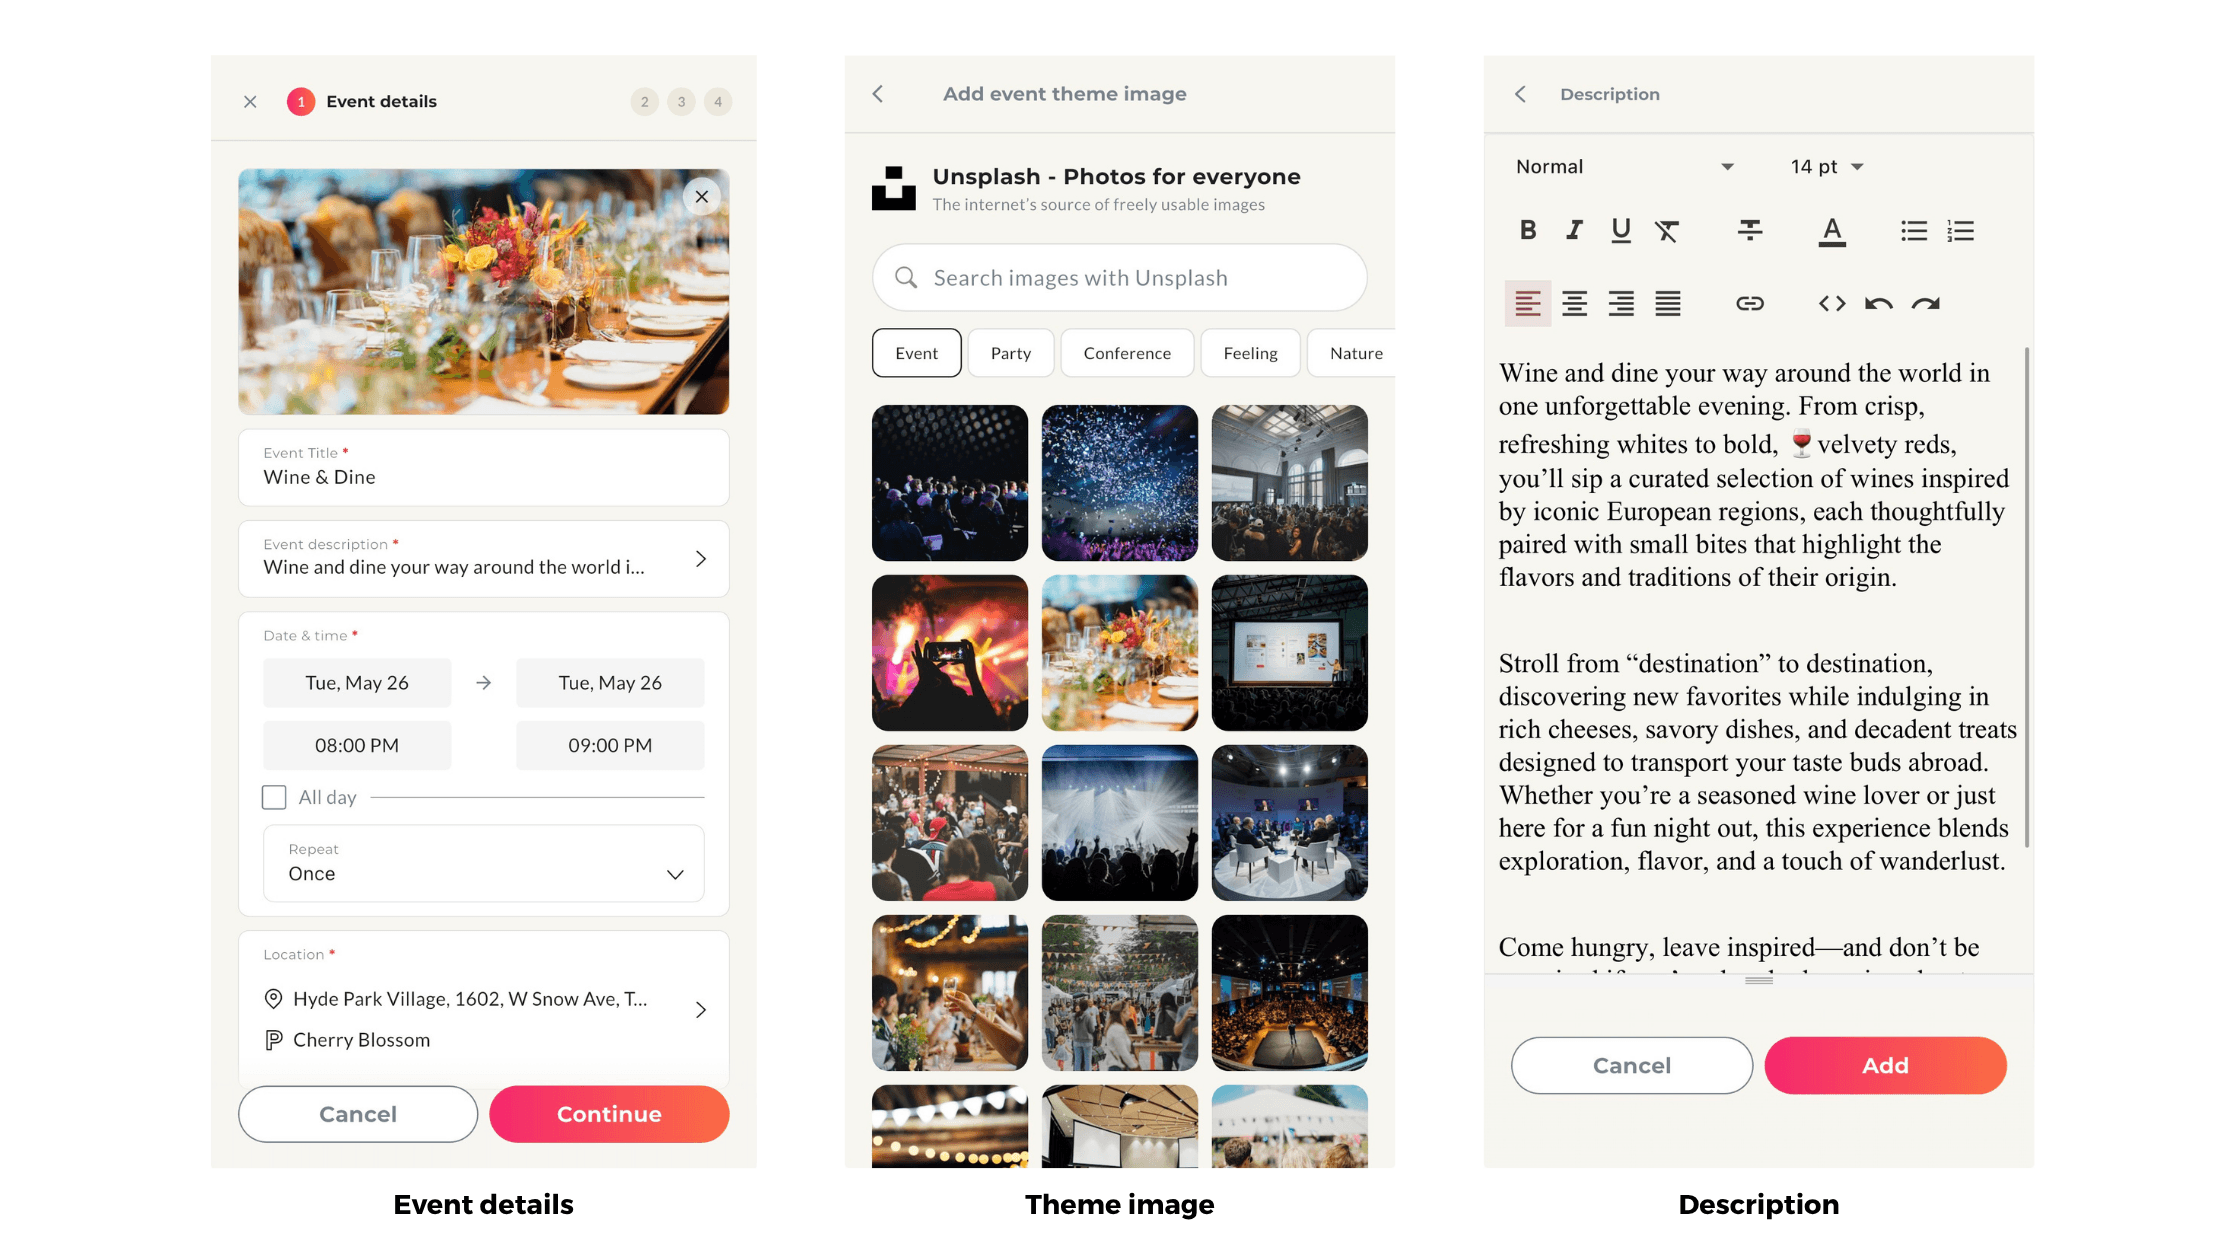
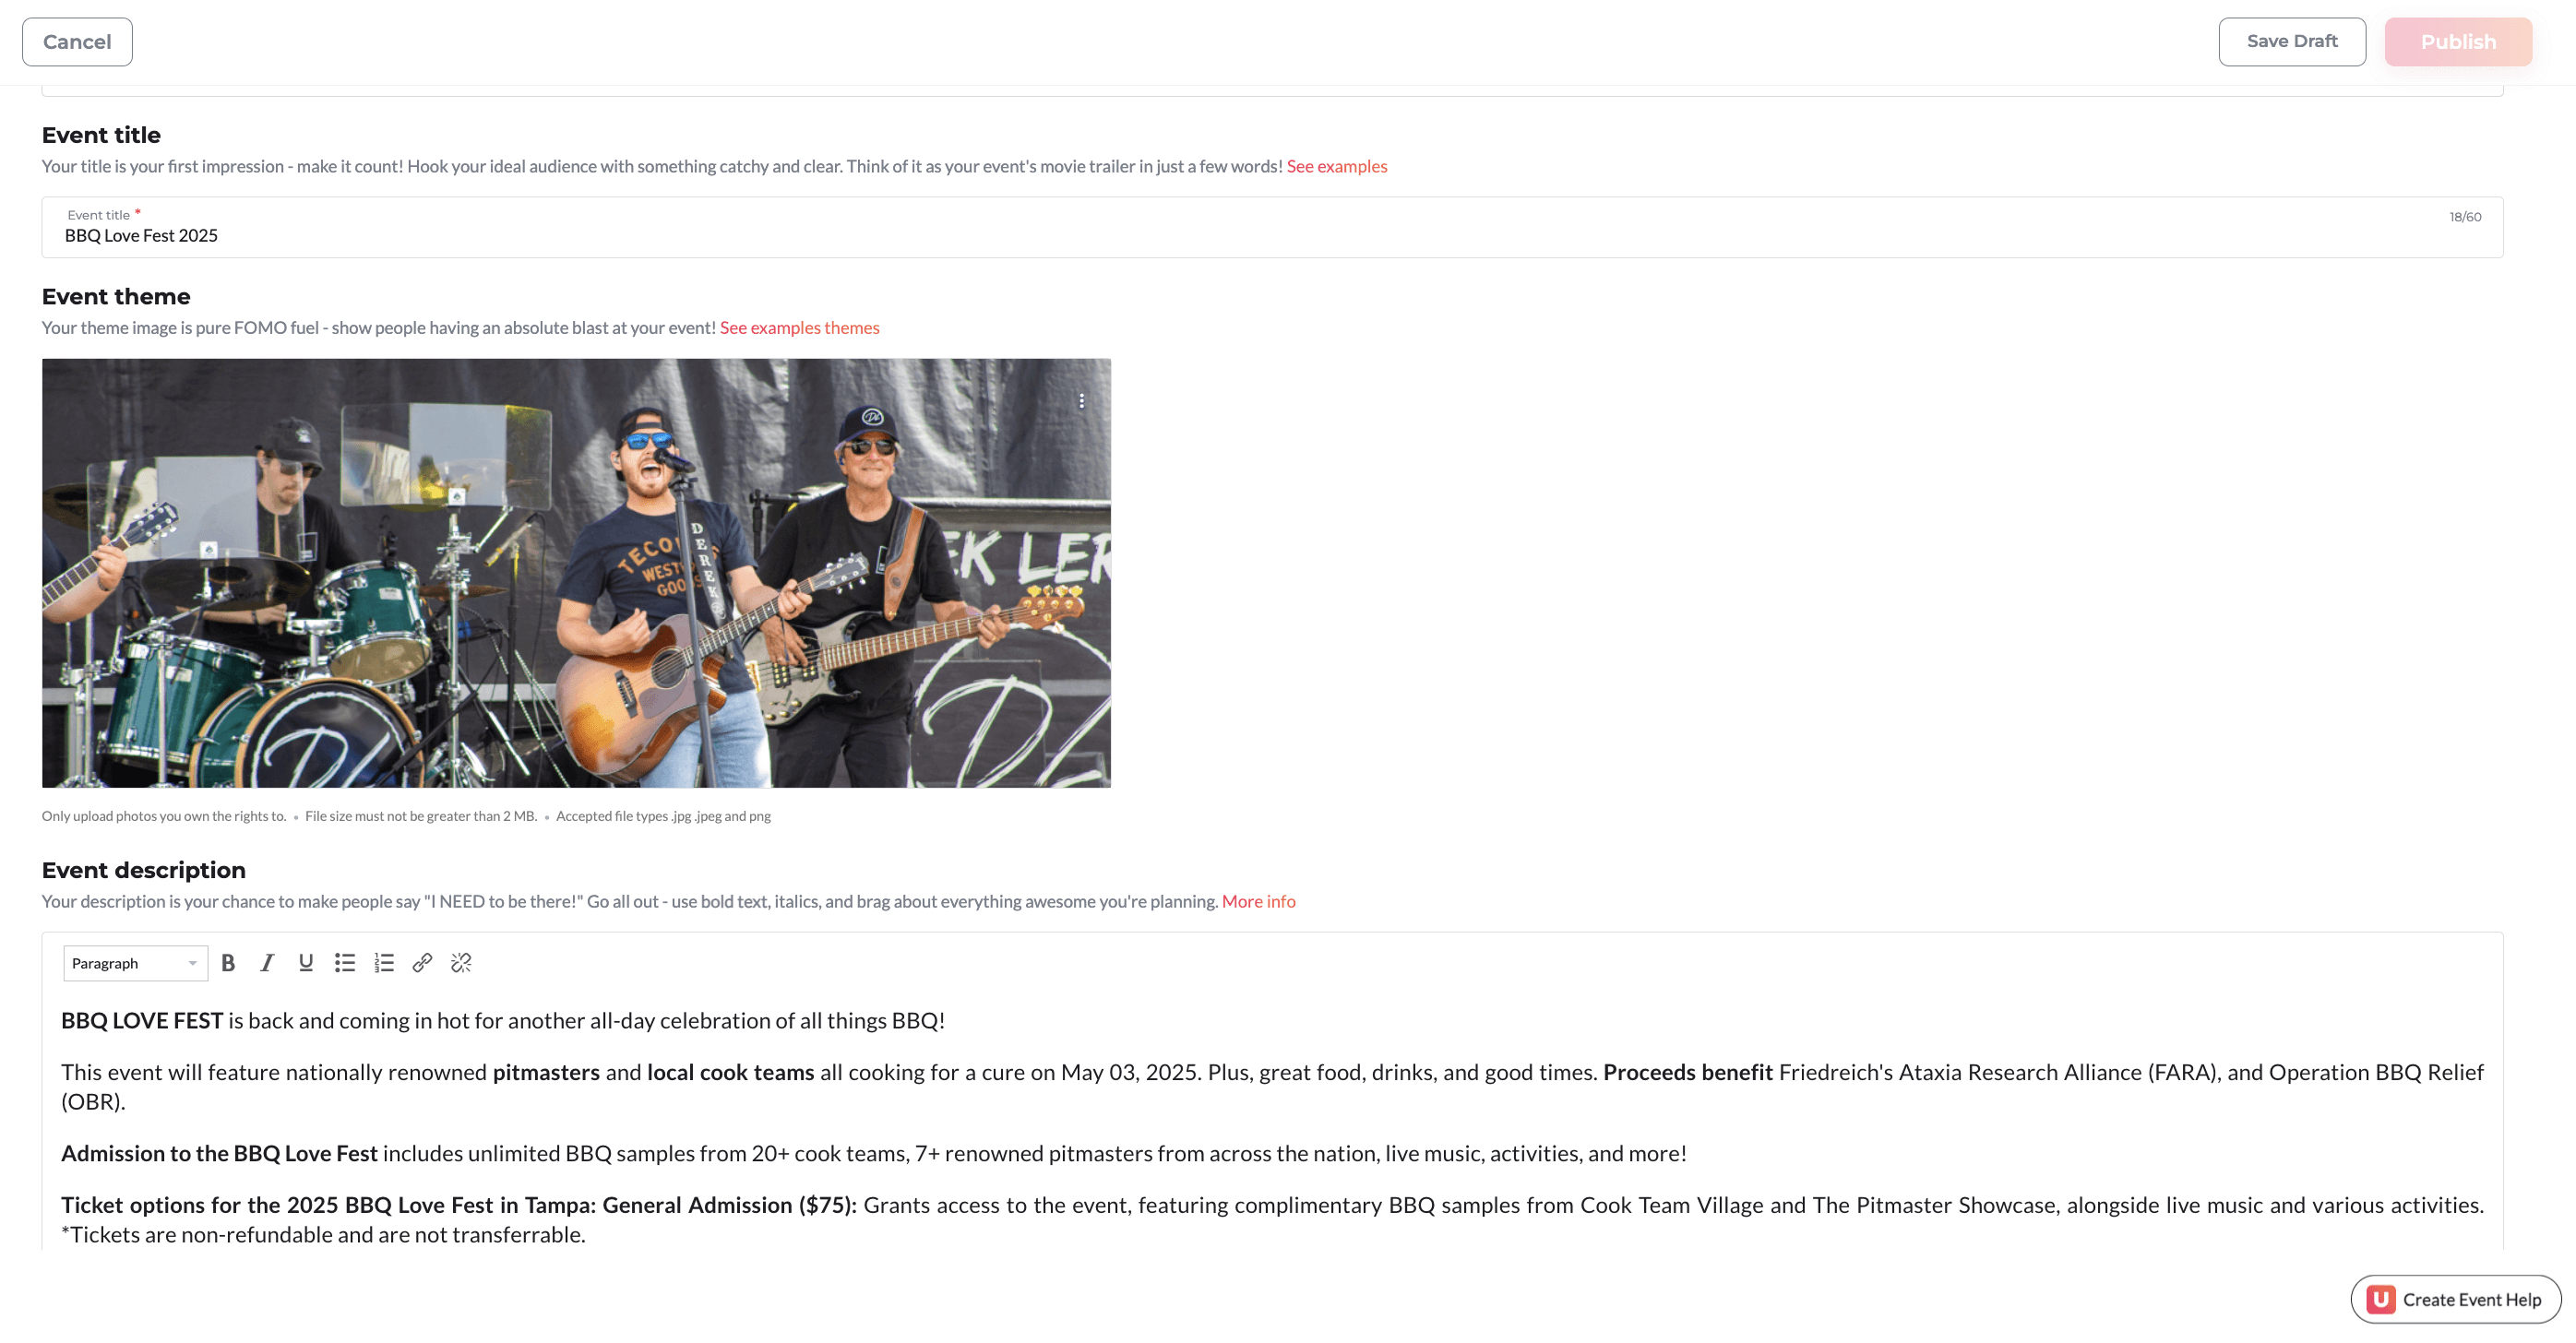
Create a captivating title that will appeal to your ideal audience.
For your event theme, we recommend staying away from graphics and flyers. Use high quality images of people enjoying your event in the past. Create a FOMO effect. If it's your first event, take advantage of our Unsplash stock photos library. Just search for something that correlates with your event! Image size should be 600x300 pixels.
The description is the place to capture potential attendees attention. Throw in the emojis, the bold text, and brag away. What is your event going to feature that's going to make people want to purchase tickets? This is your chance to brag about how great it's going to be. We suggest making it detailed. Do not just make it a quick short sentence.
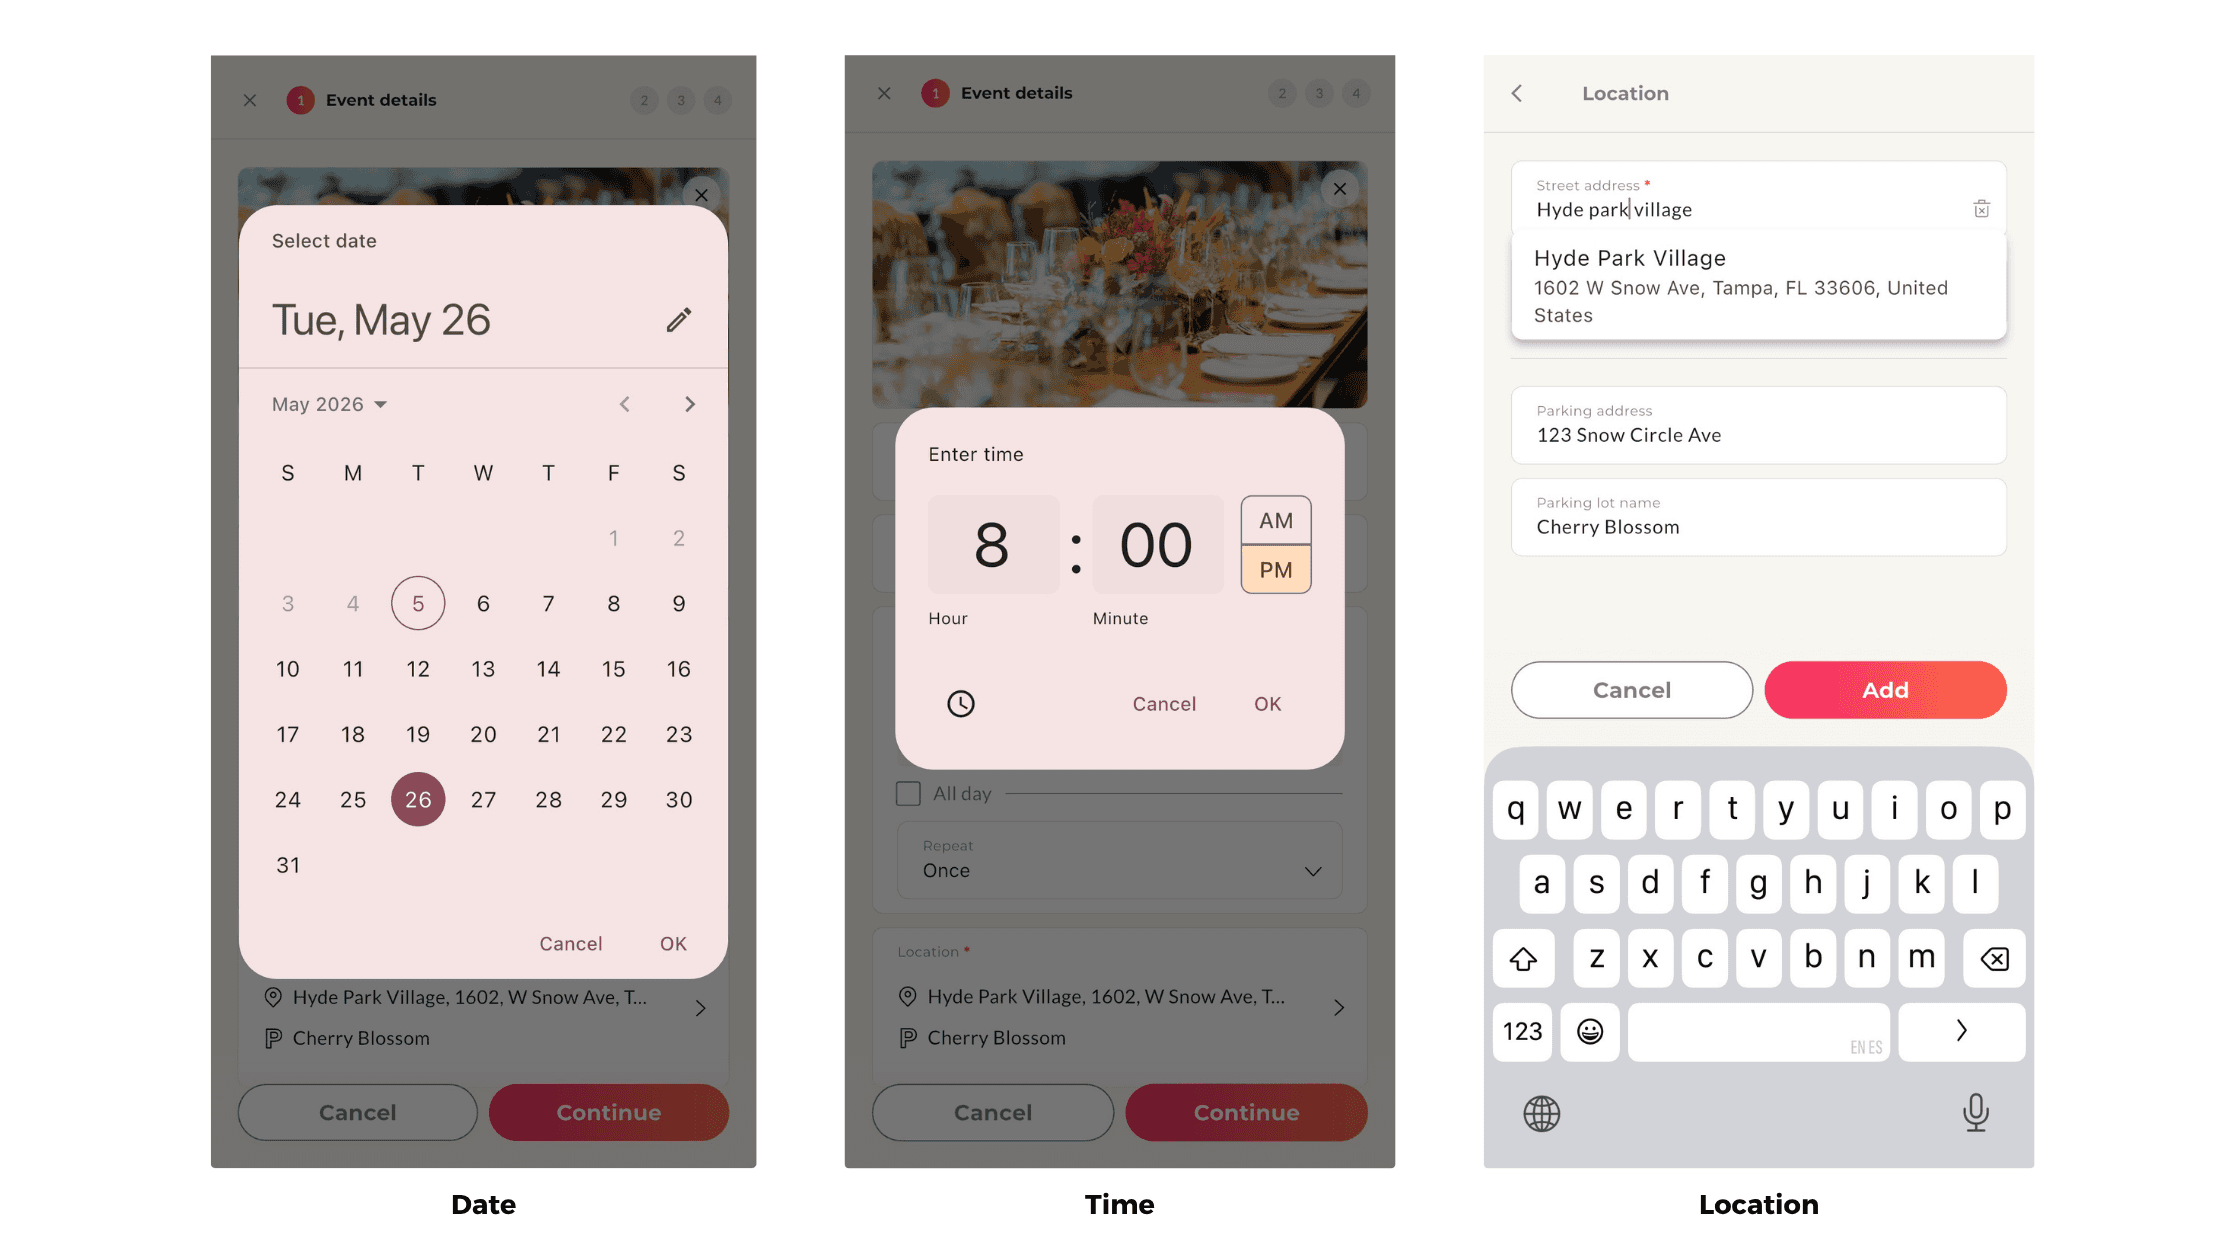
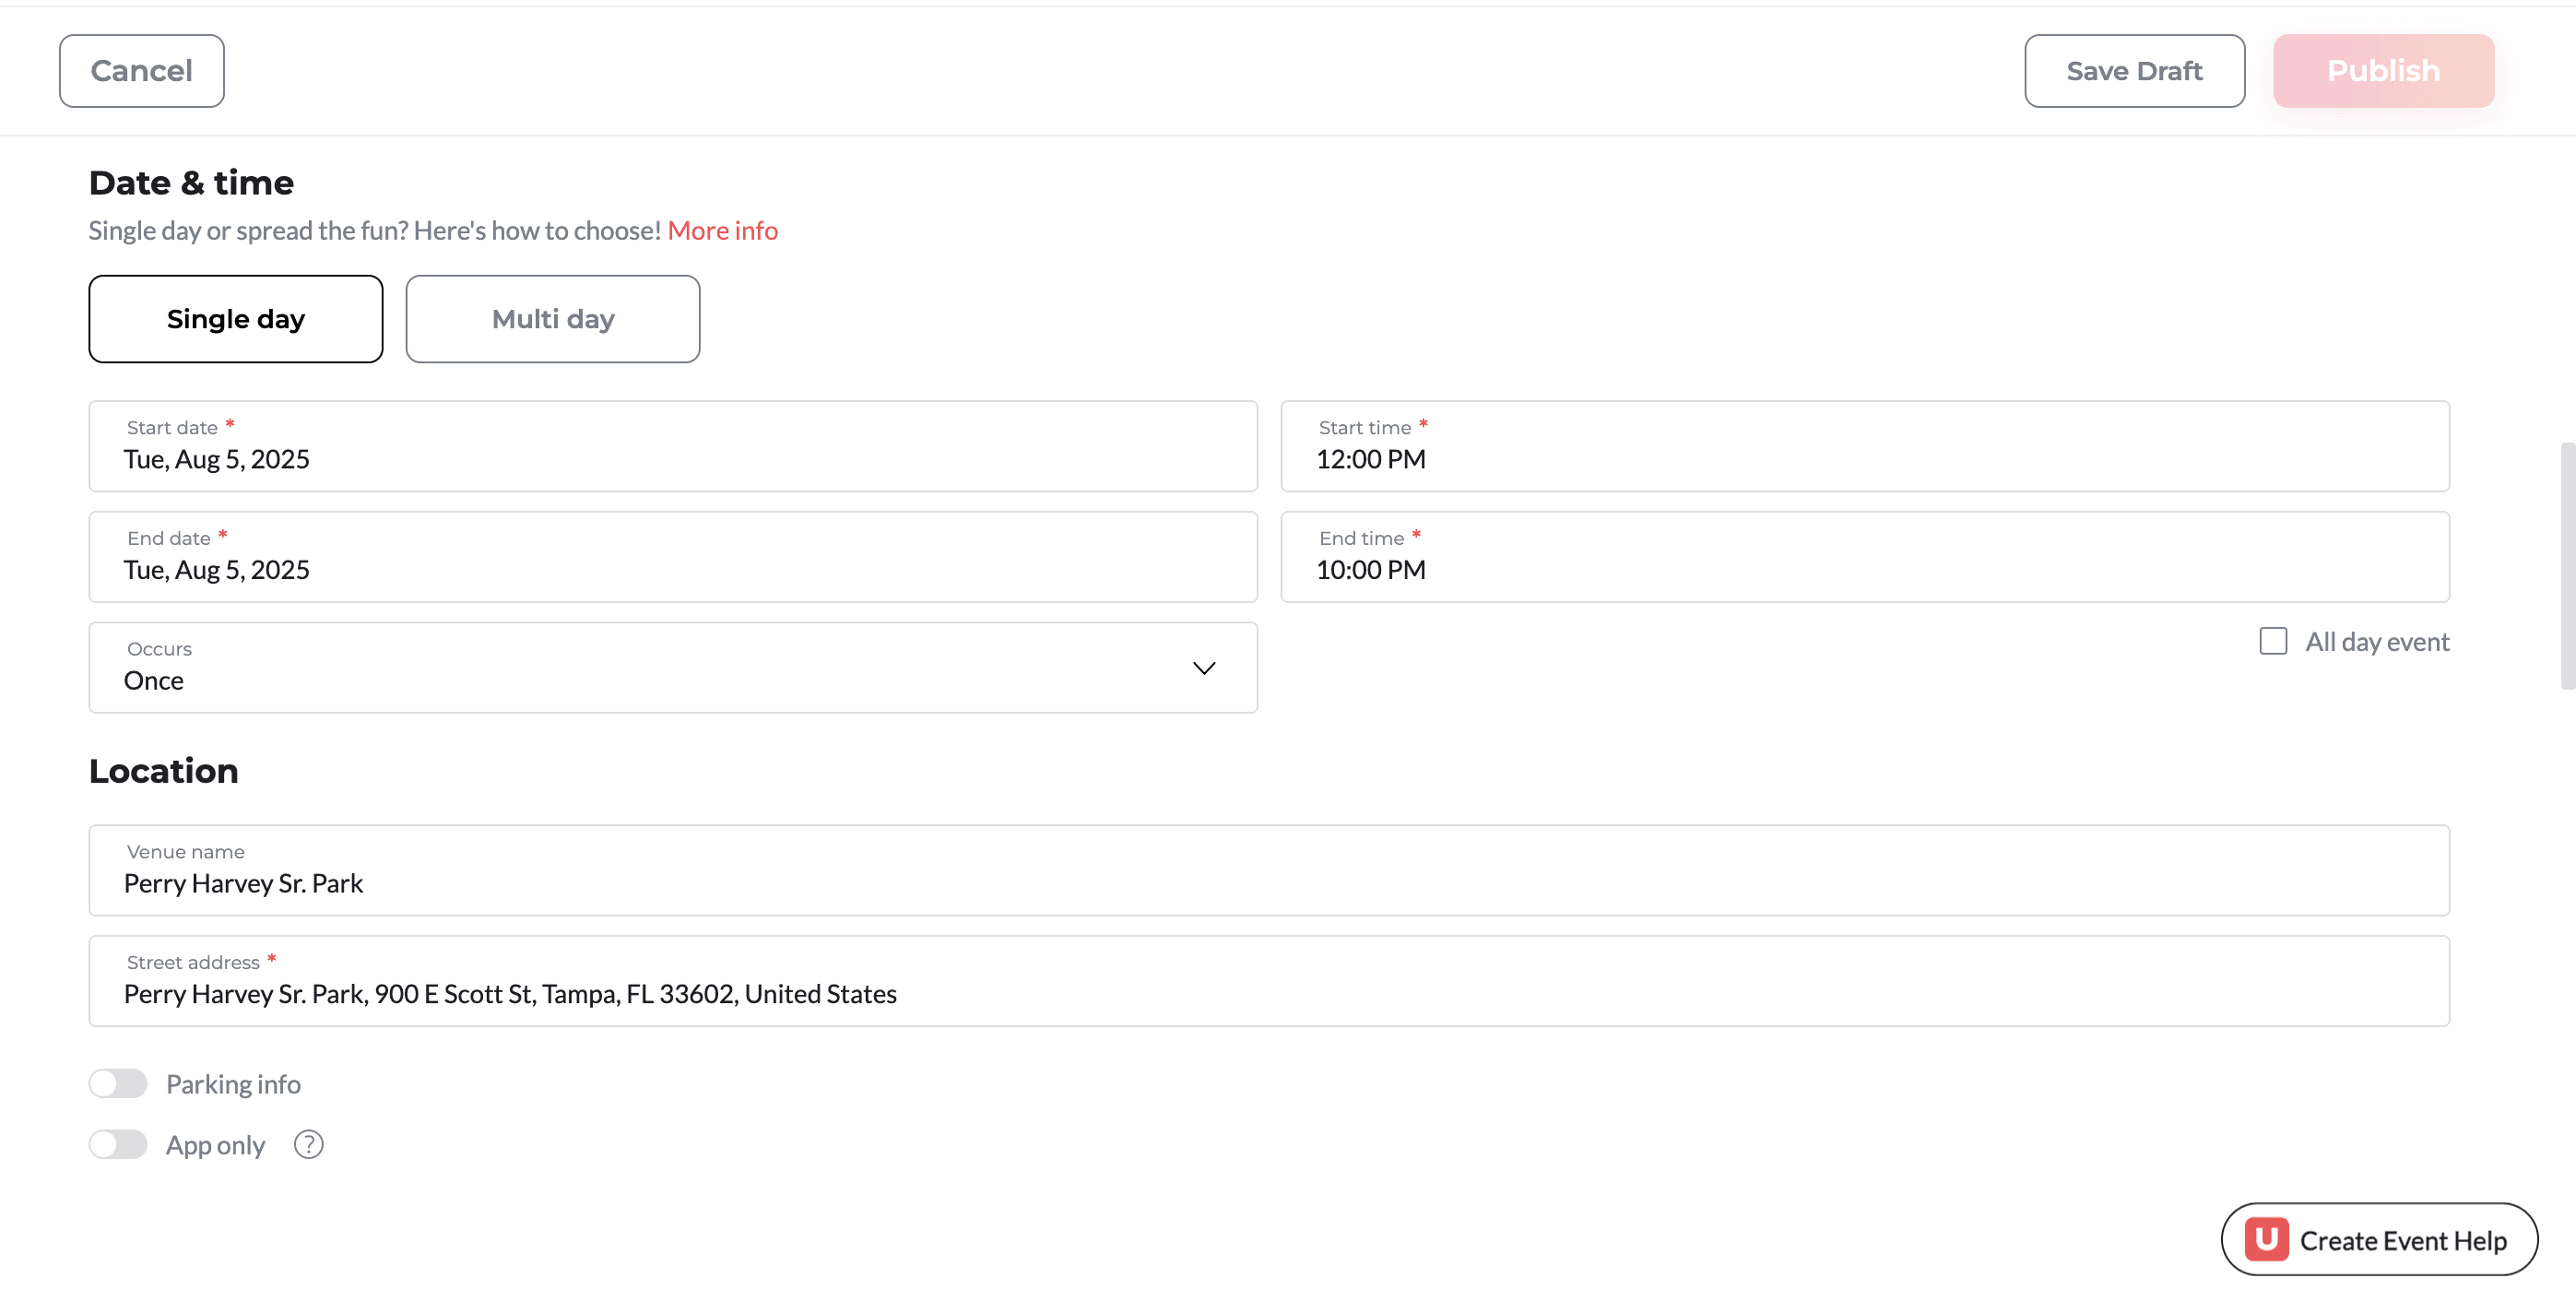
Select the date & time. If the event is multiple days, make sure to check that box and fill out the necessary info.
Type the name of the location, and then select the desired address from the auto-populated list in the Street address field. This will make it easier for our users to find you!
If it's hard to find parking at your business or event, toggle on parking info and add details.
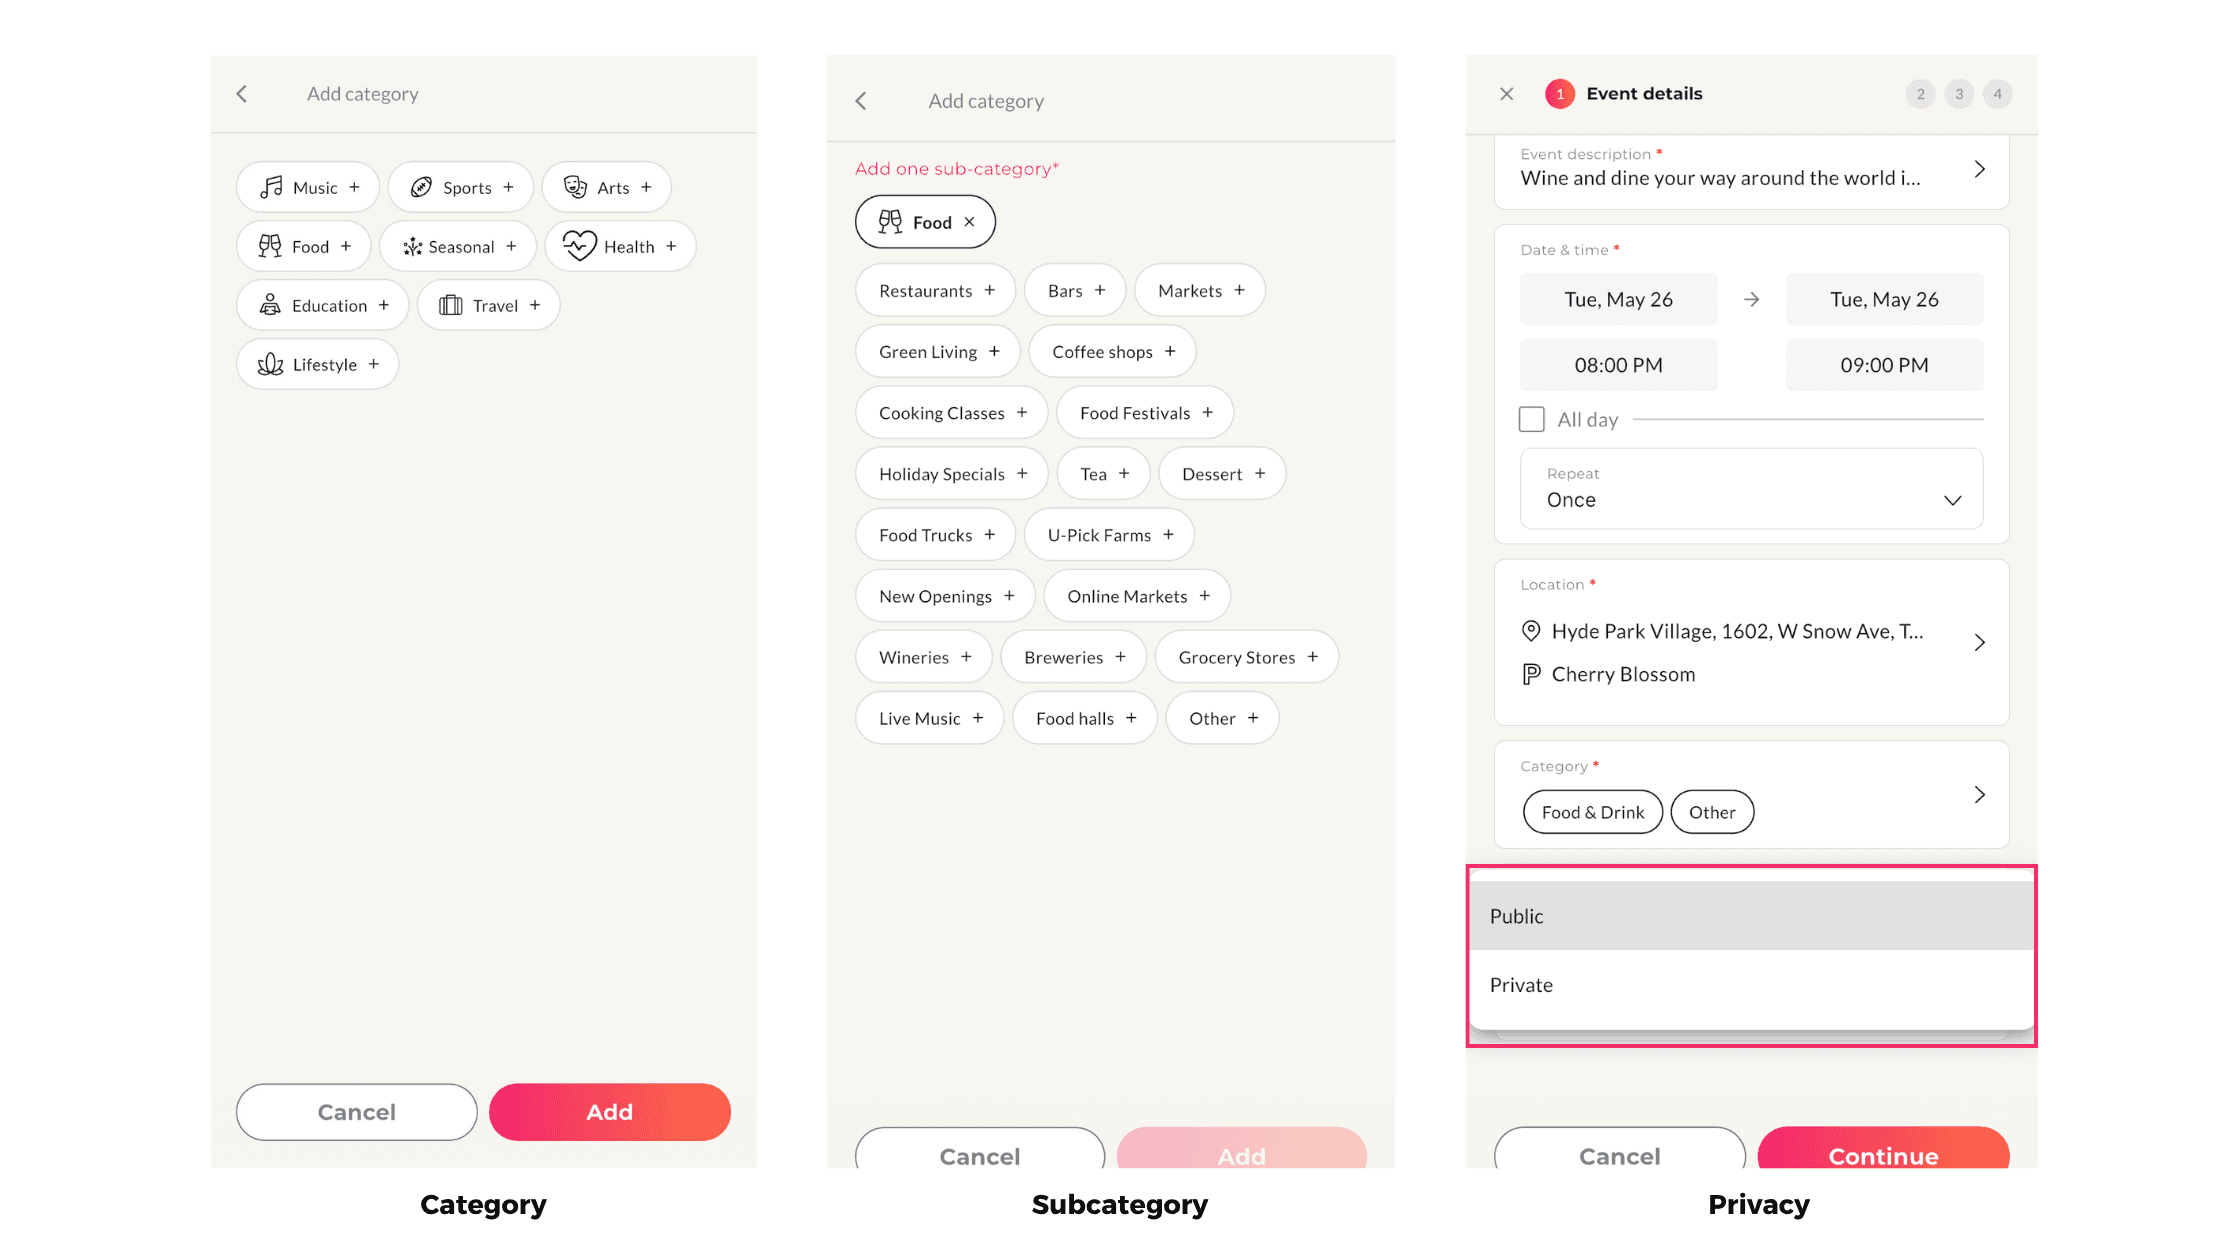
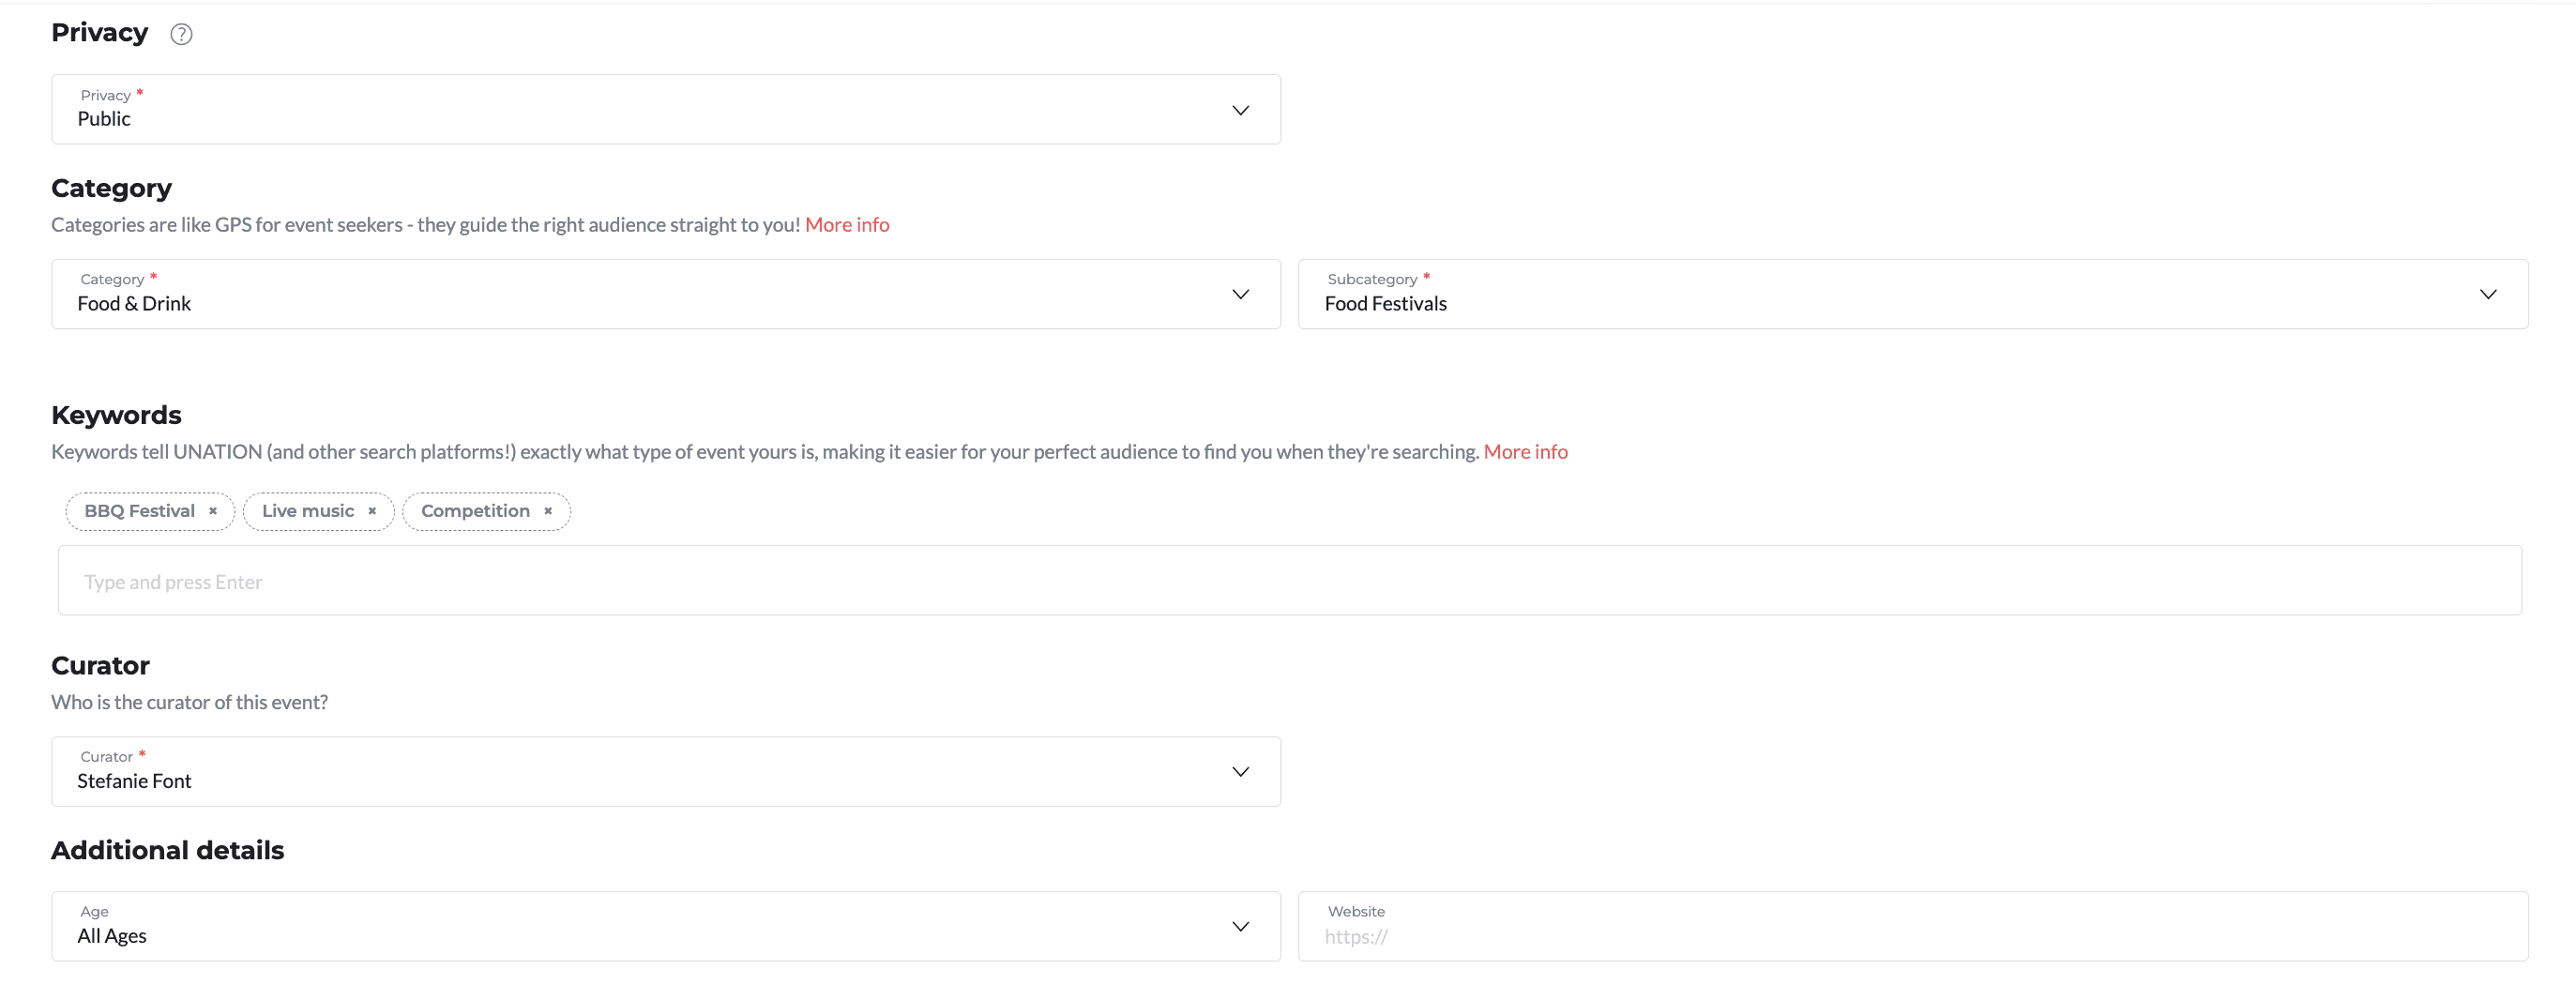
Select the privacy of your event. If you want it to be found by our users, keep it public. If you only want to make it visible to people who you send the link to, then make it private.
Select your category and subcategory. This will help users find your event easier if they're searching for events under that specific category.
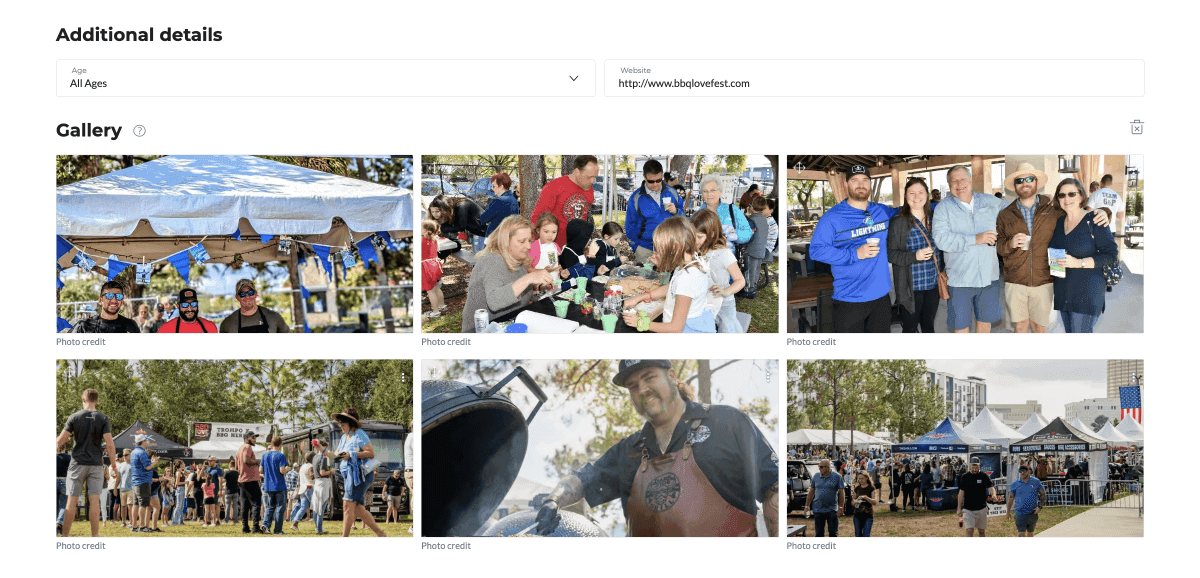
. Be sure to include the age allowed to attend the event
. On desktop, here is where you'll have the ability to:
Select keywords that best explain your event. This will also help your event get in front of the right audience.
Select the curator. Make sure the account you want to represent the event is selected.
Add website link to give credibility
Add photos to the gallery which is a great spot to add all of the photos in your album from previous events. This adds to the story you are telling to our users, and continues to build on the FOMO effect. You can add an unlimited amount and share photo credit!
Tickets
There are three options:
1. Create ticket: if you plan on creating your tickets with UNATION's ticketing platform, then you'll select the "Create ticket" box
2. Link ticket: If you're selling tickets on a different platform such as Ticketmaster or Eventbrite, you can select the box titled "Link ticket". This will give you the option to paste your ticket link and the CTA "get tickets" button will redirect users to that link
3. No ticket: If your event is free, or requires no tickets, you can select the box titled "No ticket"
Creating UNATION Ticketing


. If you're selling tickets with UNATION, and you're creating your event, then please follow the tips below:
First-time creators: If you haven't already, the first thing you'll need to do is connect a Stripe account so that you can quickly and securely receive your money. It's easy! Here's how.
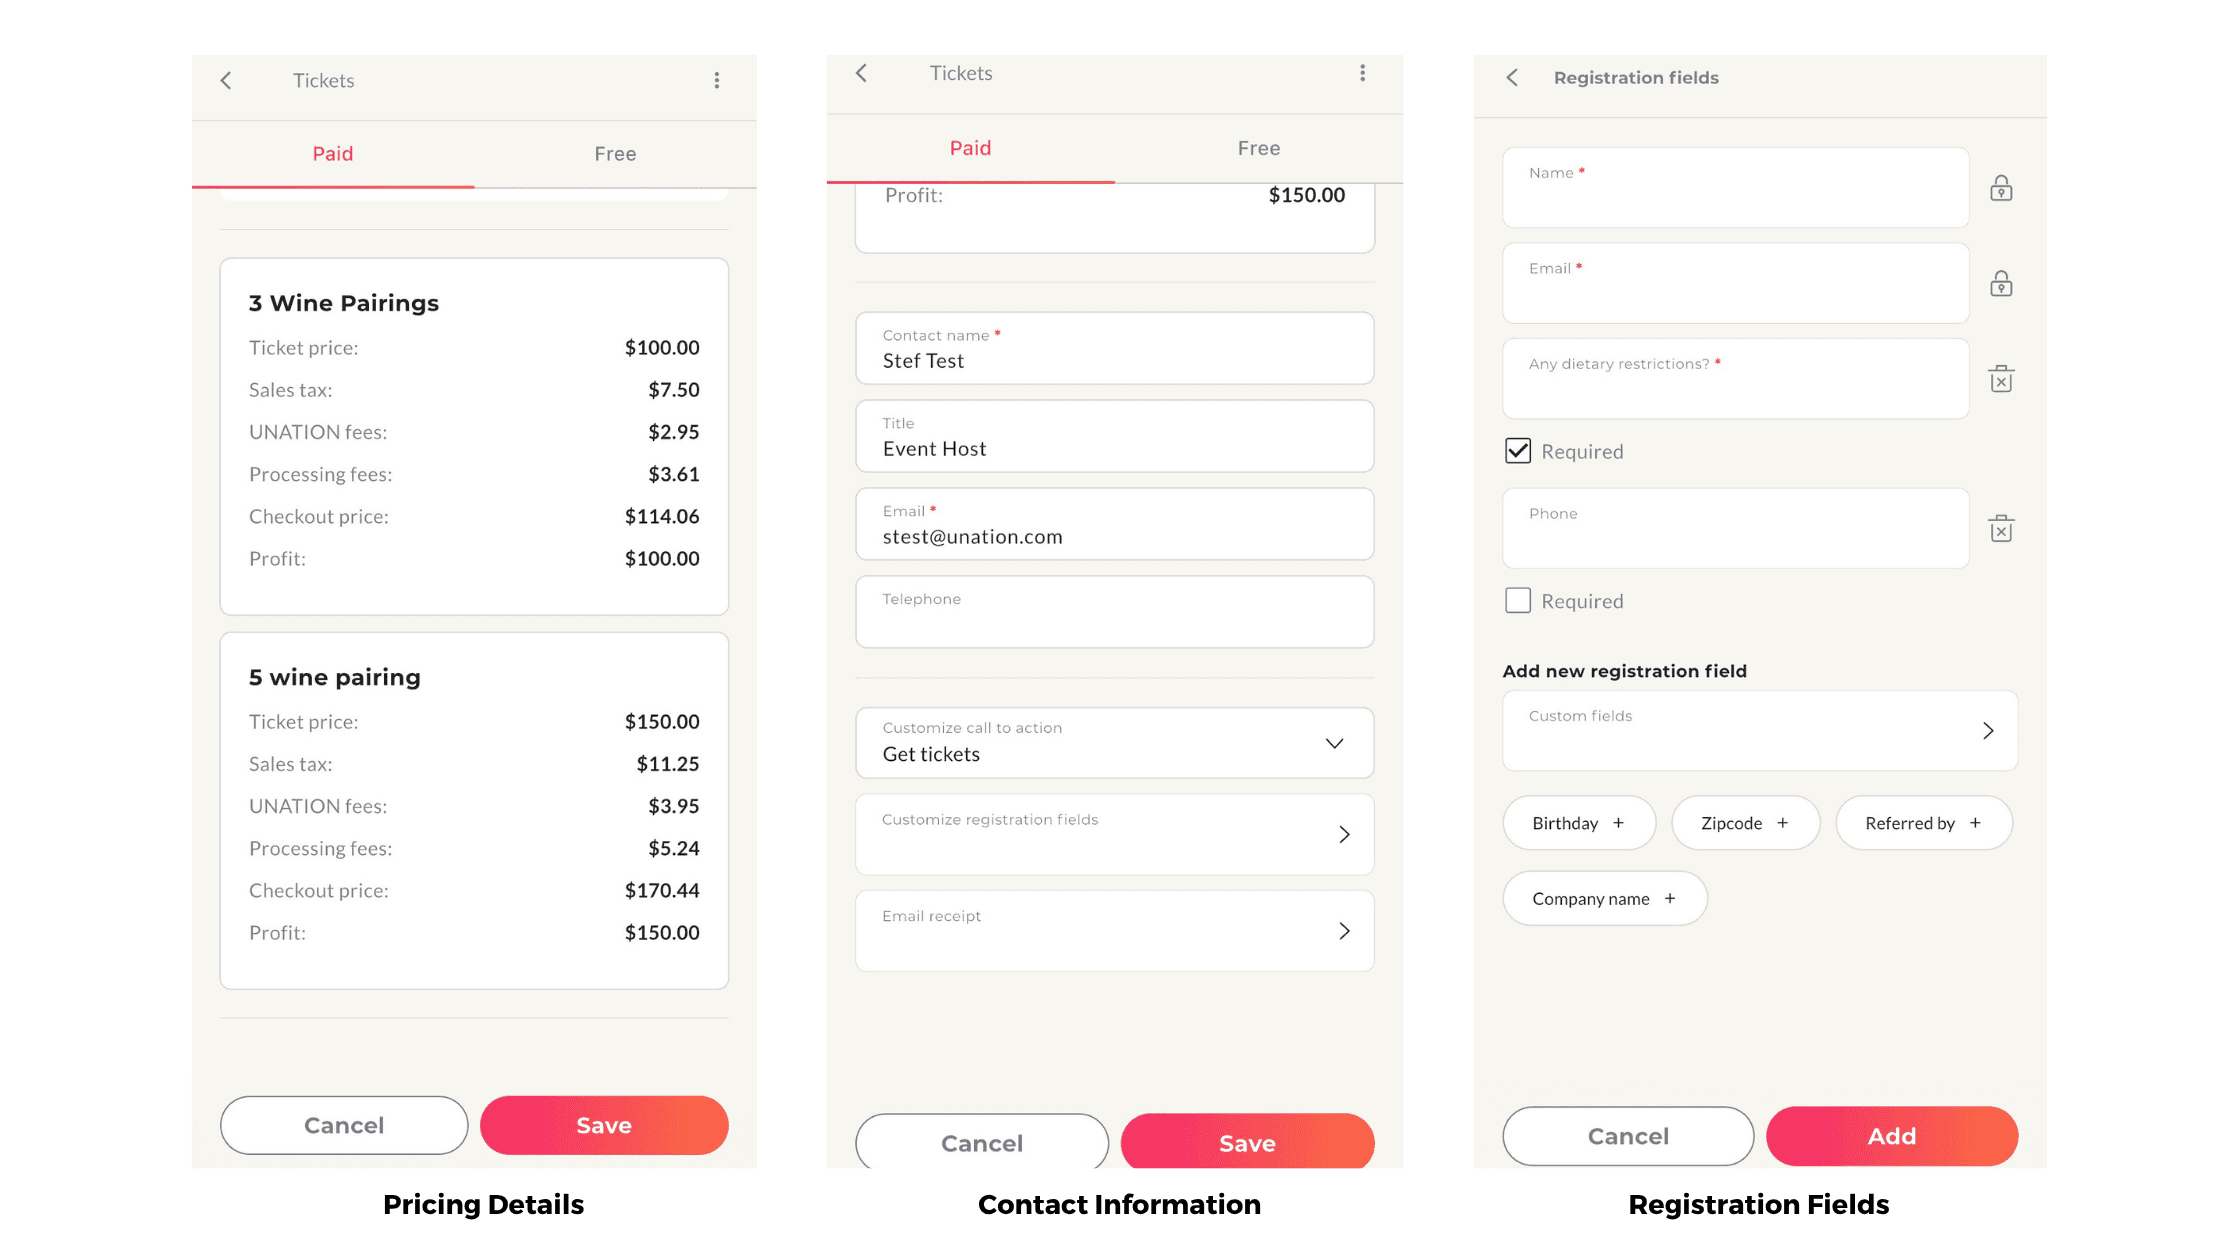
Once you've connect to Stripe, you'll want to fill out the necessary information for each ticket level.
Title of ticket level: This can be anything such as General Admission, VIP, Kids, etc.
Description: What does this ticket level include? Entry? A goody bag? Drink ticket? Include those details to best help the ticket purchaser make an educated decision on which one to move forward with.
Price: How much does that ticket level cost?
Quantity: How many are available total?
Max tickets per purchase:How many can one person purchase during one transaction?
Check the box on the far right if the availability for your tickets is unlimited.
Custom sales alert: If you want to create the event before releasing ticket sales, you can do that and schedule the date/time you'd like to make the tickets available to the public.
Continue adding ticket levels as necessary, and following the steps above for each.
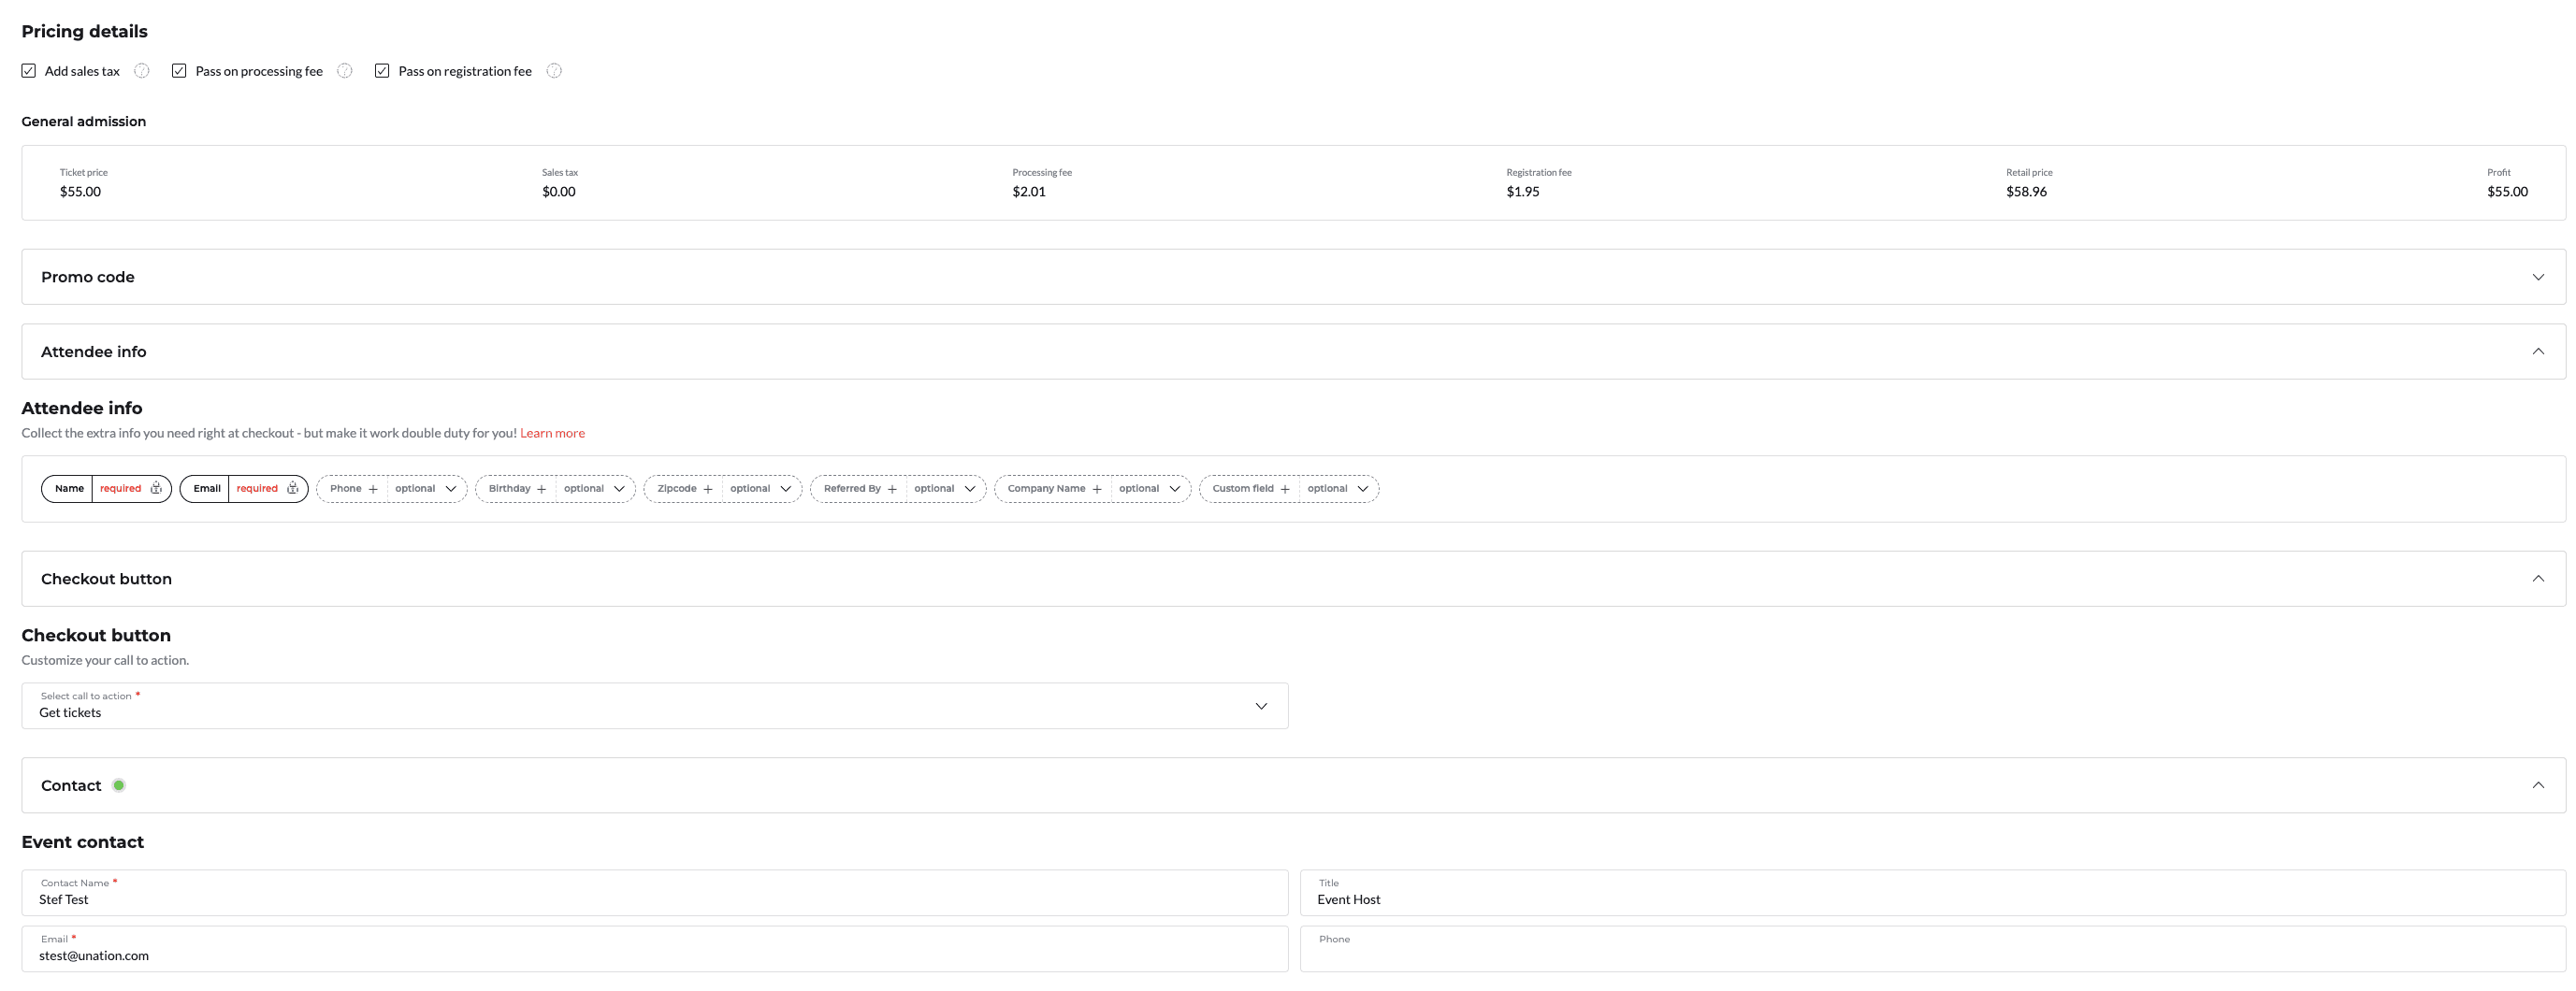
. For pricing details, you have the option to pass the registration and processing fees off to the ticket purchasers or pay them yourself. We'll always recommend that you pass them to the ticket purchasers because they're already used to paying fees when purchasing tickets online. The difference with UNATION is that our fees are way cheaper than other platforms! Below is a breakdown of the fee structure:
Free Event –> No Fee
$1-$34 –> $0.99*
$35-$74 –> $1.95*
$75-$124 –> $2.95*
$12-$199 –> $3.95*
$200-$249 –> $4.95*
$250 & UP –> $5.95*
*the Stripe processing fee is 2.9% of the total checkout amount, plus the $0.30
You also have the option to charge a sales tax in this section. All you have to do is mark the box as checked, it will be added to the total price.
You'll notice the calculator will break down each price level total with the taxes and the fees included, so you'll have full transparency on what each person will pay.
The attendee info section is beneficial to learn more about the people purchasing tickets to your event. We suggest taking advantage of the custom field option! Yes, Name, email and phone will always be helpful… but so will digging deeper. Some suggestions:
If it's a happy hour, you can ask what their favorite liquor for cocktail drinks are, and whichever liquor gets the most responses is the one you can make a featured cocktail around.
If it's a 5k and you need shirt sizes, this is the place to collect that information.
If it's a music festival, you can ask what artist they want to see next so it helps your planning for the next festival.
Check out button is where you'll select whether you want the green CTA button on your event page to say "get tickets", "RSVP", or "Register"
It's important to have an event contact to answer any questions a ticket purchaser might have around the event or their tickets.

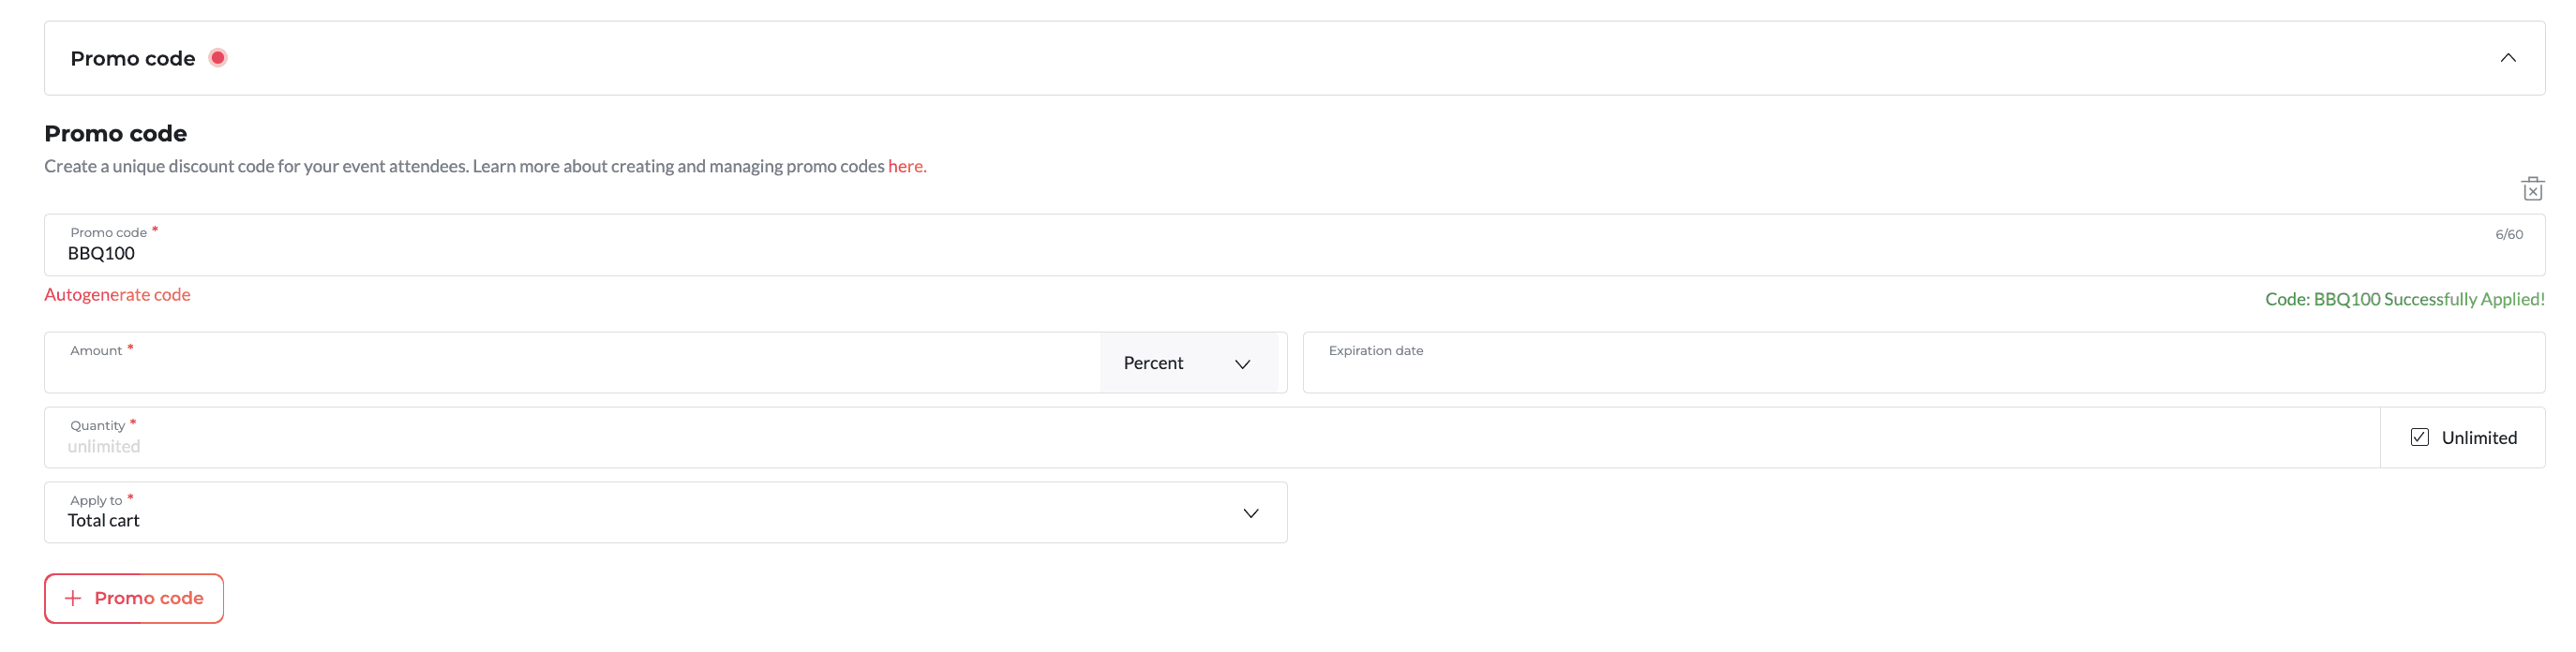
. For promo codes, you'll have the option to create multiple. You can choose between dollar amount or percentage, and type the amount you want to discount. You'll also have the ability to create an expiration date and the quantity you want available. So, how many times would you like the promo code to be used before it's enough?
Add-Ons
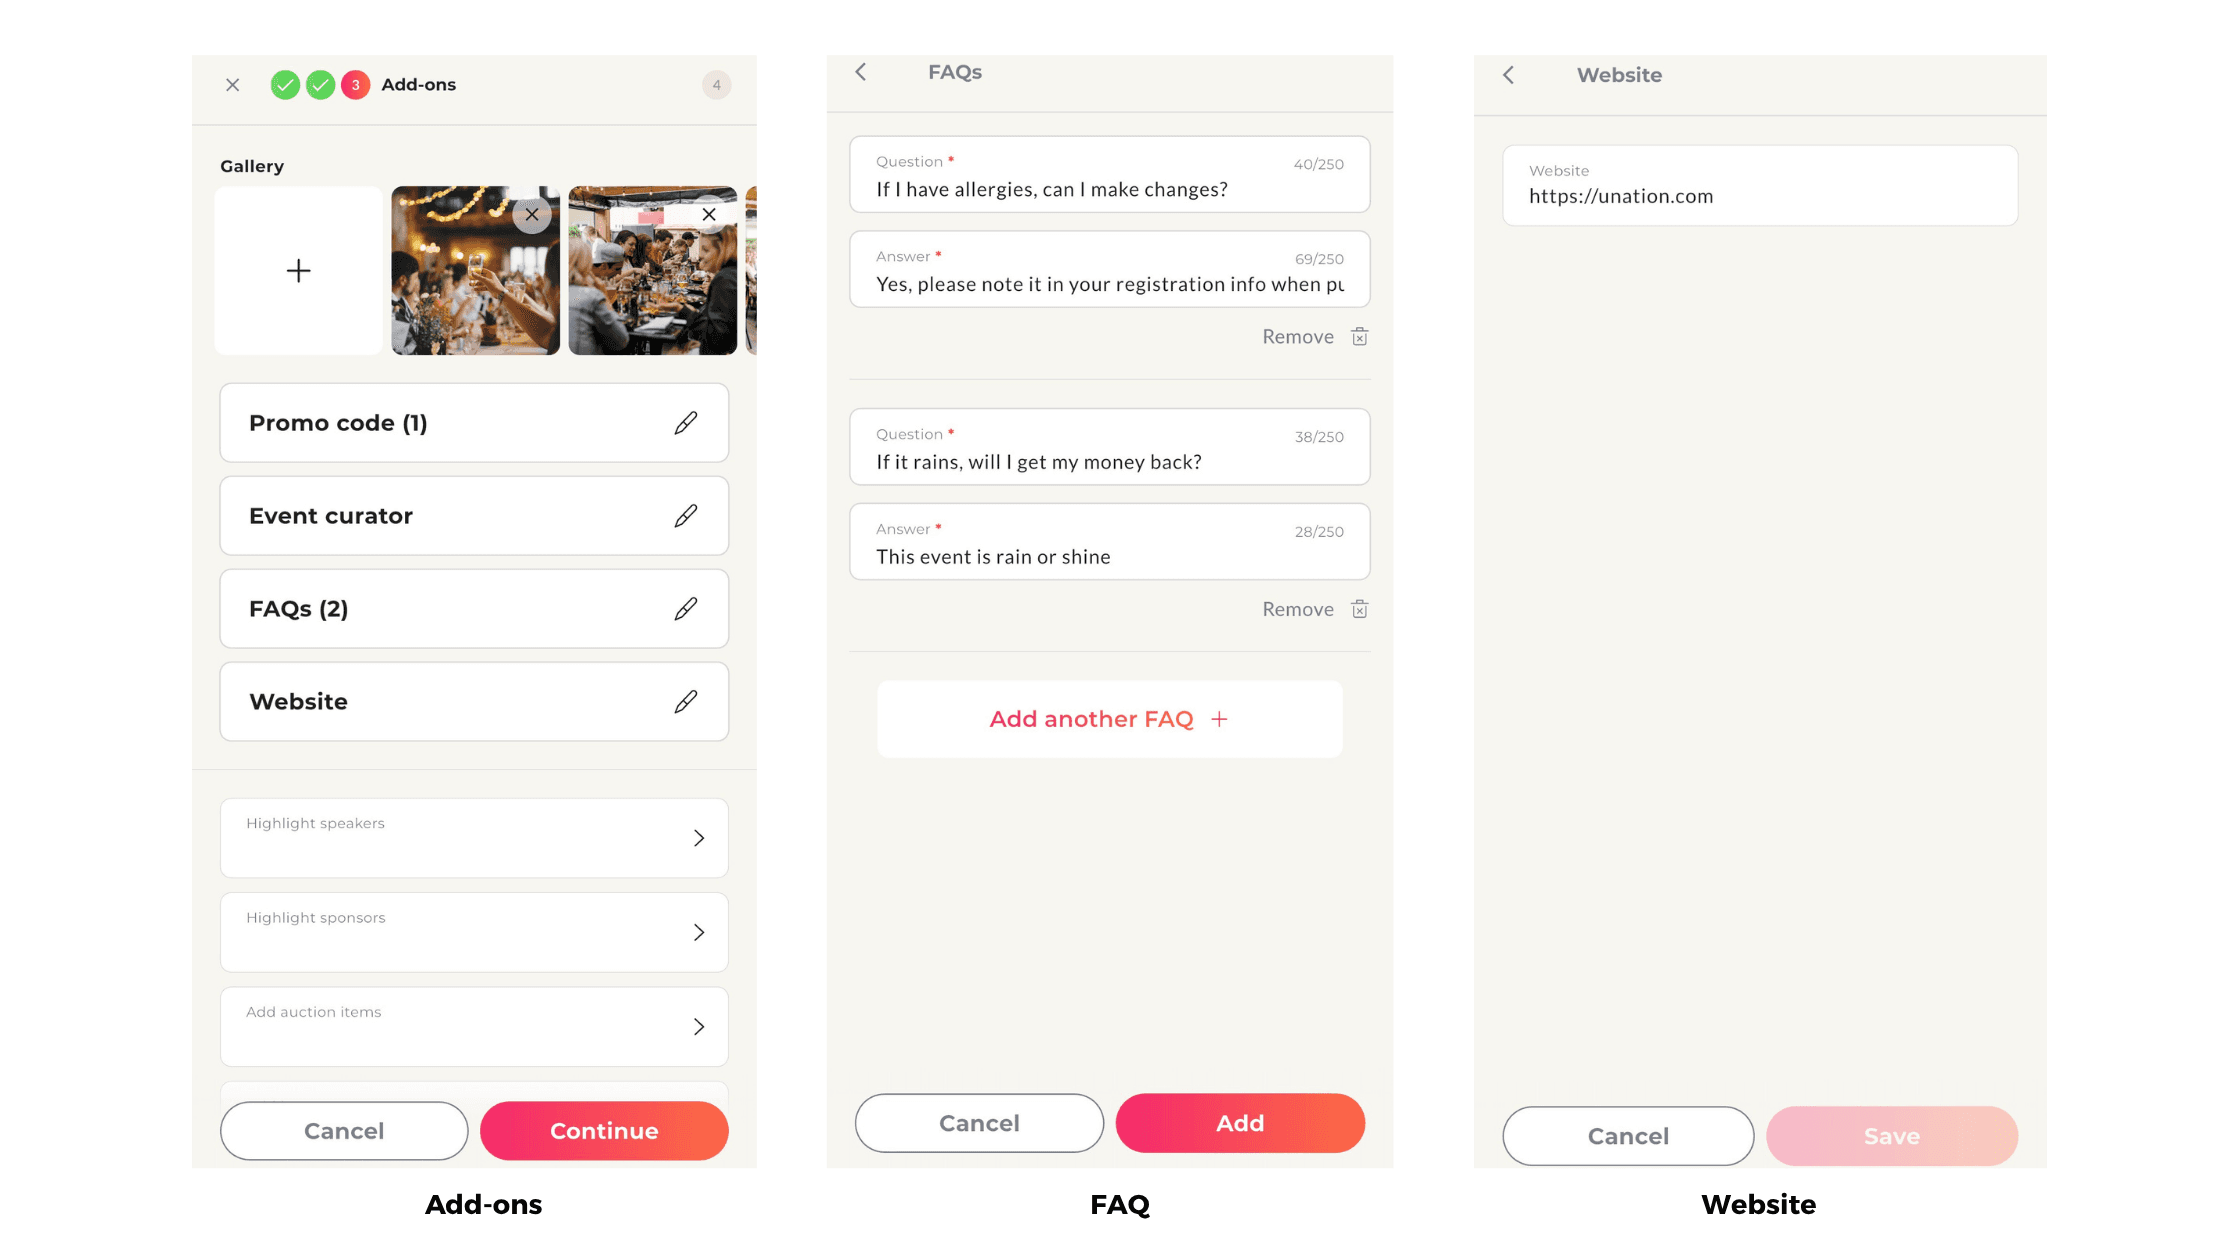

Once you get to the add-ons page, you'll have the ability to add more details for potential event attendees so they can learn everything they need to know before making the purchase. Including FAQs, Speakers, Sponsors, Auctions, and a Custom Banner. The more information you include, the better!
Invite
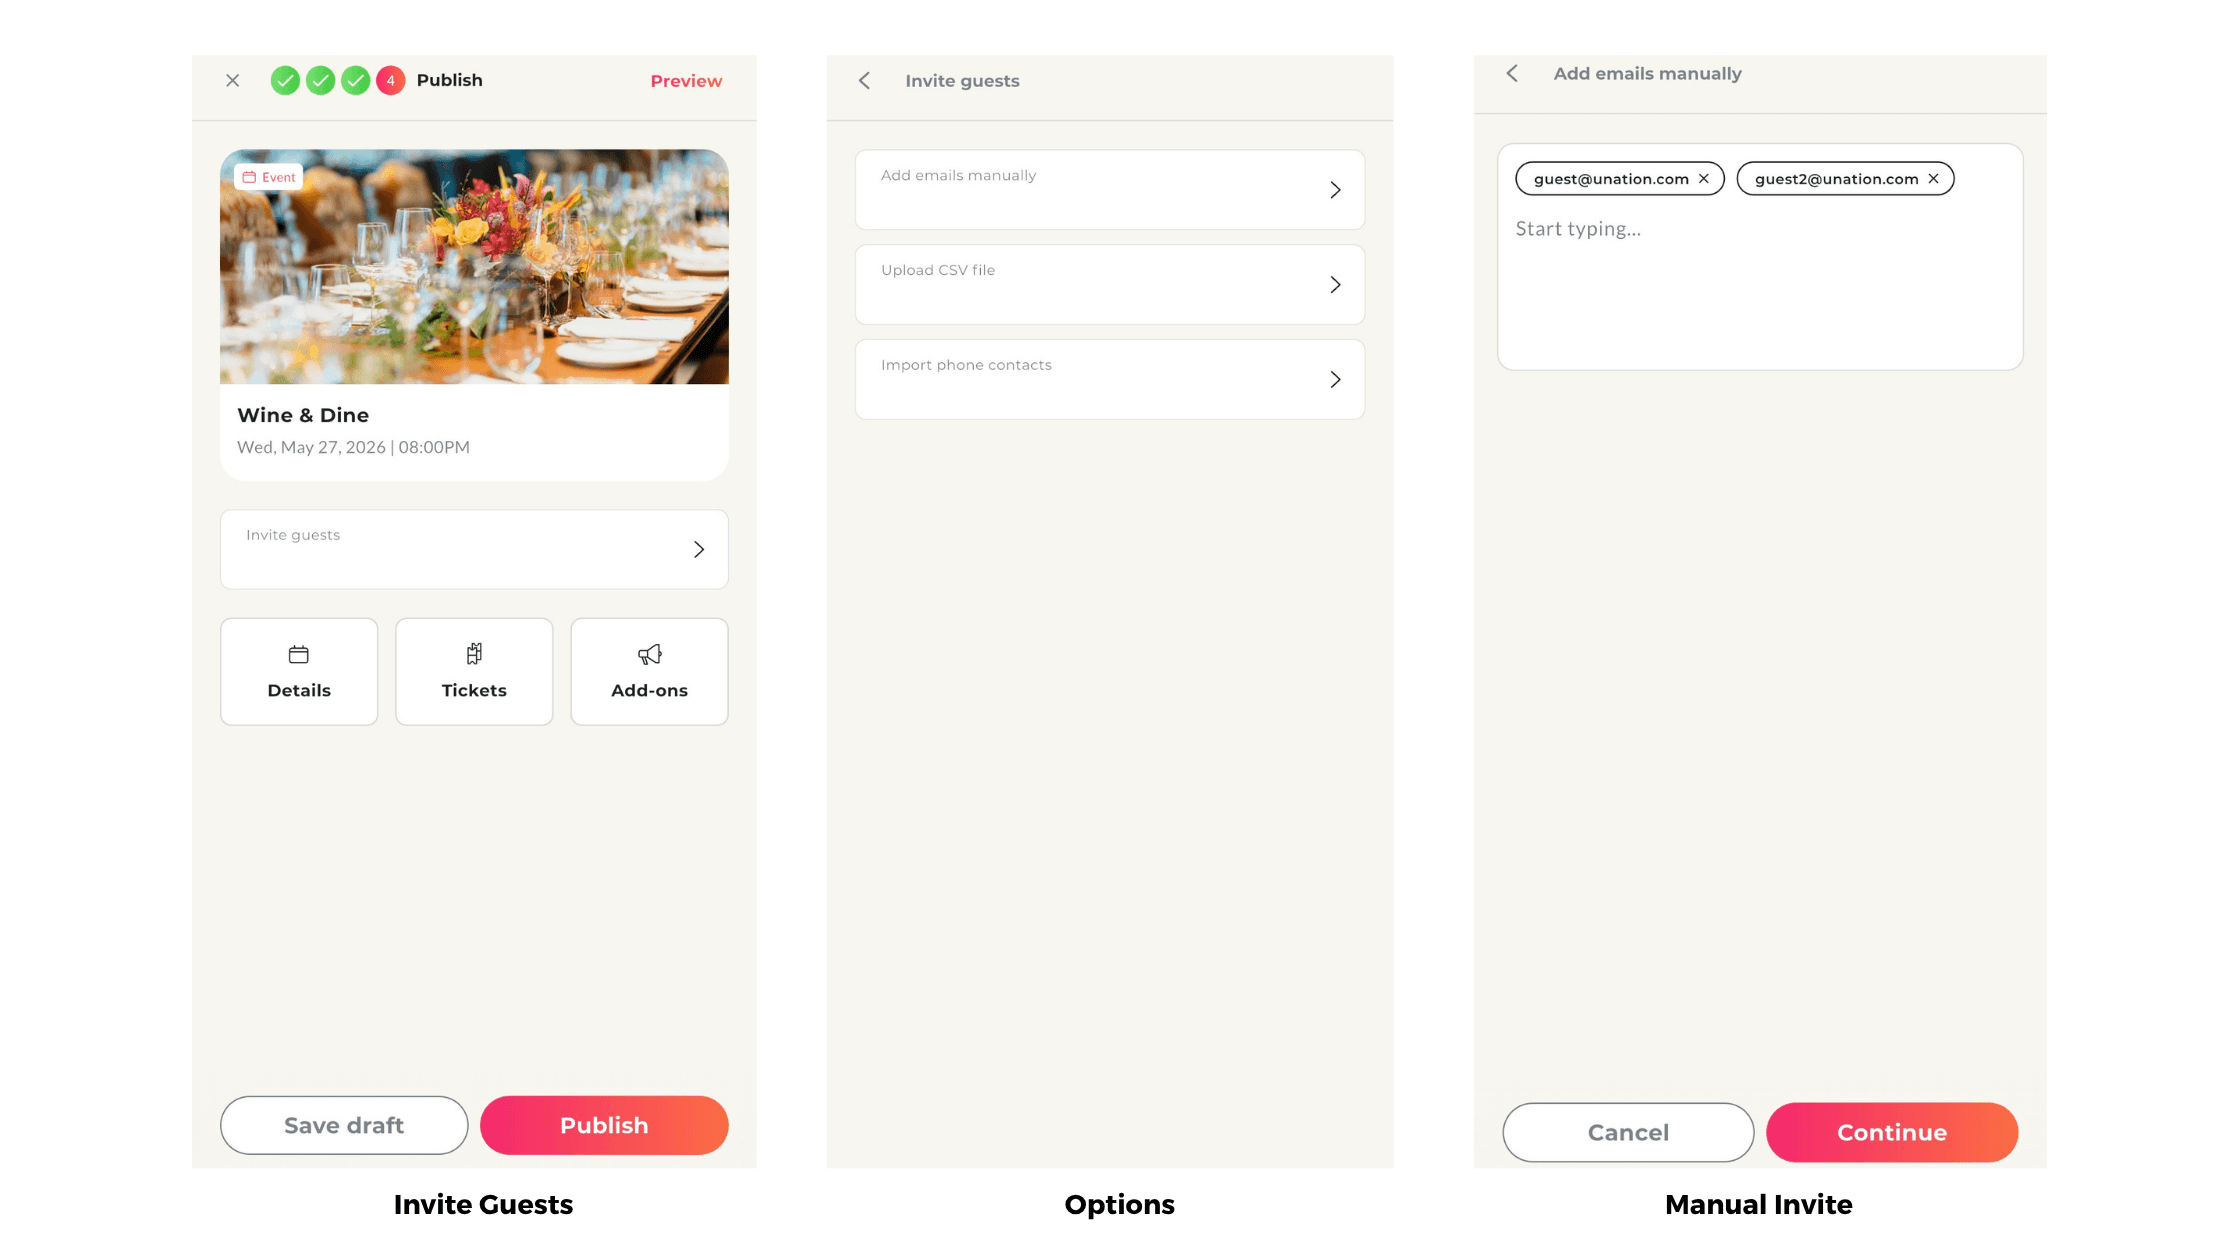
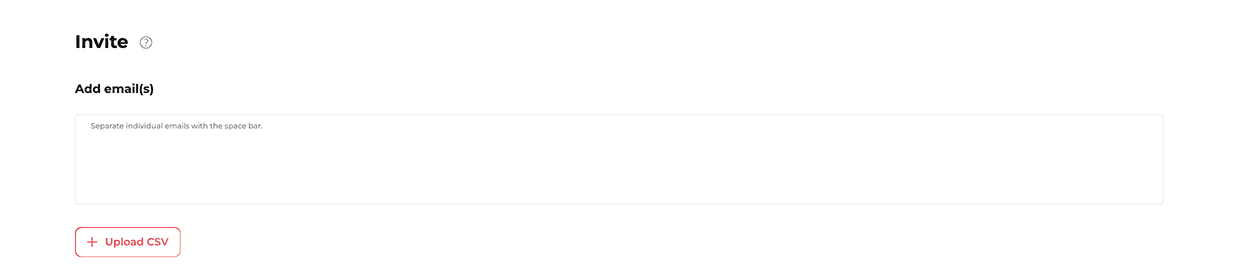
The final page is an invite page. If your event is public, then you can skip this step. If your event is set to private, then we recommend using this section to add email addresses of those you want to invite to the event or use the CSV upload functionality.
Voila! It's time to publish your Event!
Connecting your Stripe Account on Desktop
UNATION partners with Stripe to make it easy and secure for you to receive payments for your events and Offers. By connecting your existing or new Stripe account, you can accept payments via credit card, Apple Pay, or Google Pay directly.
Your privacy matters. UNATION never has access to your private financial information. All sensitive details are handled securely by Stripe—your relationship is directly with Stripe, and UNATION simply connects your Stripe account to your UNATION account.
You control your money. UNATION does not hold your funds. When someone purchases a ticket or Offer, the money is deposited directly into your Stripe account. UNATION only collects a small fee per event (which you can choose to pass on to buyers) or a commission on Offers.
Connecting your Stripe account to UNATION is an easy one-time action. If you have an existing Stripe account, all you have to do is log in through the UNATION dashboard. If you need to create a new Stripe account, that should only take you 5-10 minutes. Once your Stripe account is connected, you can immediately start collecting payments which will go directly into your Stripe account.
If you need to create a new Stripe account, you'll need to have the following information ready:
Bank account information for payouts
Routing number
Account number
Social Security Number (for identity verification)
Your website URL (if applicable)
If you have any questions or need help connecting your Stripe account, our support team is here to assist you.
Follow the steps below to connect your Stripe with UNATION:
Follow the steps below to connect your Stripe with UNATION:
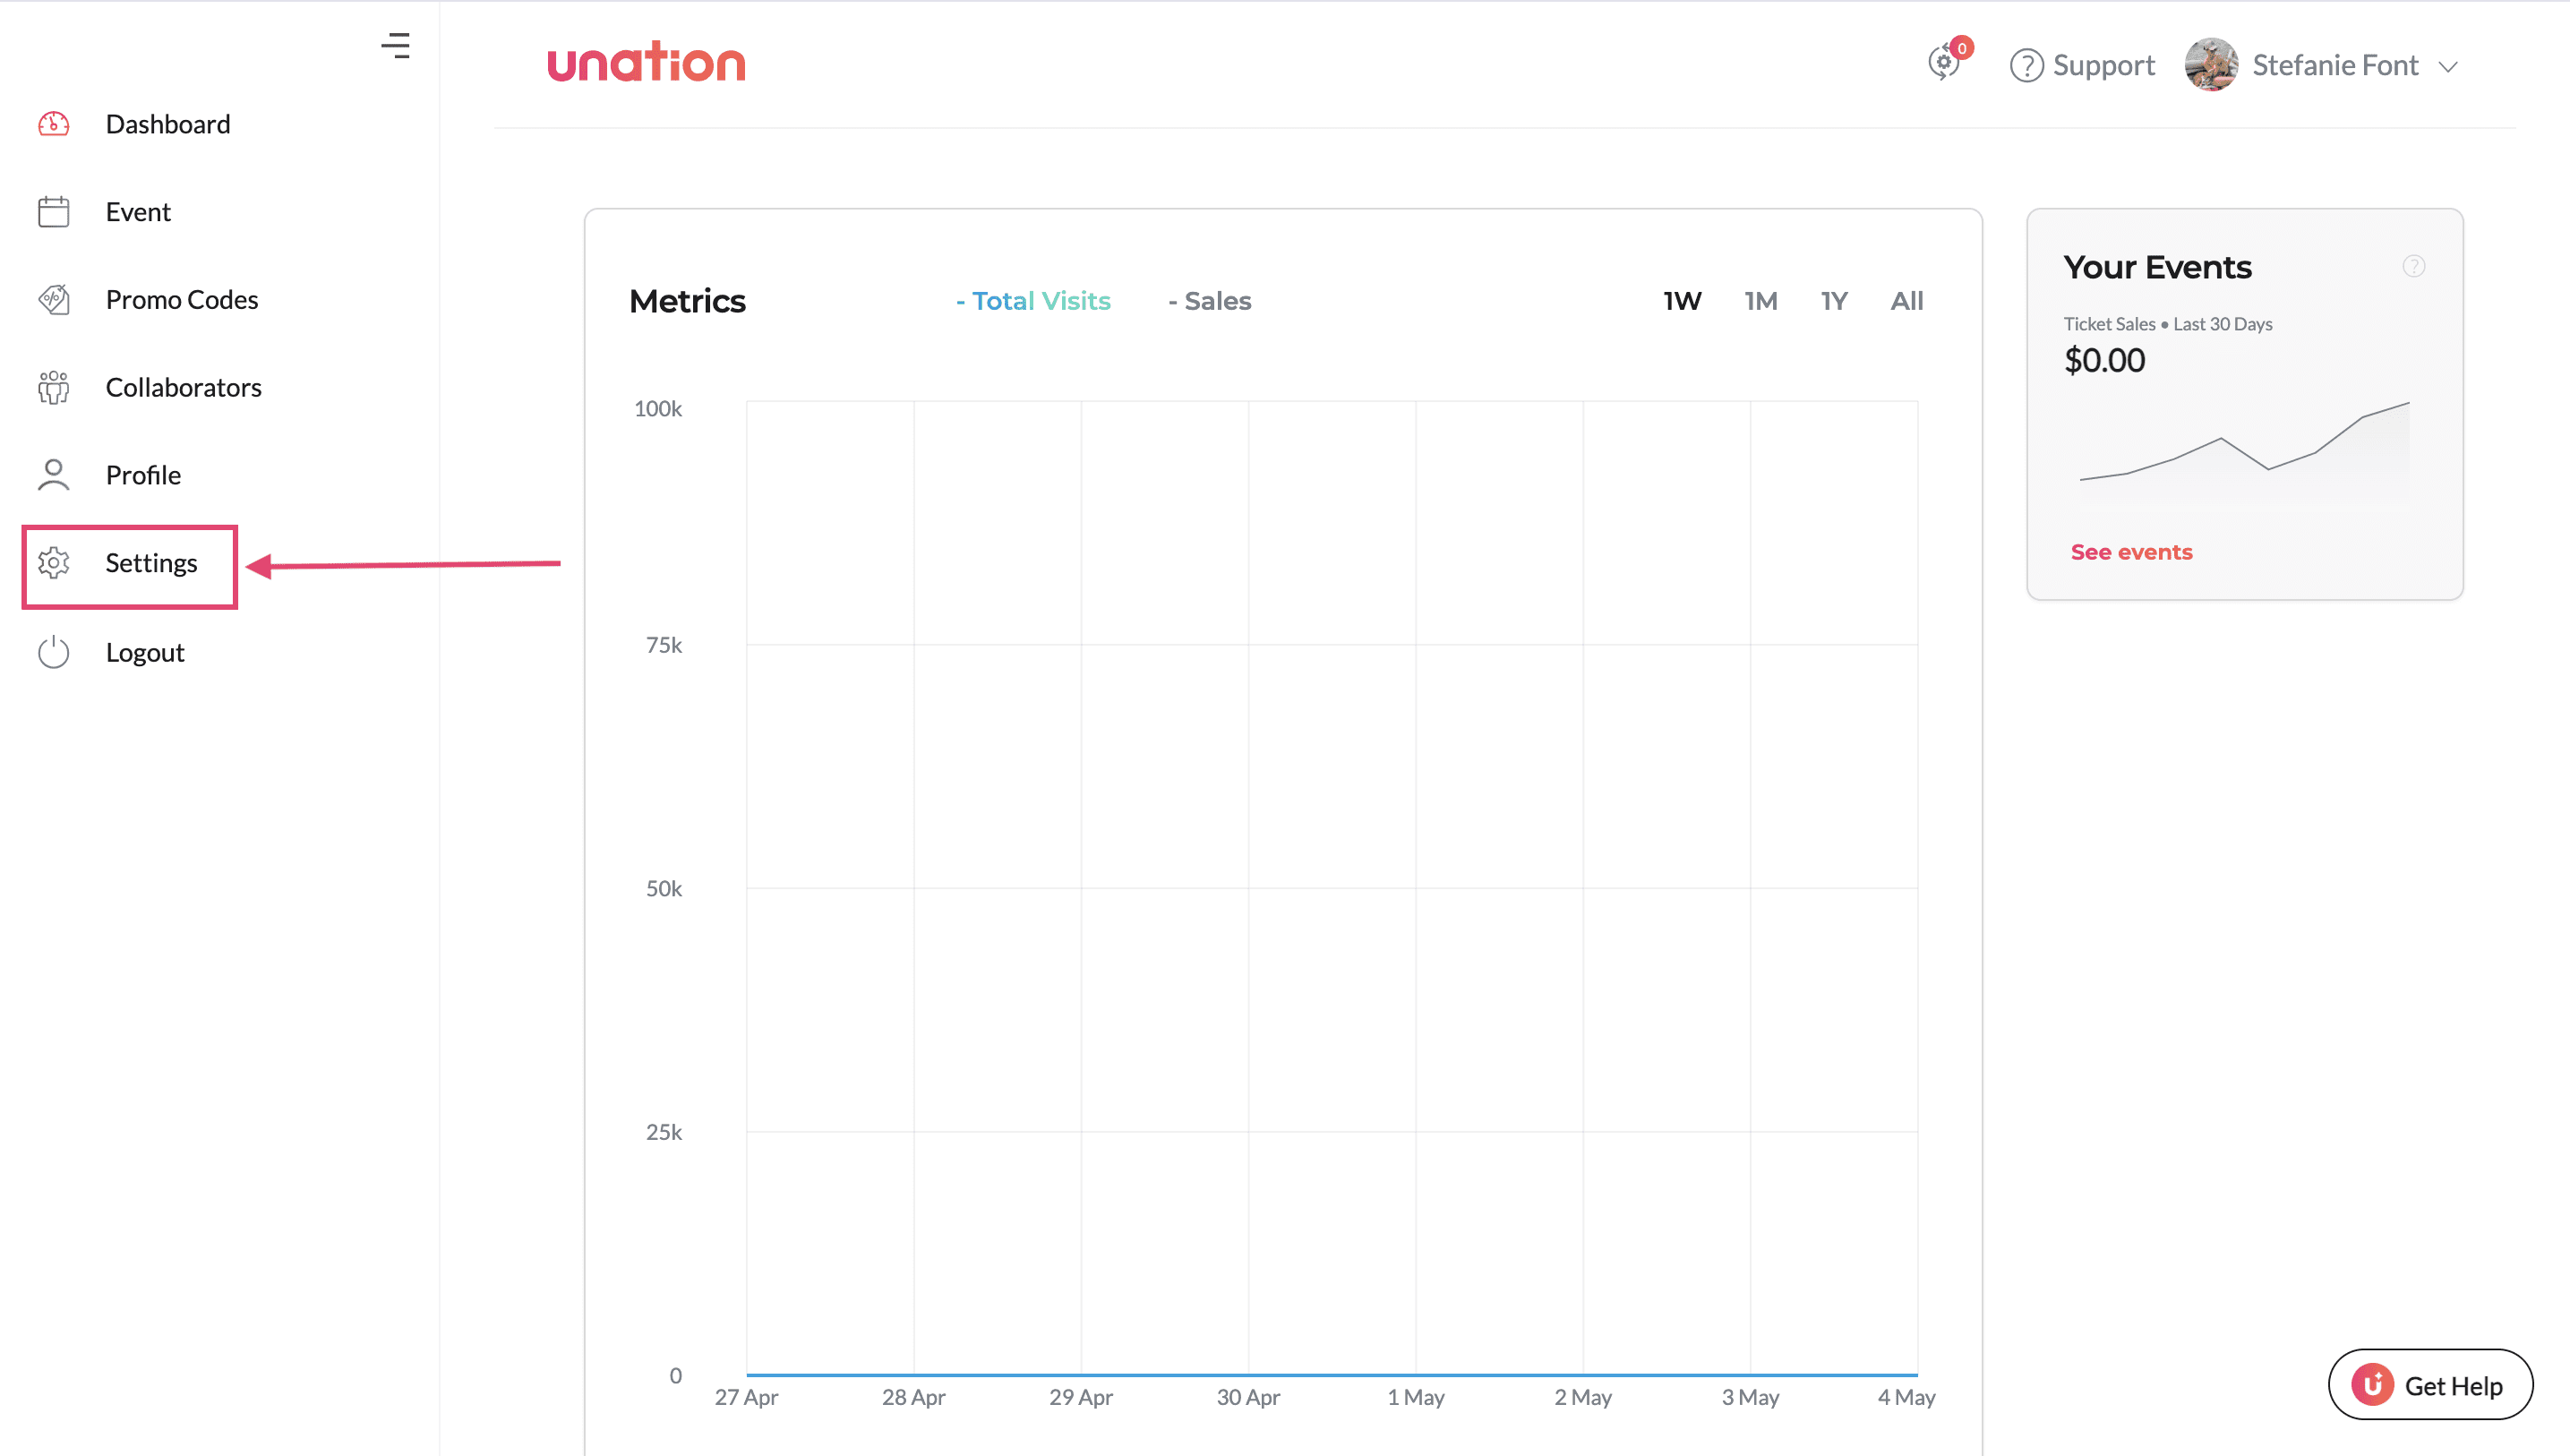
Select Settings on the left-hand column in your dashboard. Please note that if your menu looks different, that is completely fine, as menu options change based on permissions on the platform.

Once you're on the settings page, you'll notice the "Connect" banner at the top of the page, or, you can click "Manage Stripe" under settings and connect through there.

After pressing "Connect", it will redirect you to Stripe. From there, you can connect your existing Stripe account or you can create a new account with them.
If you're connecting an existing account, you'll just need to provide your Stripe login info. If you're creating a new account with Stripe, you'll need to follow the necessary steps to onboard. This will include:
Business type
Personal details
Business details
Bank details
Public details
Tax calculation
If you need any assistance throughout the onboarding process, you may reach out to Stripe's customer support. They have always been great at responding quickly and getting us any answers we need.
Stripe Support article: Information required on your business website to process payments
From there, if you would like to contact support, there's a "Contact support" button on the right hand menu

Once you've completed the onboarding process, you will be redirected back to the UNATION dashboard. Your account should now show as connected, with the "connect" button being replaced with a "disconnect" button.
Now that your Stripe is connected to your UNATION account, it's time to create your ticketed event 🎉
Managing your Event
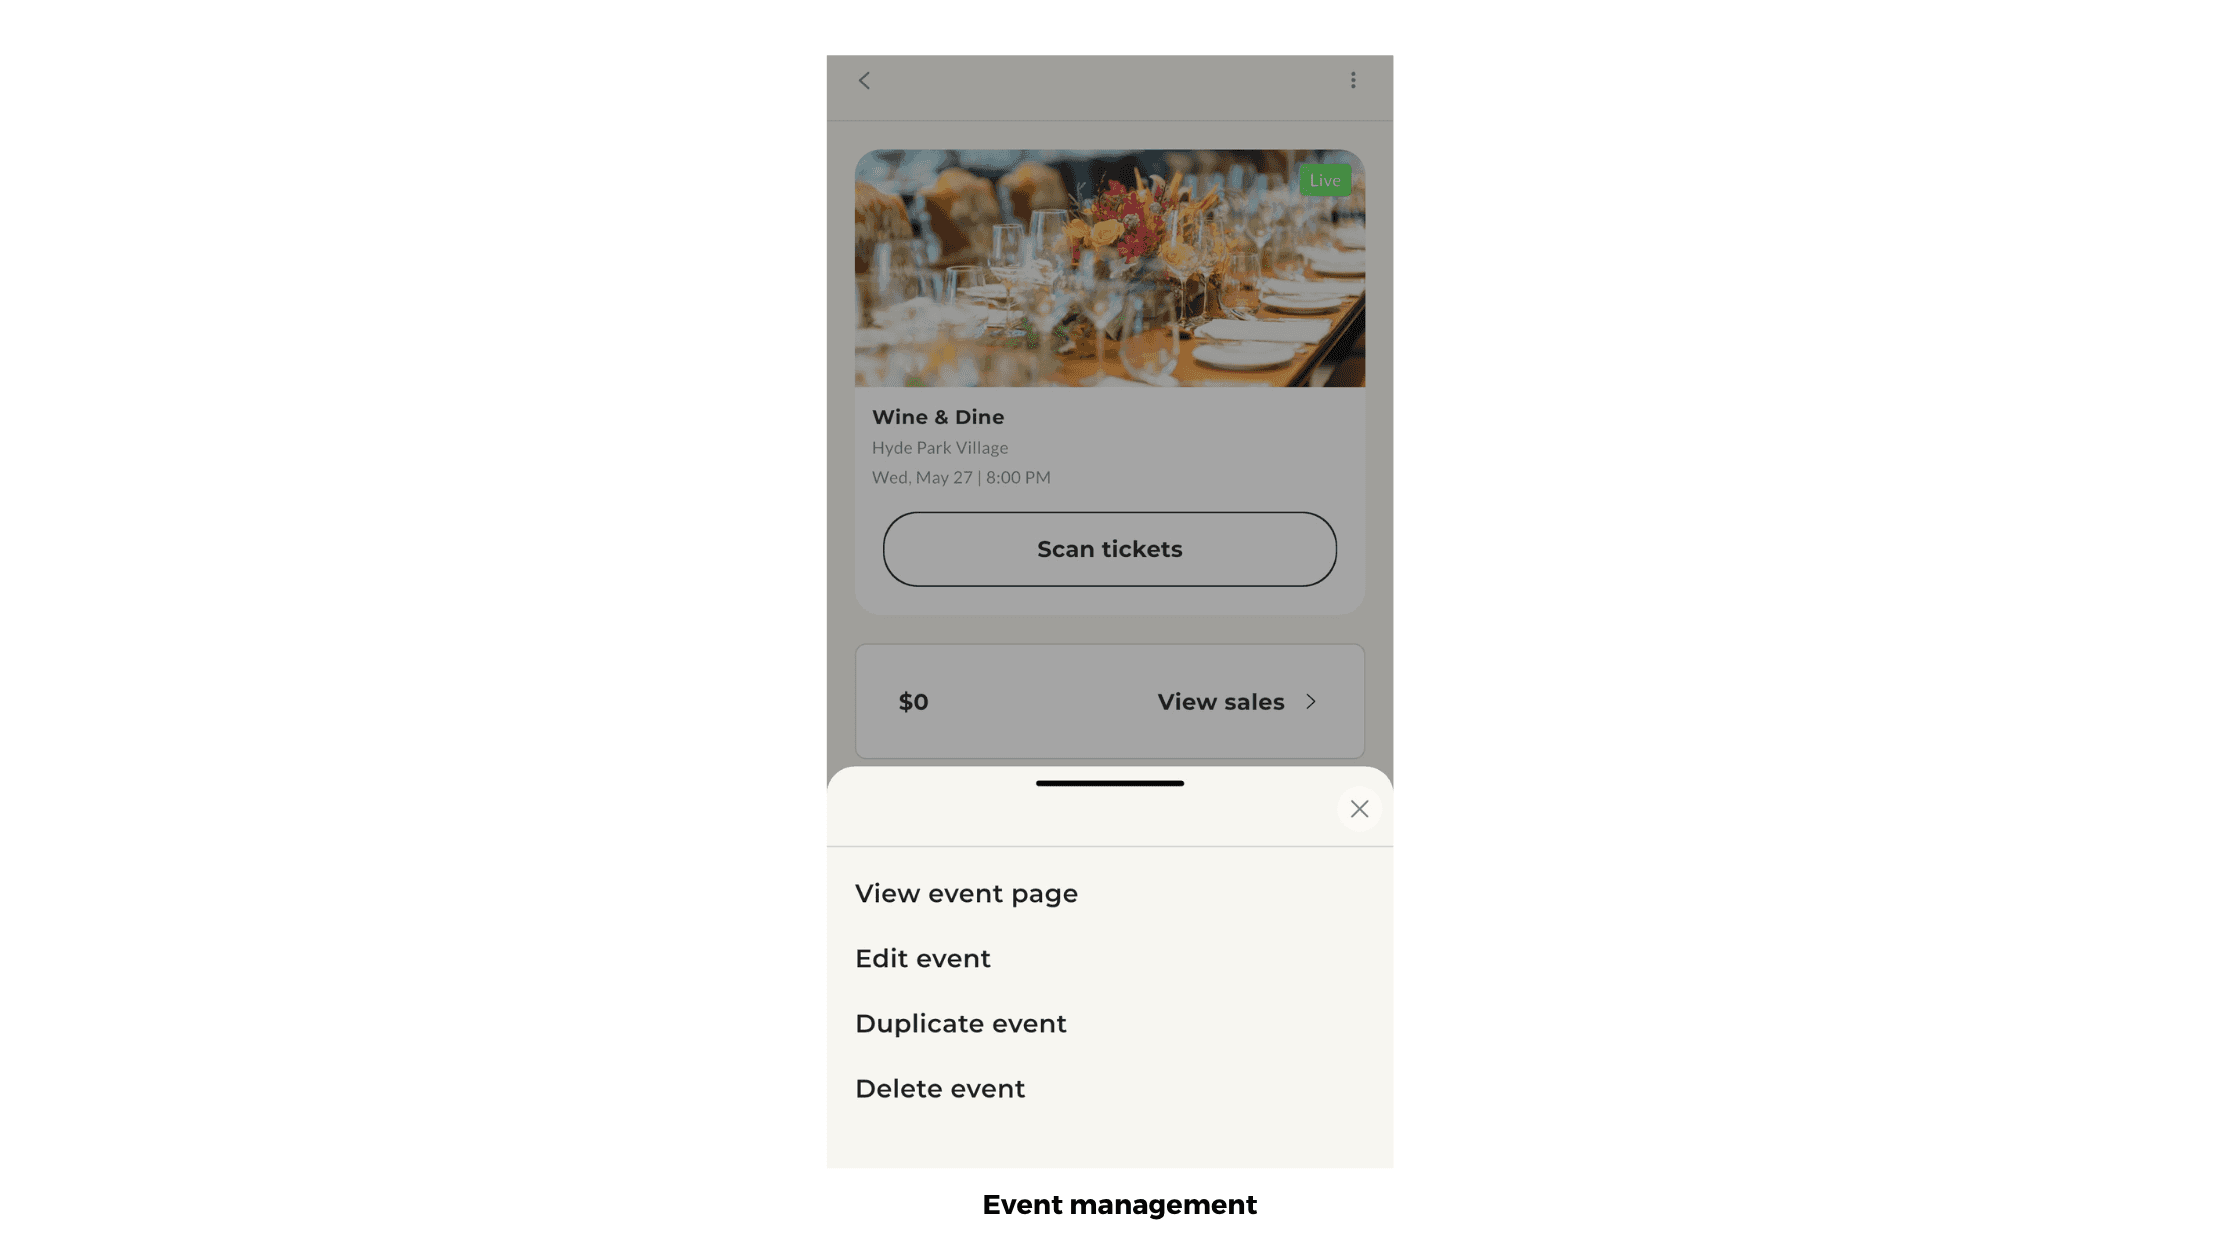
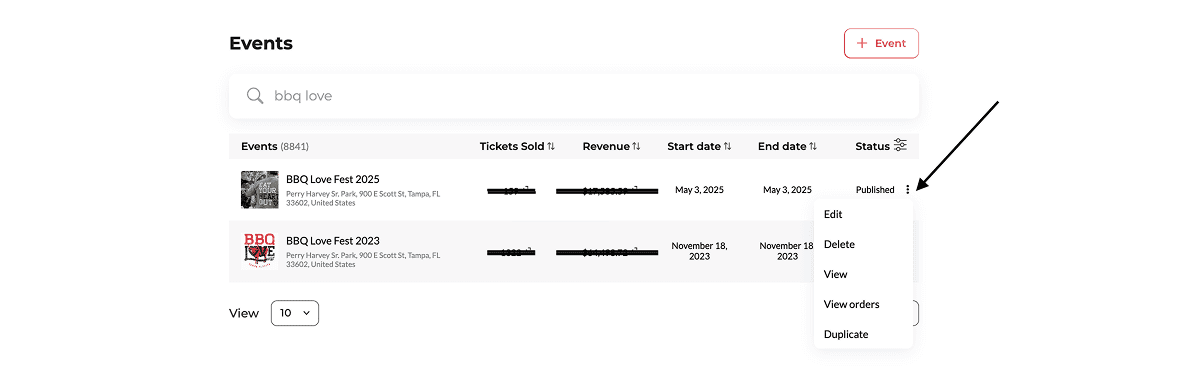
To edit, delete, view, duplicate or view orders for your event simply click the 3 dots on the event, and select the action item you're looking for.
If you are using UNATION for ticketing, please keep reading for some additional pro tips.
On mobile app:
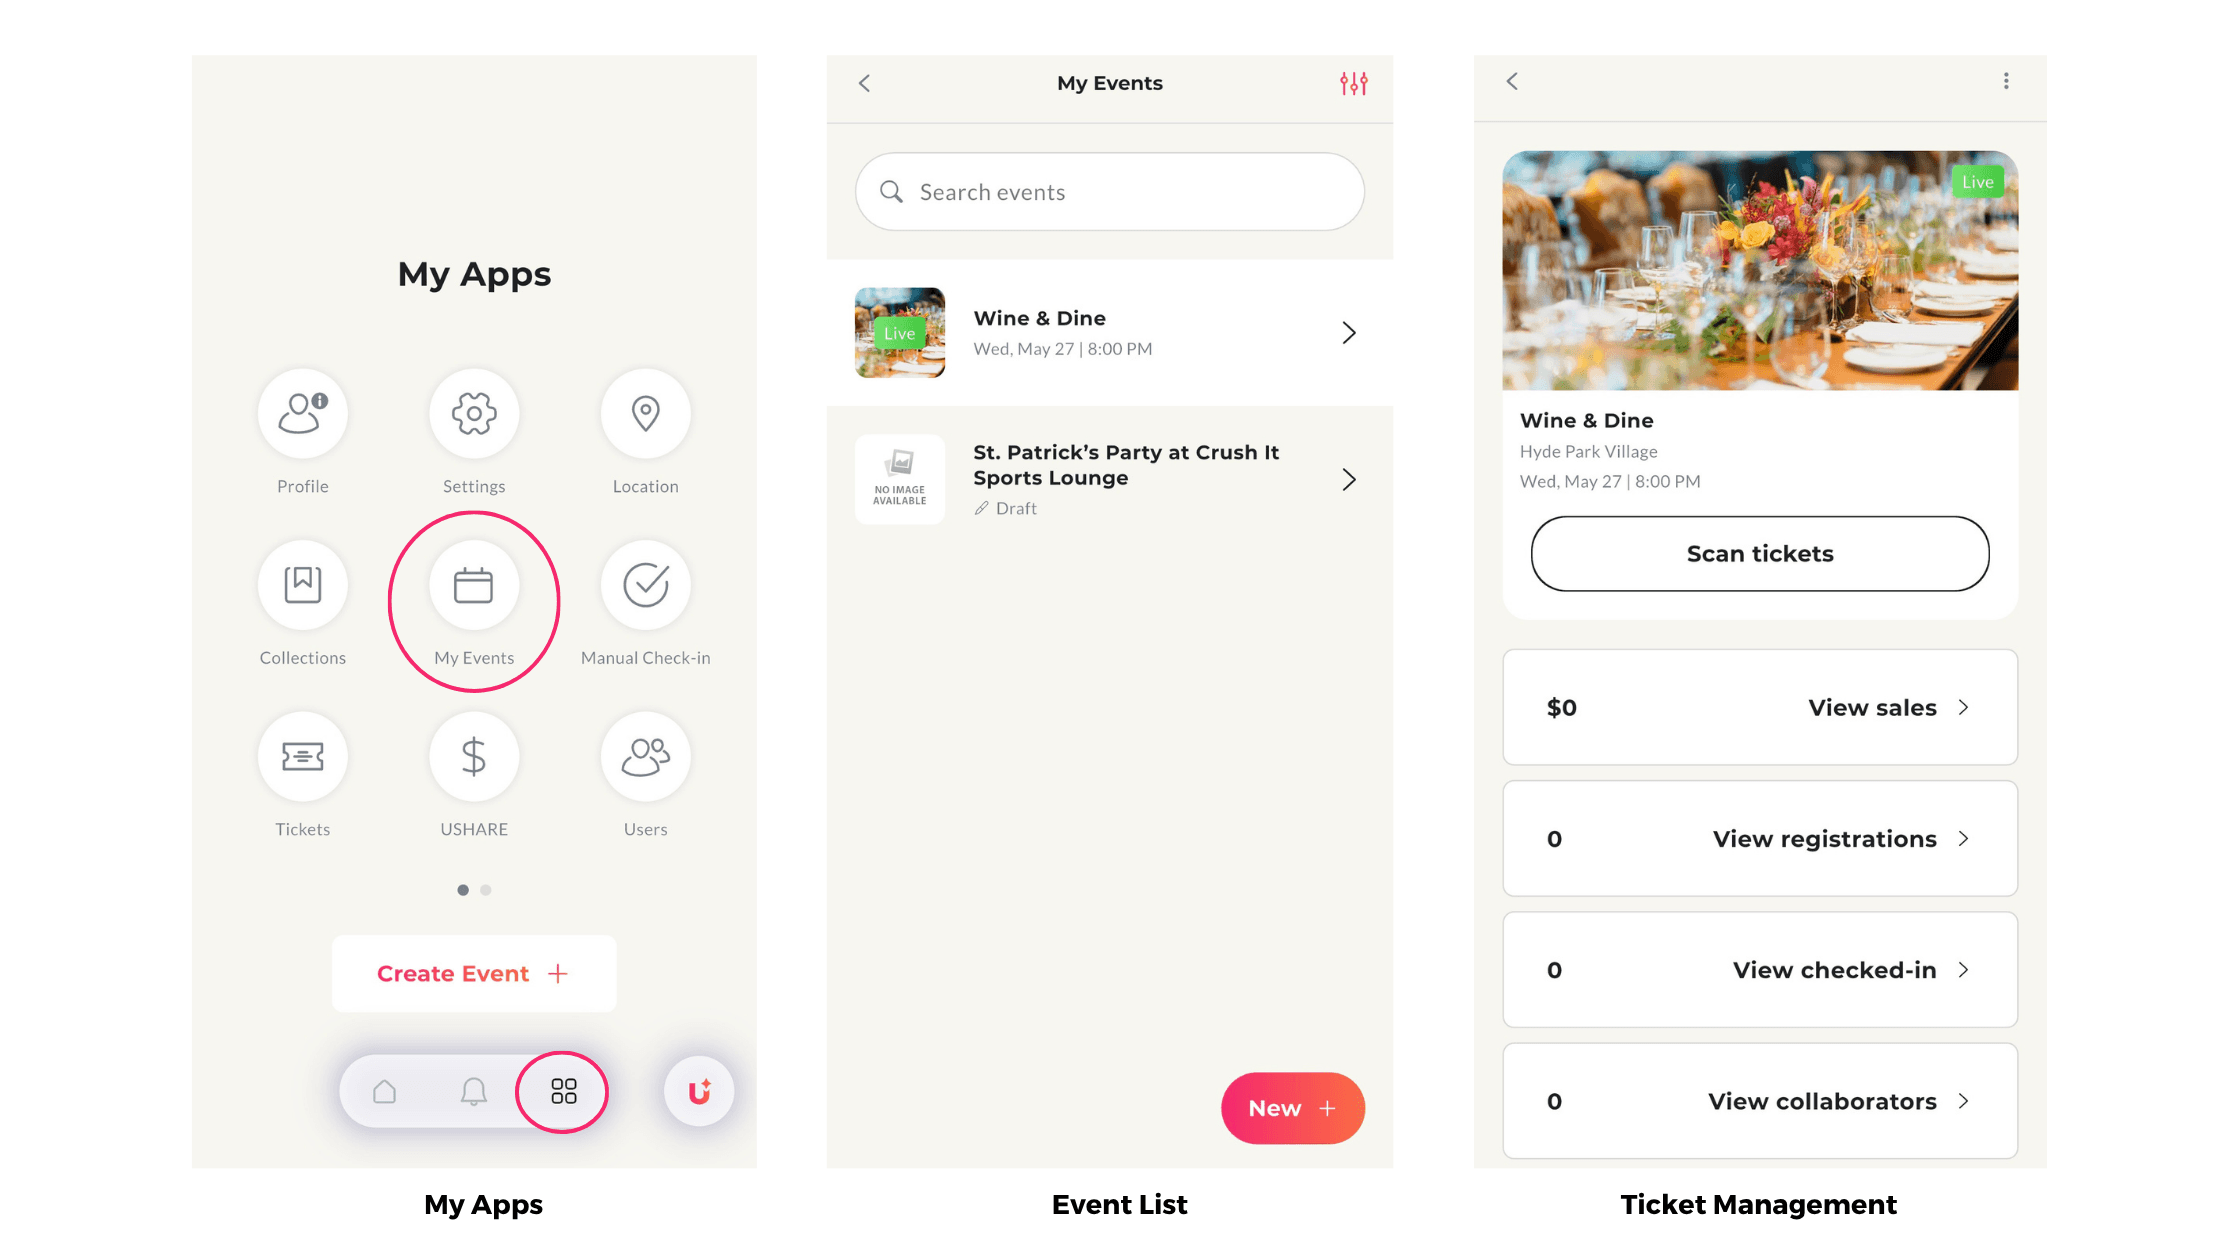
From your home page, click the last icon on the bottom menu, and find my events in the "My Apps" page
Once you see a list of your events, you'll select the one you want to view tickets for
Once you're in the event page, you'll see all of your ticketing information such as:
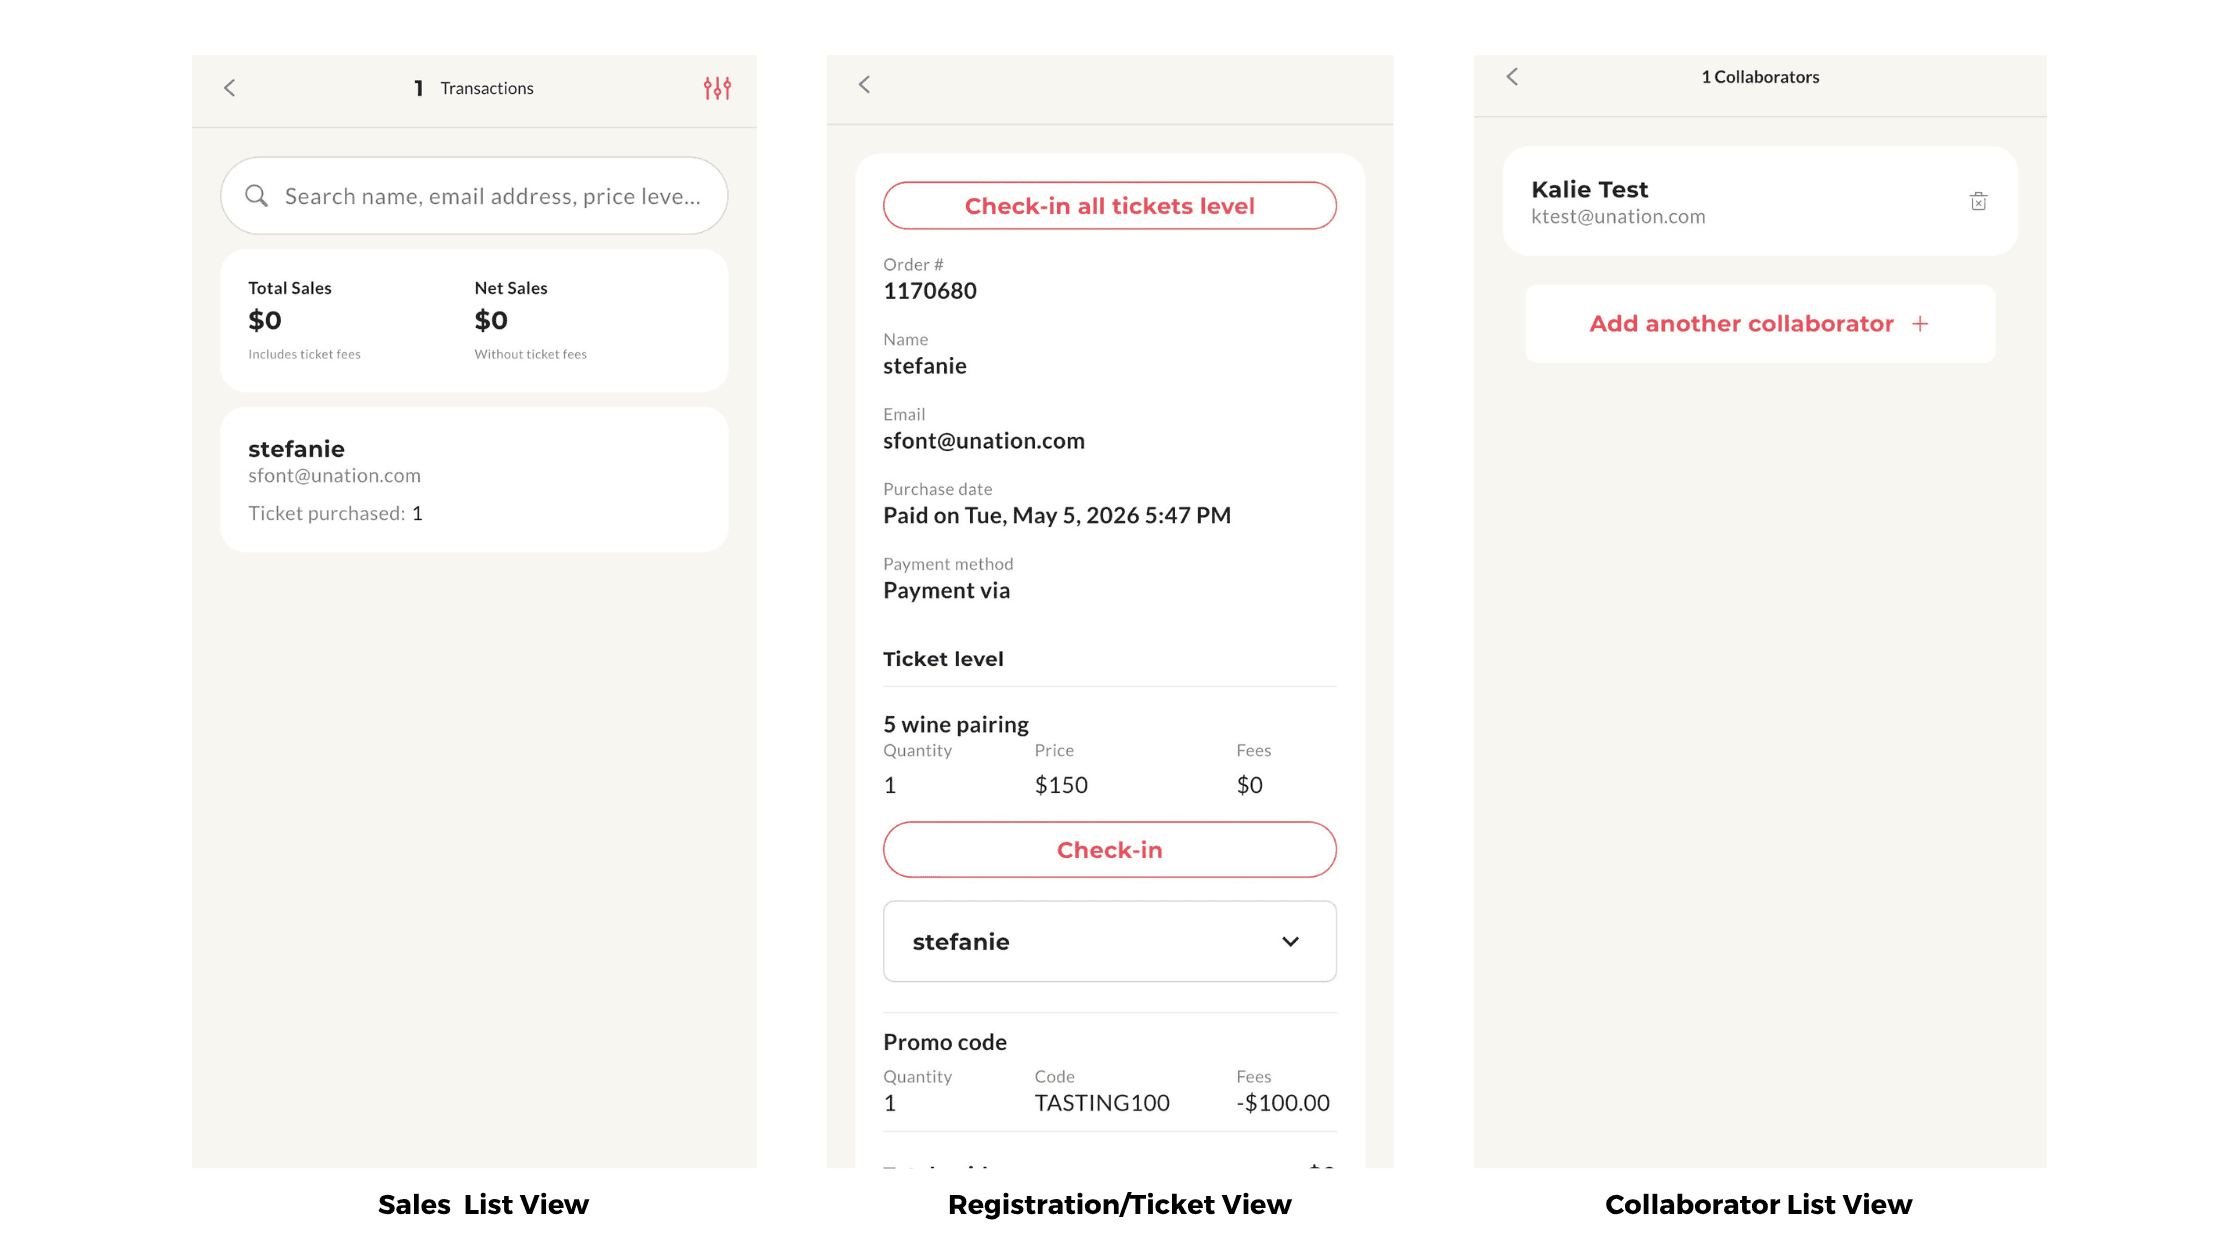
Ability to scan tickets. This is where ticket purchasers will present you with their QR code and you press the "scan tickets" button so the camera opens, and you are able to check the attendee in
View sales: This is where you'll see all transactions along with gross and net profit. You can also search for a ticket purchasers name, email address, etc. and see all details from their purchase as well as check them in without needing to scan their ticket
View registrations: This is where you'll see the list of registrations, how many tickets were purchased per purchaser, and how many have checked in to the event so far. You can also click into a ticket purchaser's name and see all of the details from their purchase as well as check them in without needing to scan the ticket
View checked-in: This is where you will see a list of all the attendees that have been checked in thus far
View collaborators: This is where you can see a list of collaborators as well as add a new one. Collaborators are members from your team that will assist in checking attendees in without having access to your entire UNATION account
On desktop:
When you select "View orders" from the screenshot above, you will be able to manage your ticketed event - whether it's sending a bulk email to all attendees, downloading a CSV, initiating a refund, and more. Keep reading to learn how.
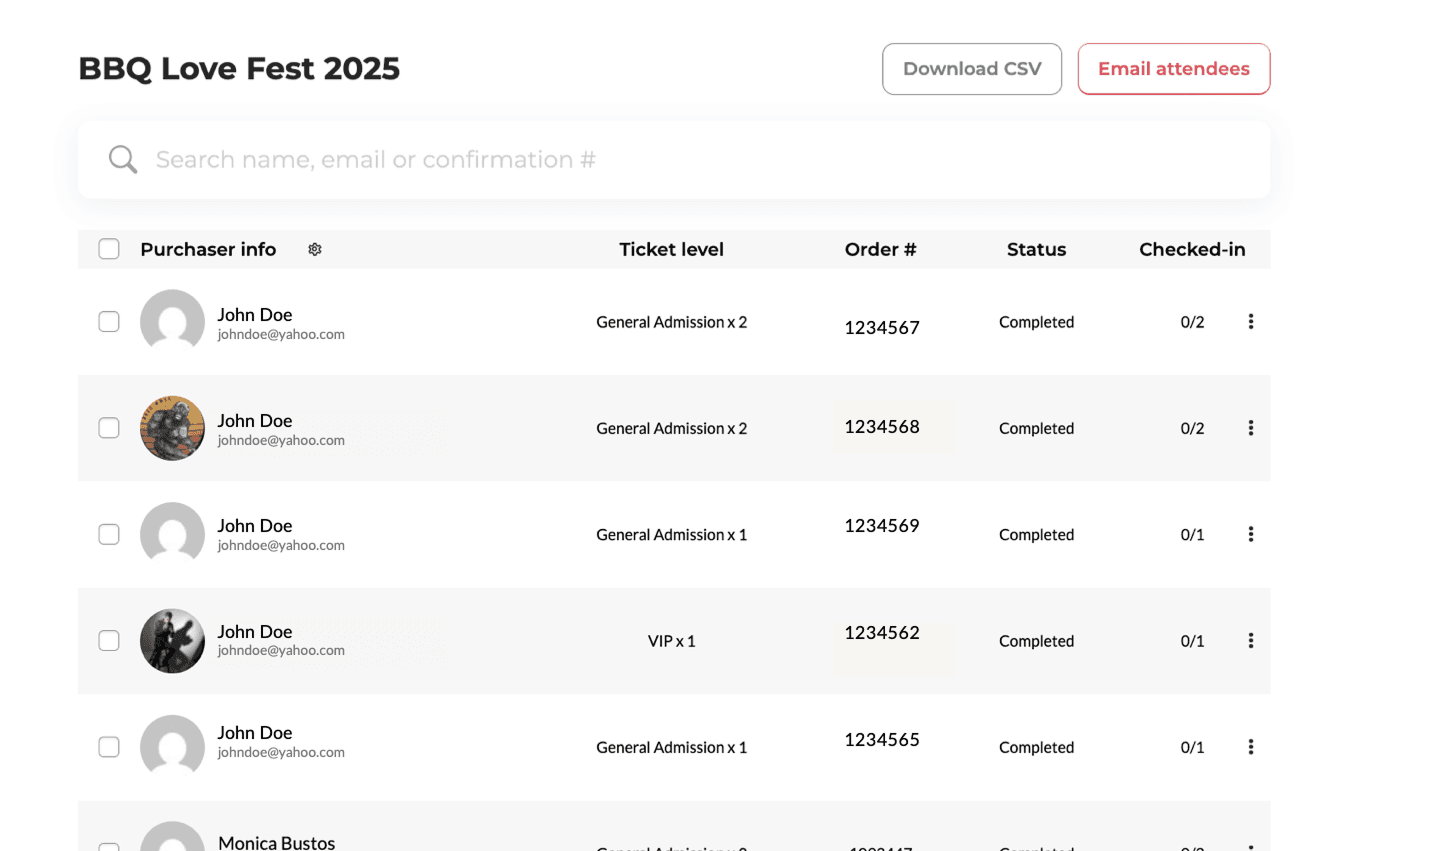
Once you select "view orders" from the call to action listed above, this is the page you will land on. Here, you'll see the name, email, tickets purchased, order numbers, and status for each purchase. You also have the ability to check in guests at the event from this screen (or you can download the UNATION app and scan the QR codes for quicker entry, steps on that are further down on this article.)
On this page, you also have the option to download a CSV of all the orders and send a bulk email to all attendees by clicking the gradient "Email attendees" CTA in the upper right-hand corner.
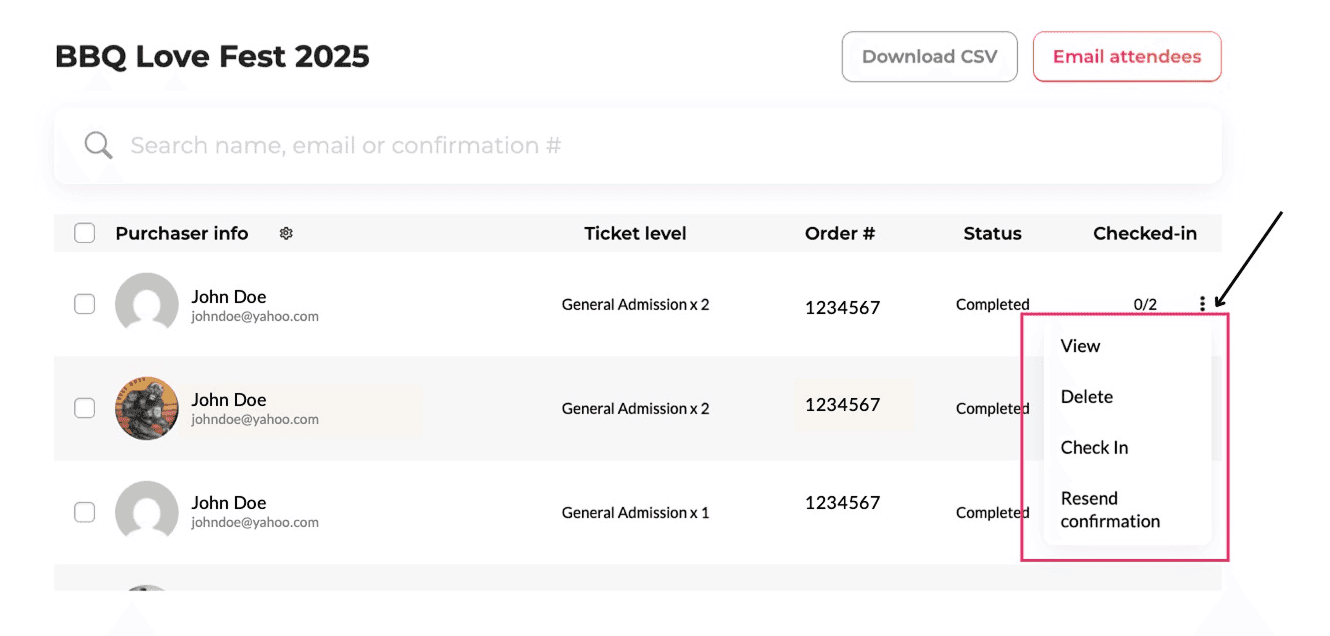
For each order, you can click to view more details, delete, check in, or resend the confirmation email. Just click the 3 dots!
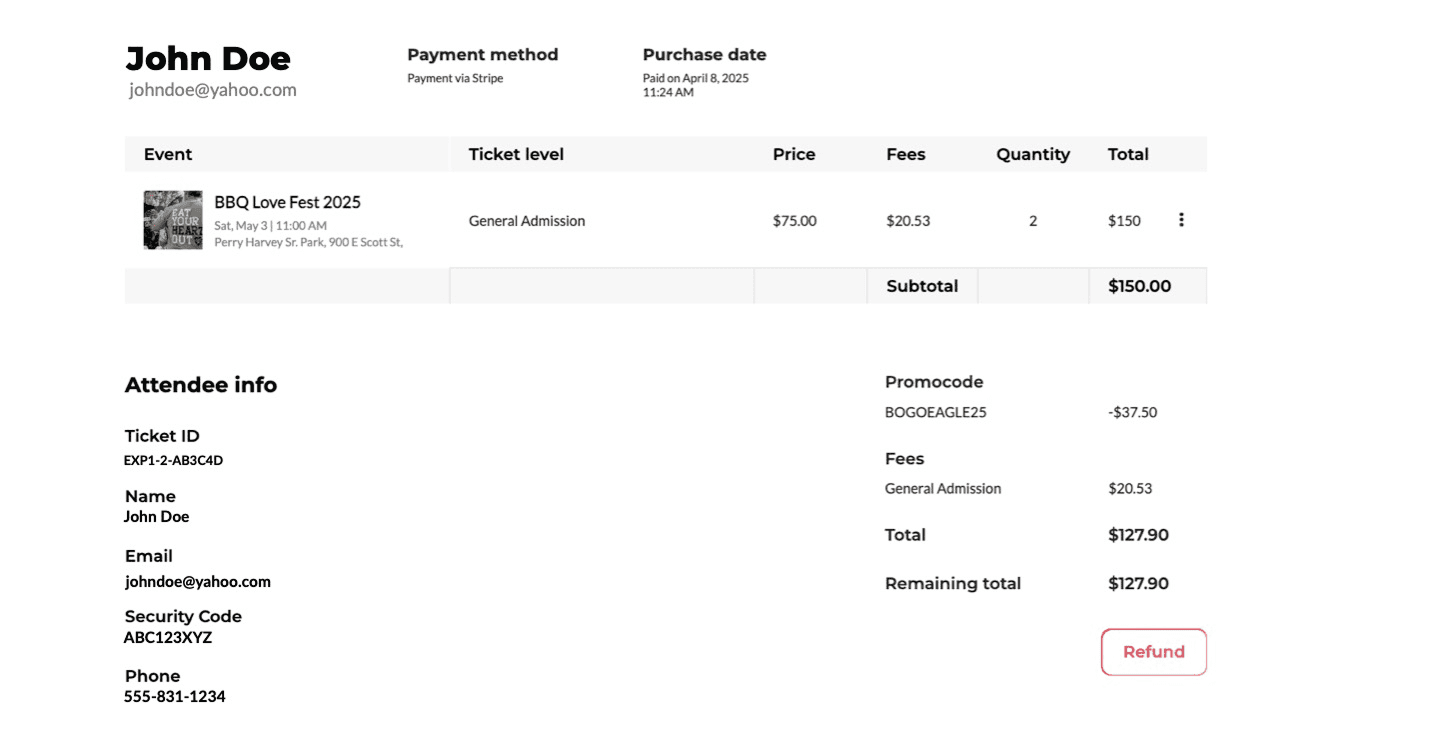
Once you select "view", this page will come up. This is where you can learn all of the details of a ticket purchaser. Remember the question you asked about what their favorite cocktail is? You can see that information here. Along with other information such as the name of the second ticket holder, what promo code they used, and you'll also have the ability to refund with the click of a button.
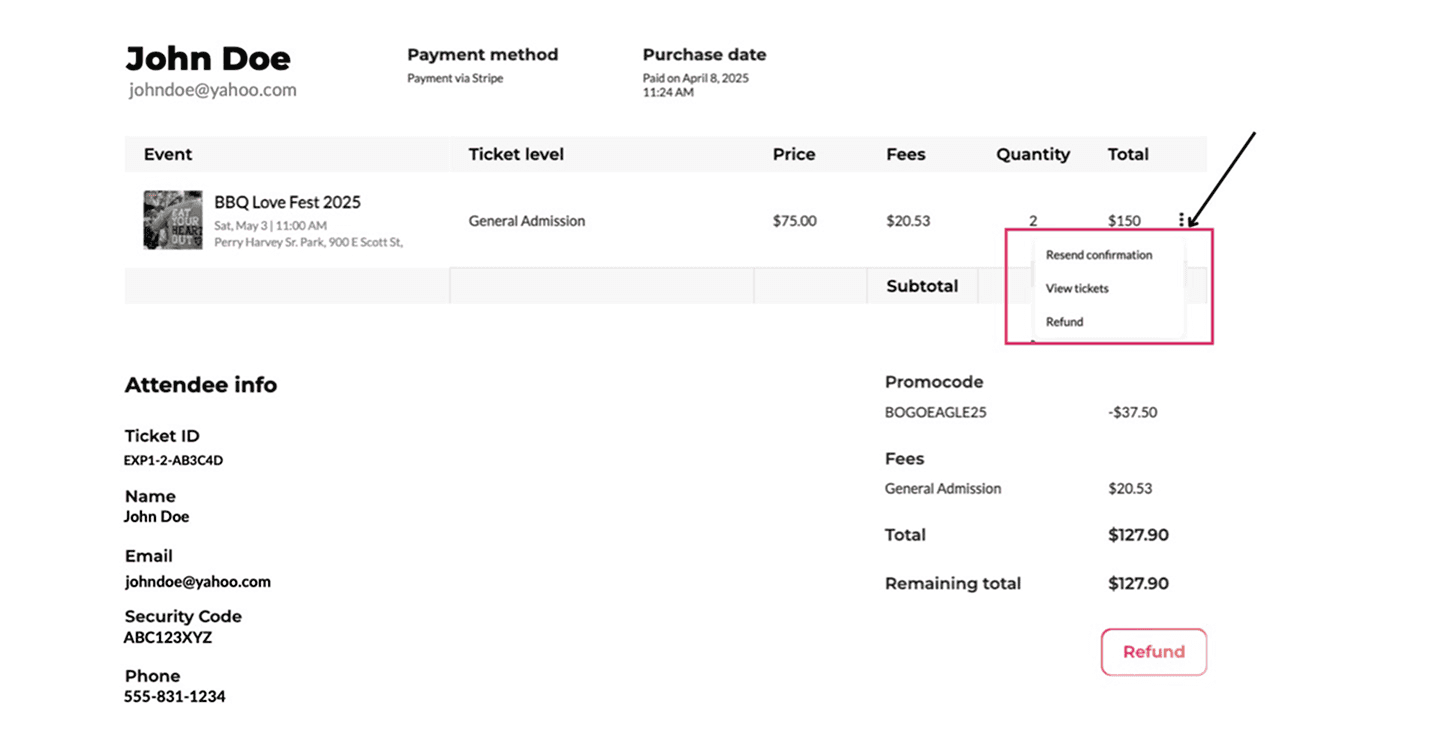
Lastly, you have the option to click the 3 dots inside an order and resend the confirmation email from there, view their ticket, or send the refund.
Creating Promo Codes on Desktop
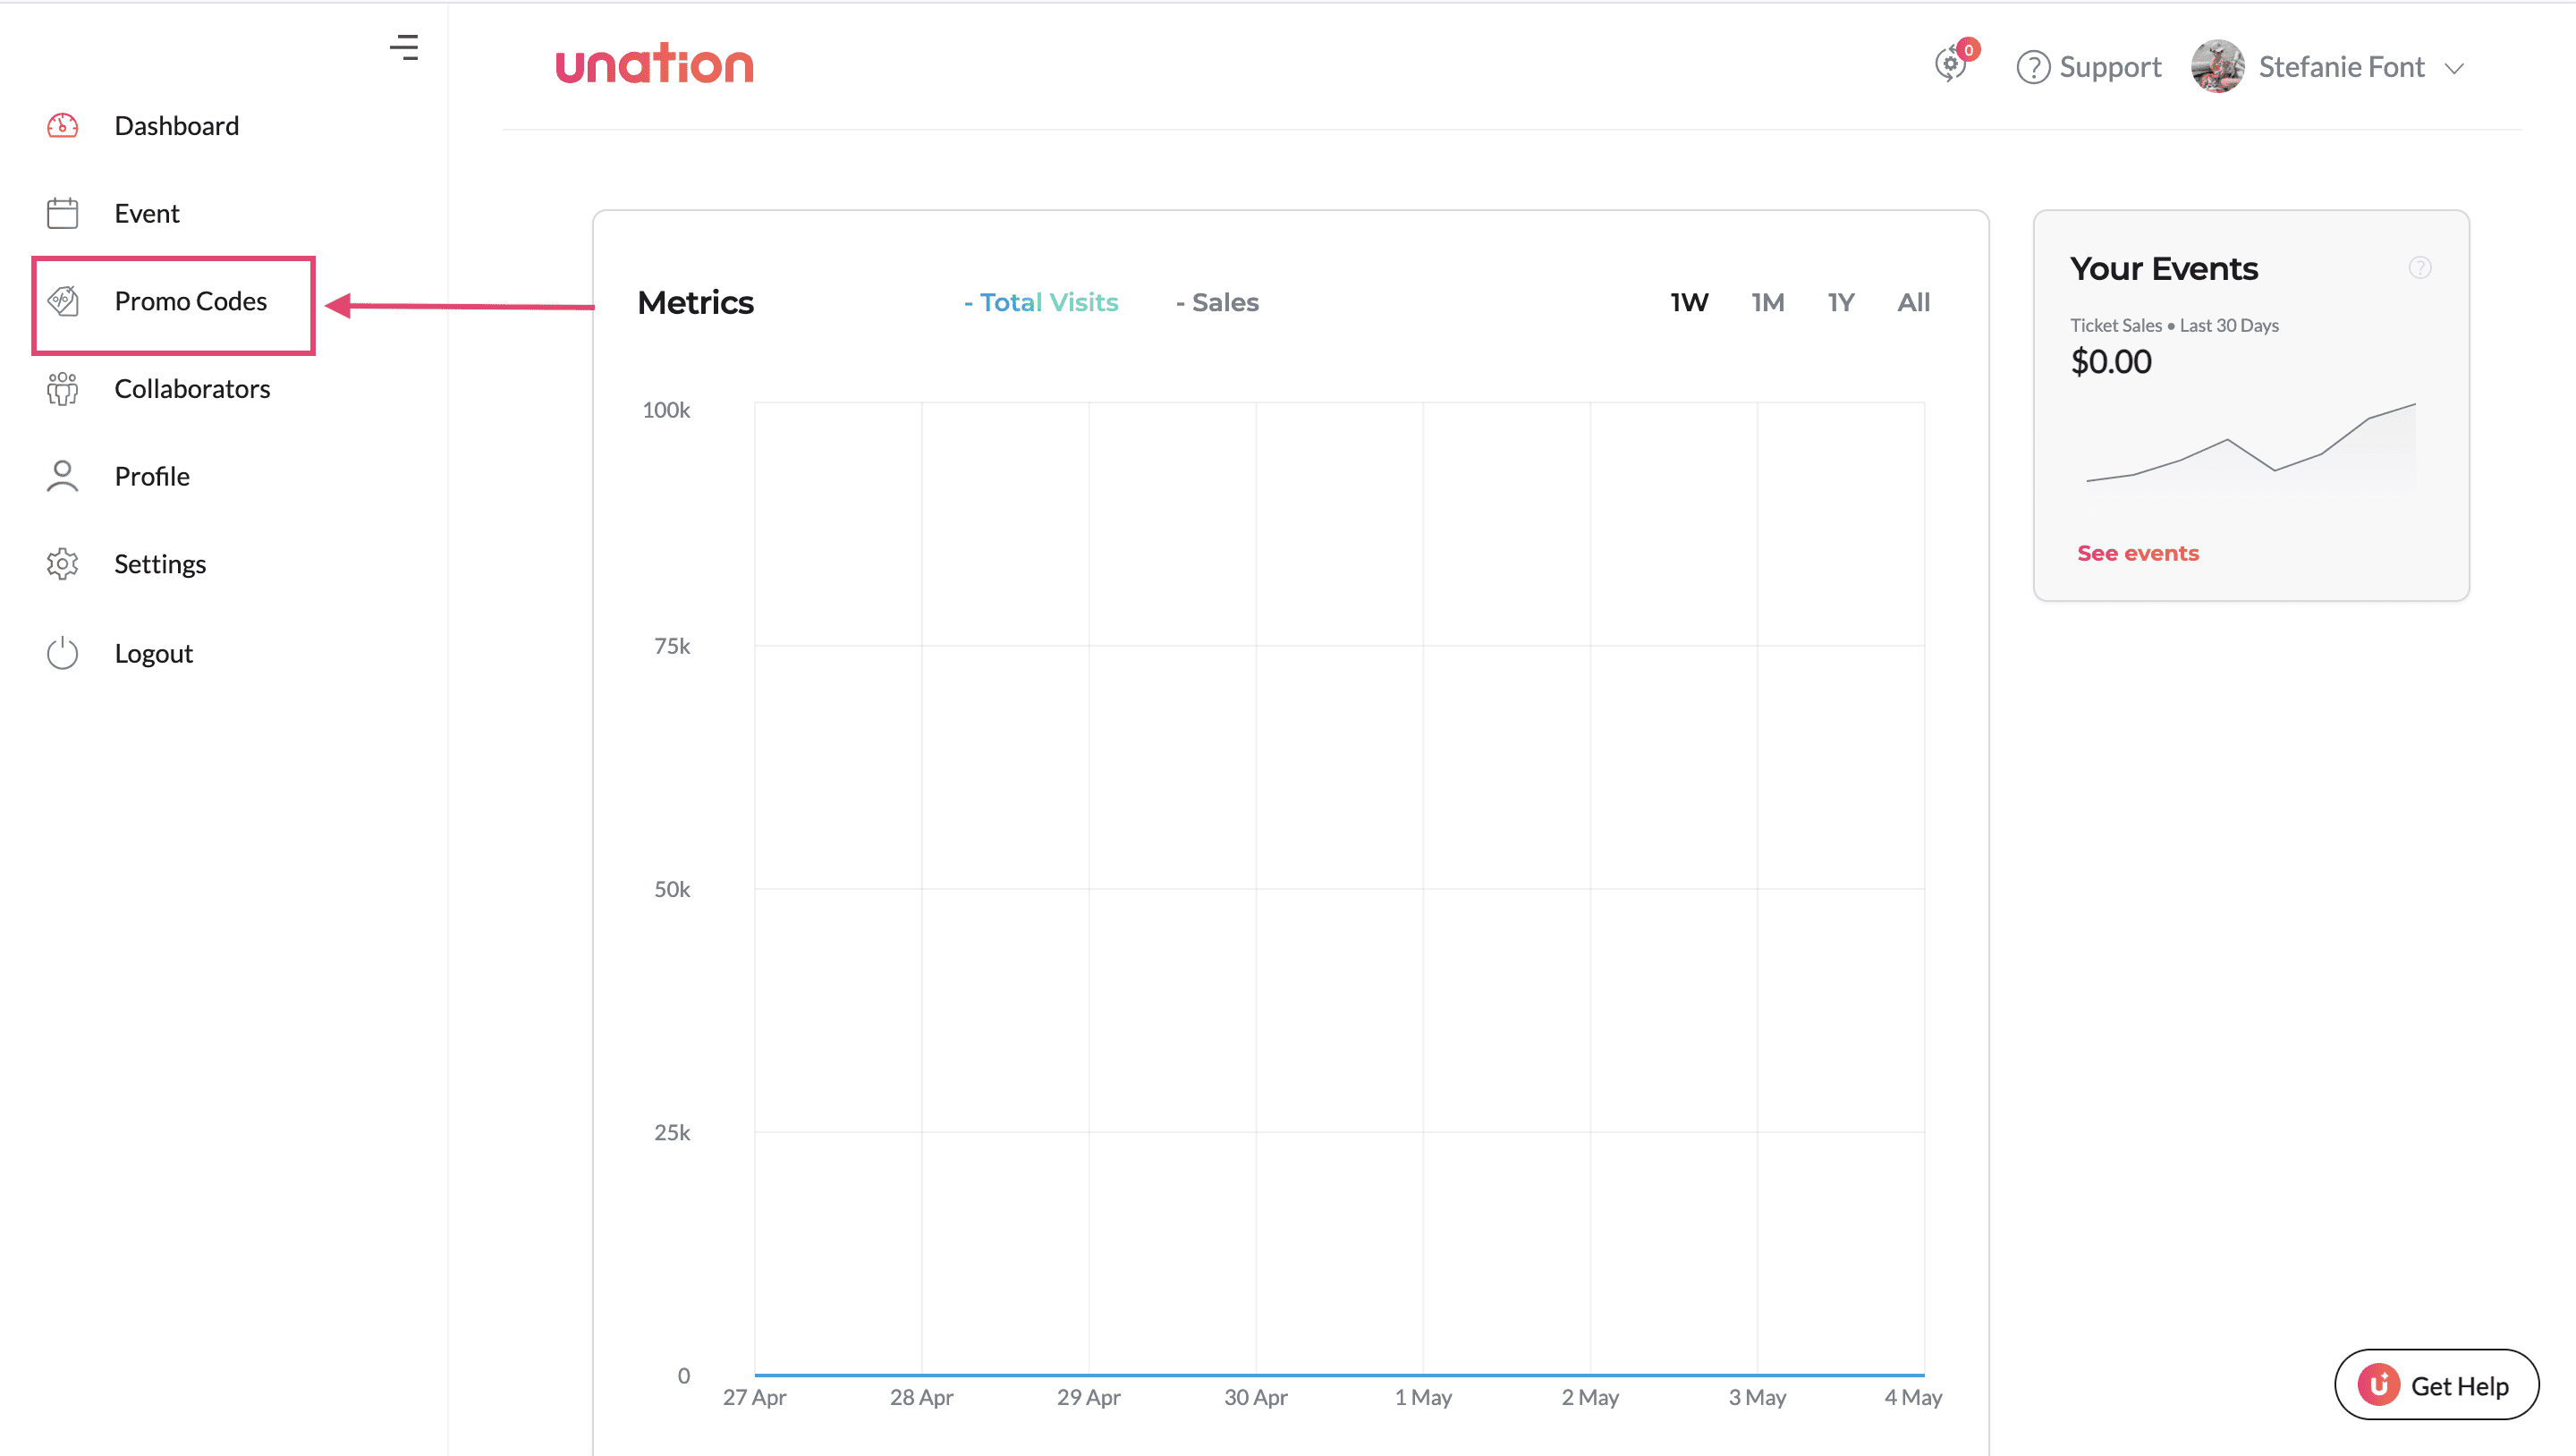
Once you're in your dashboard, there are two options for creating a promo code
You can find "Promo Codes" in the left-hand menu
You can do it directly in an existing event. You'll just have to navigate to the "Admission" section once you're in edit mode
For this, we will be focusing on number 1.
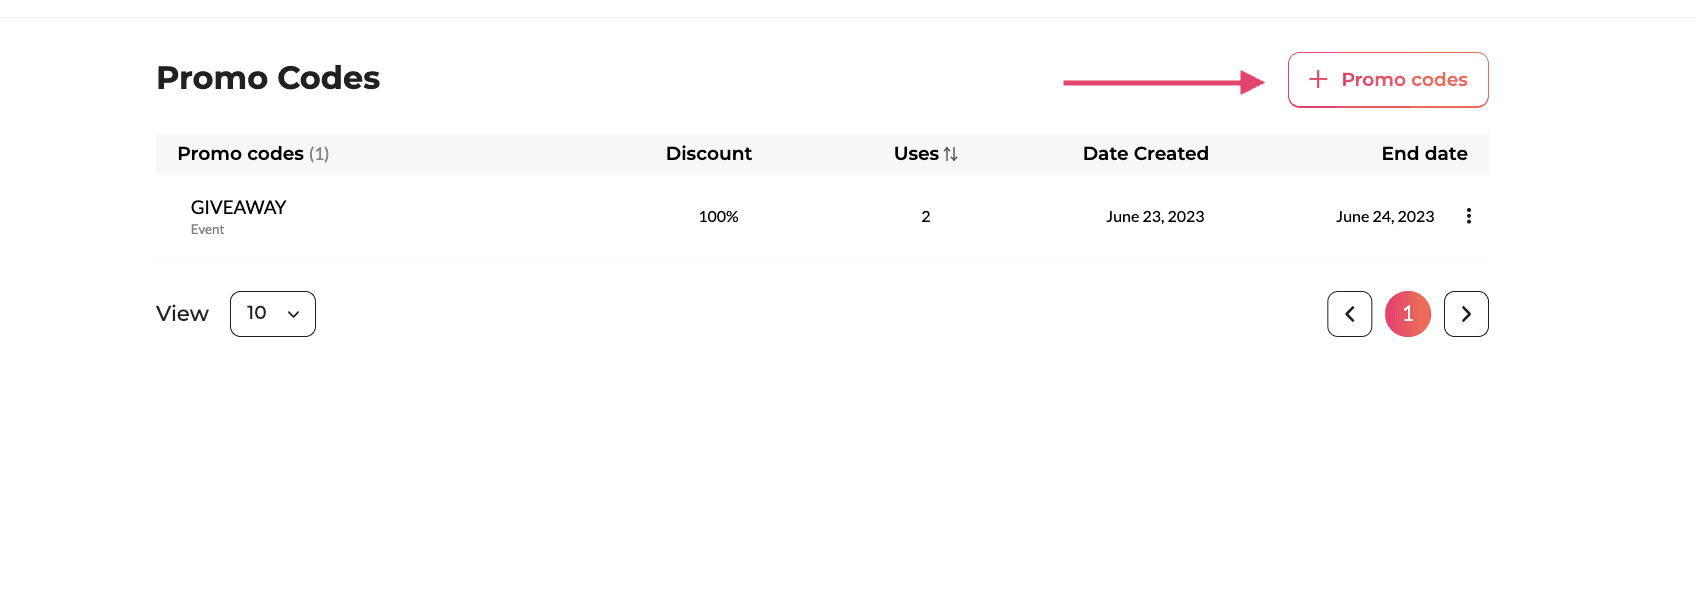
You'll land on a page that will show you a list of all of your promo codes. Here, you can see the name of the promo code, the discount, uses, date created, and end date. To create a new one, you'll want to select the box on the upper right hand corner titled "+ Promo codes"
After pressing the button, it will take you to the screen above.
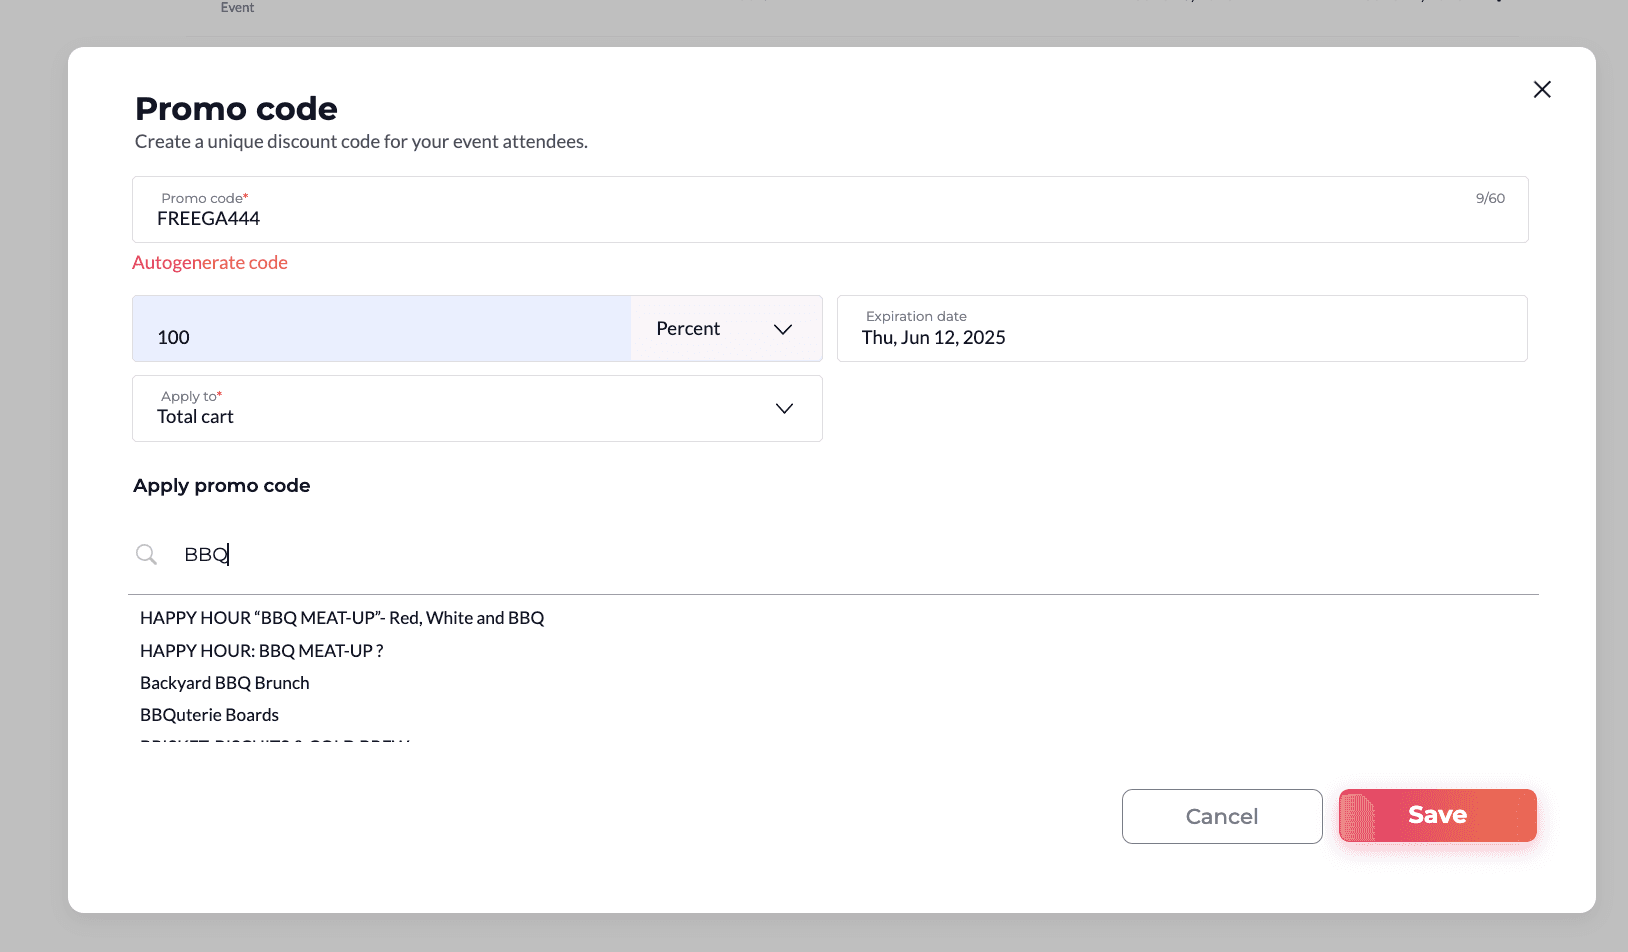
Promo code field: This is where you will create a unique title for the promo code that you will be sharing. We recommend adding unique numbers in there that won't be so easy to guess.
Amount: Next, you'll add the amount you want to discount.. whether it's percentage or a dollar amount will be up to you
Expiration date: How long will this promo code be good for? Do you want people to have access to it until the day of your event or do you want it to just run as an early bird special?
Apply to: This field allows you to determine if you want the discount applied to the total cart or if it's specific to a ticket level
Apply promo code: On the search bar, you'll be able to type the name of the events you want to apply the promo code to. You can select multiple!
Once the information above has been filled out, you can hit save.
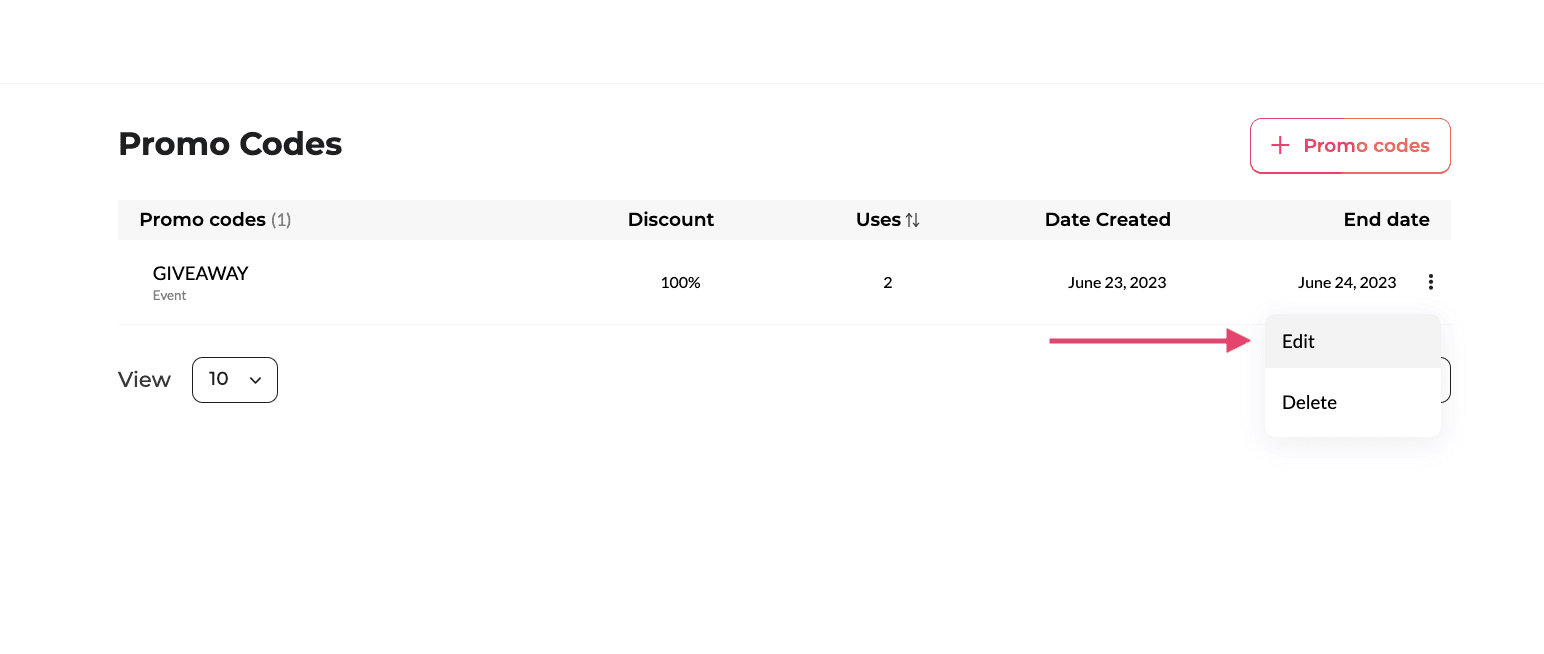
If you need to make any edits to your existing promo codes, such as updating the discount amount, changing the expiration date, or whatever it may be, you can do so by:
Going to "promo codes" on the left-hand menu of your UNATION dashboard
Finding the promo code you want to edit or delete
Clicking the 3 dots on the right and hitting "edit" or "delete".
If you need to edit, it will take you back to the screen from the previous step
Creating Collaborators on Desktop
Collaborators is a feature on UNATION that allows you to grant access to your team members, volunteers, etc. to manage events and Offers under your account, as well as check-in tickets and Offer vouchers.
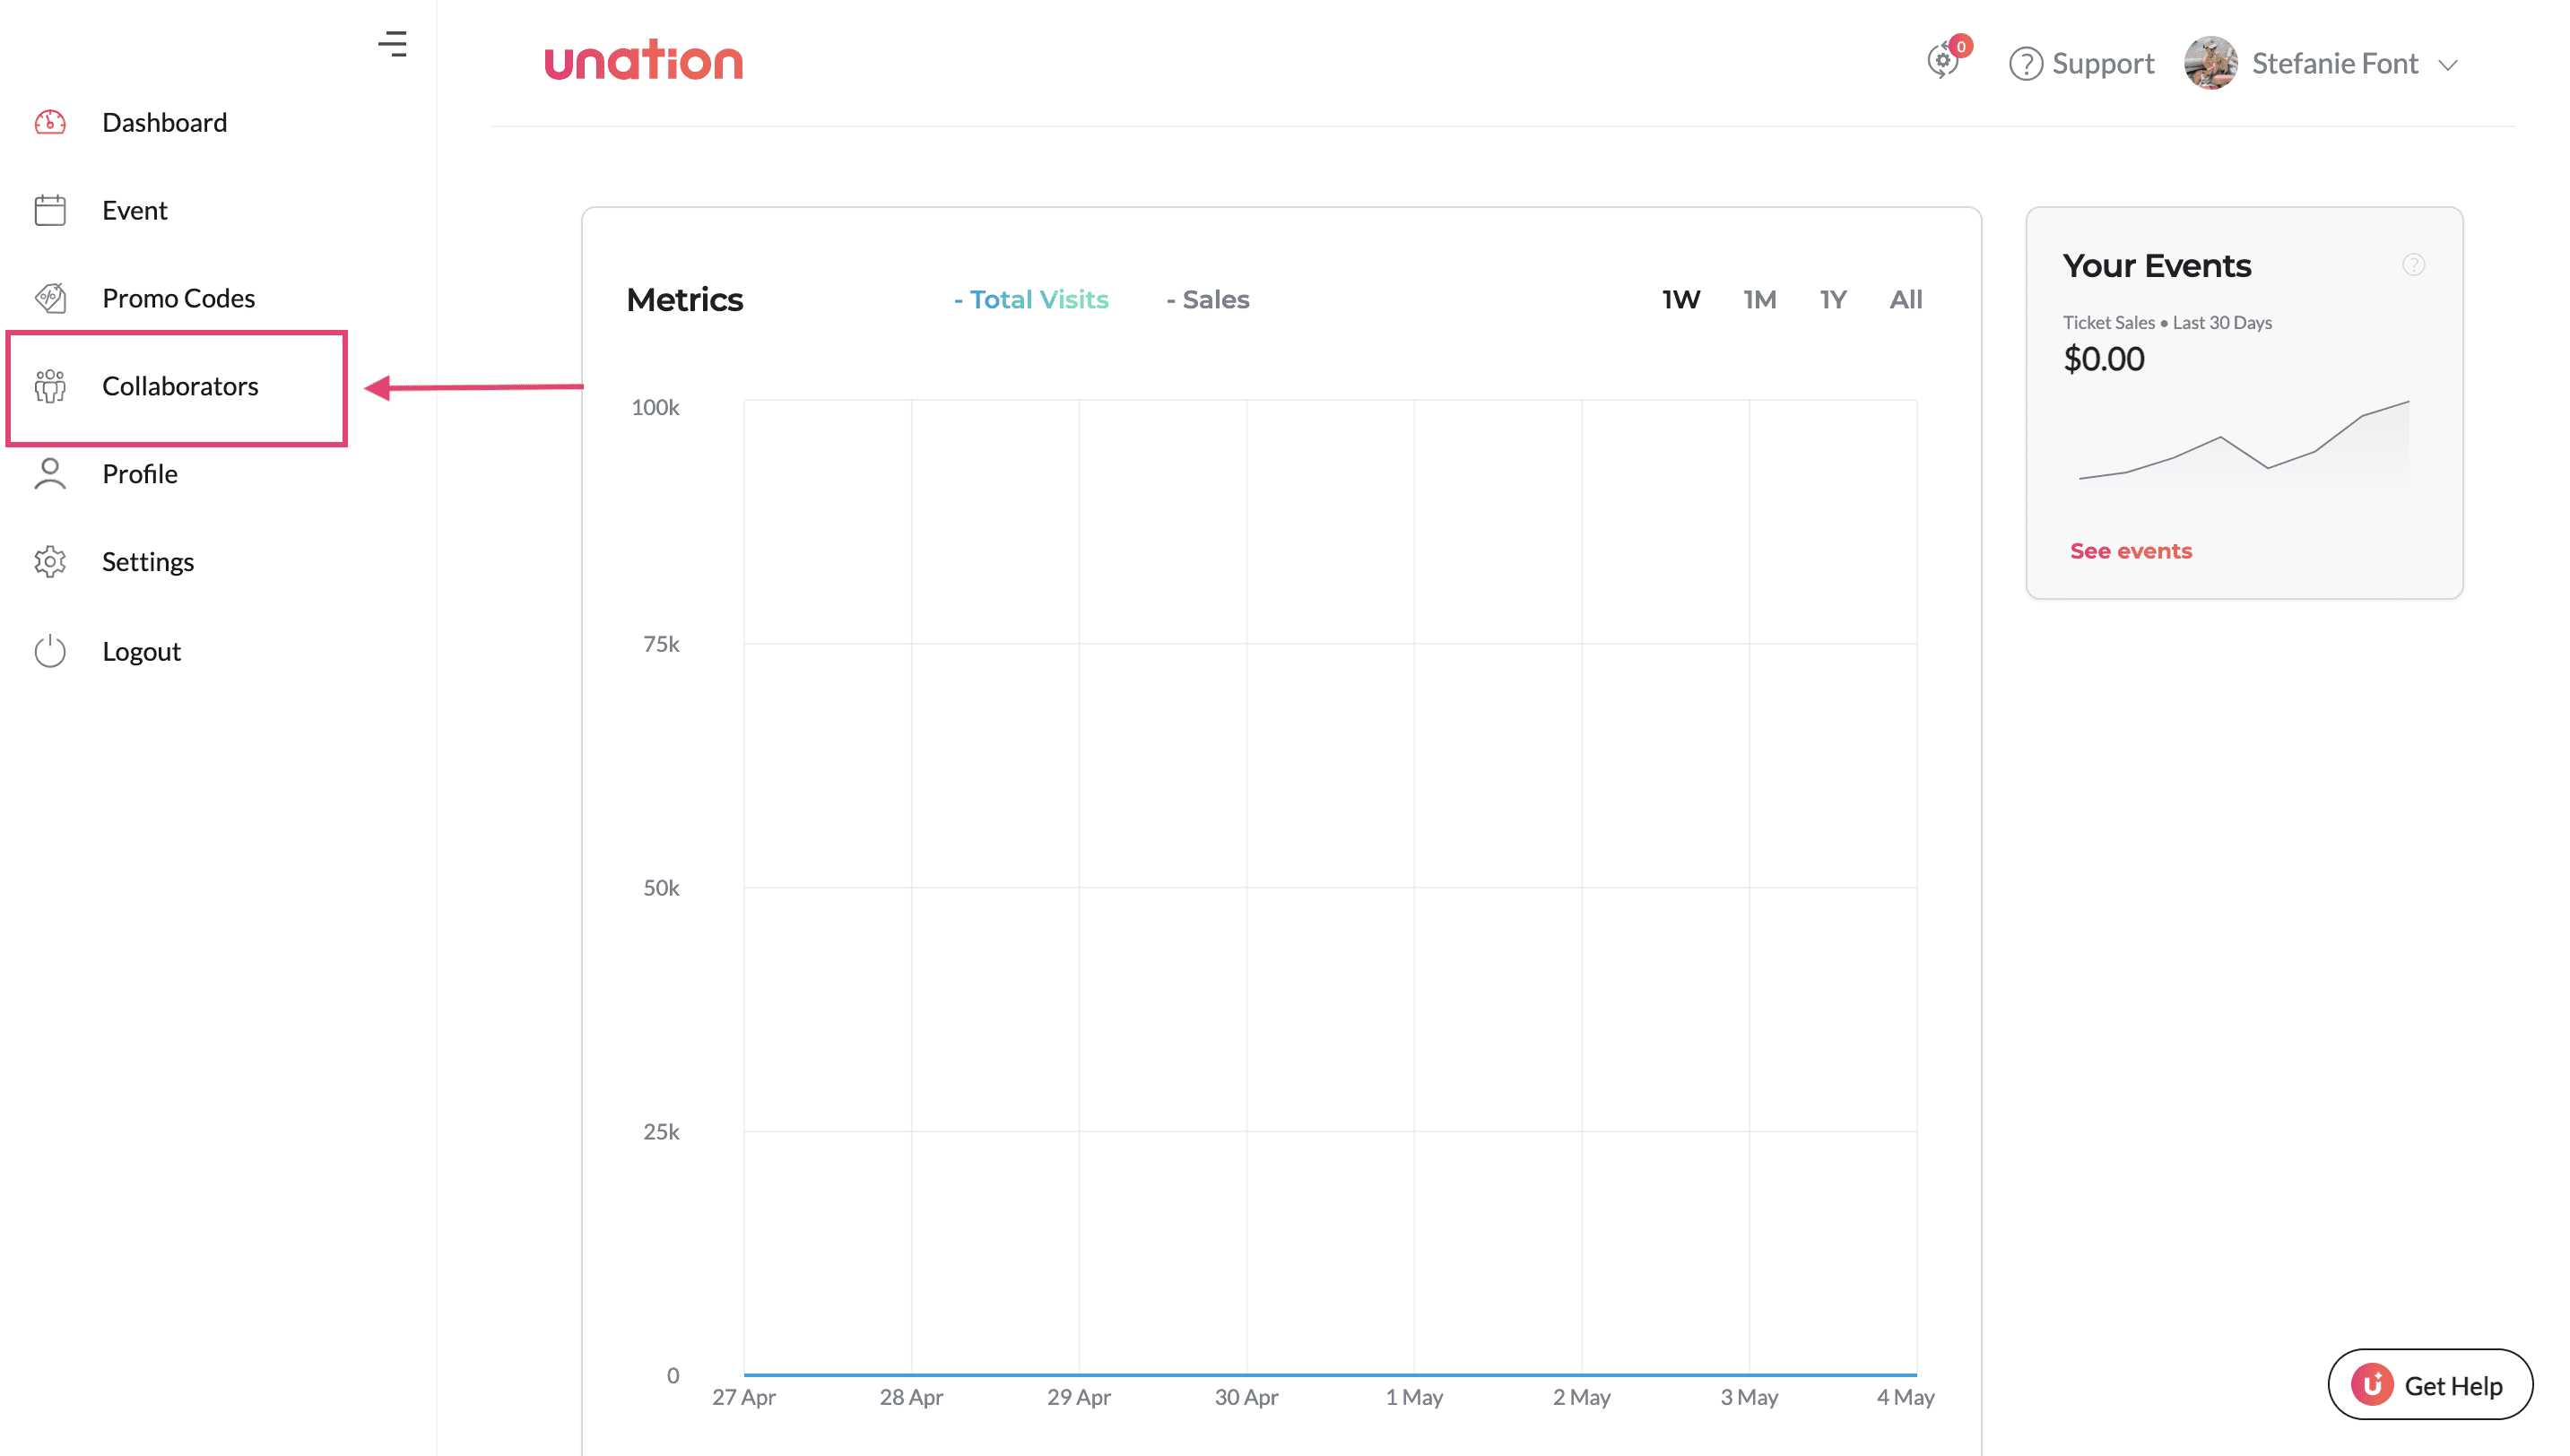
On the left hand menu, you'll want to select "Collaborators" to add and manage your new and existing members.

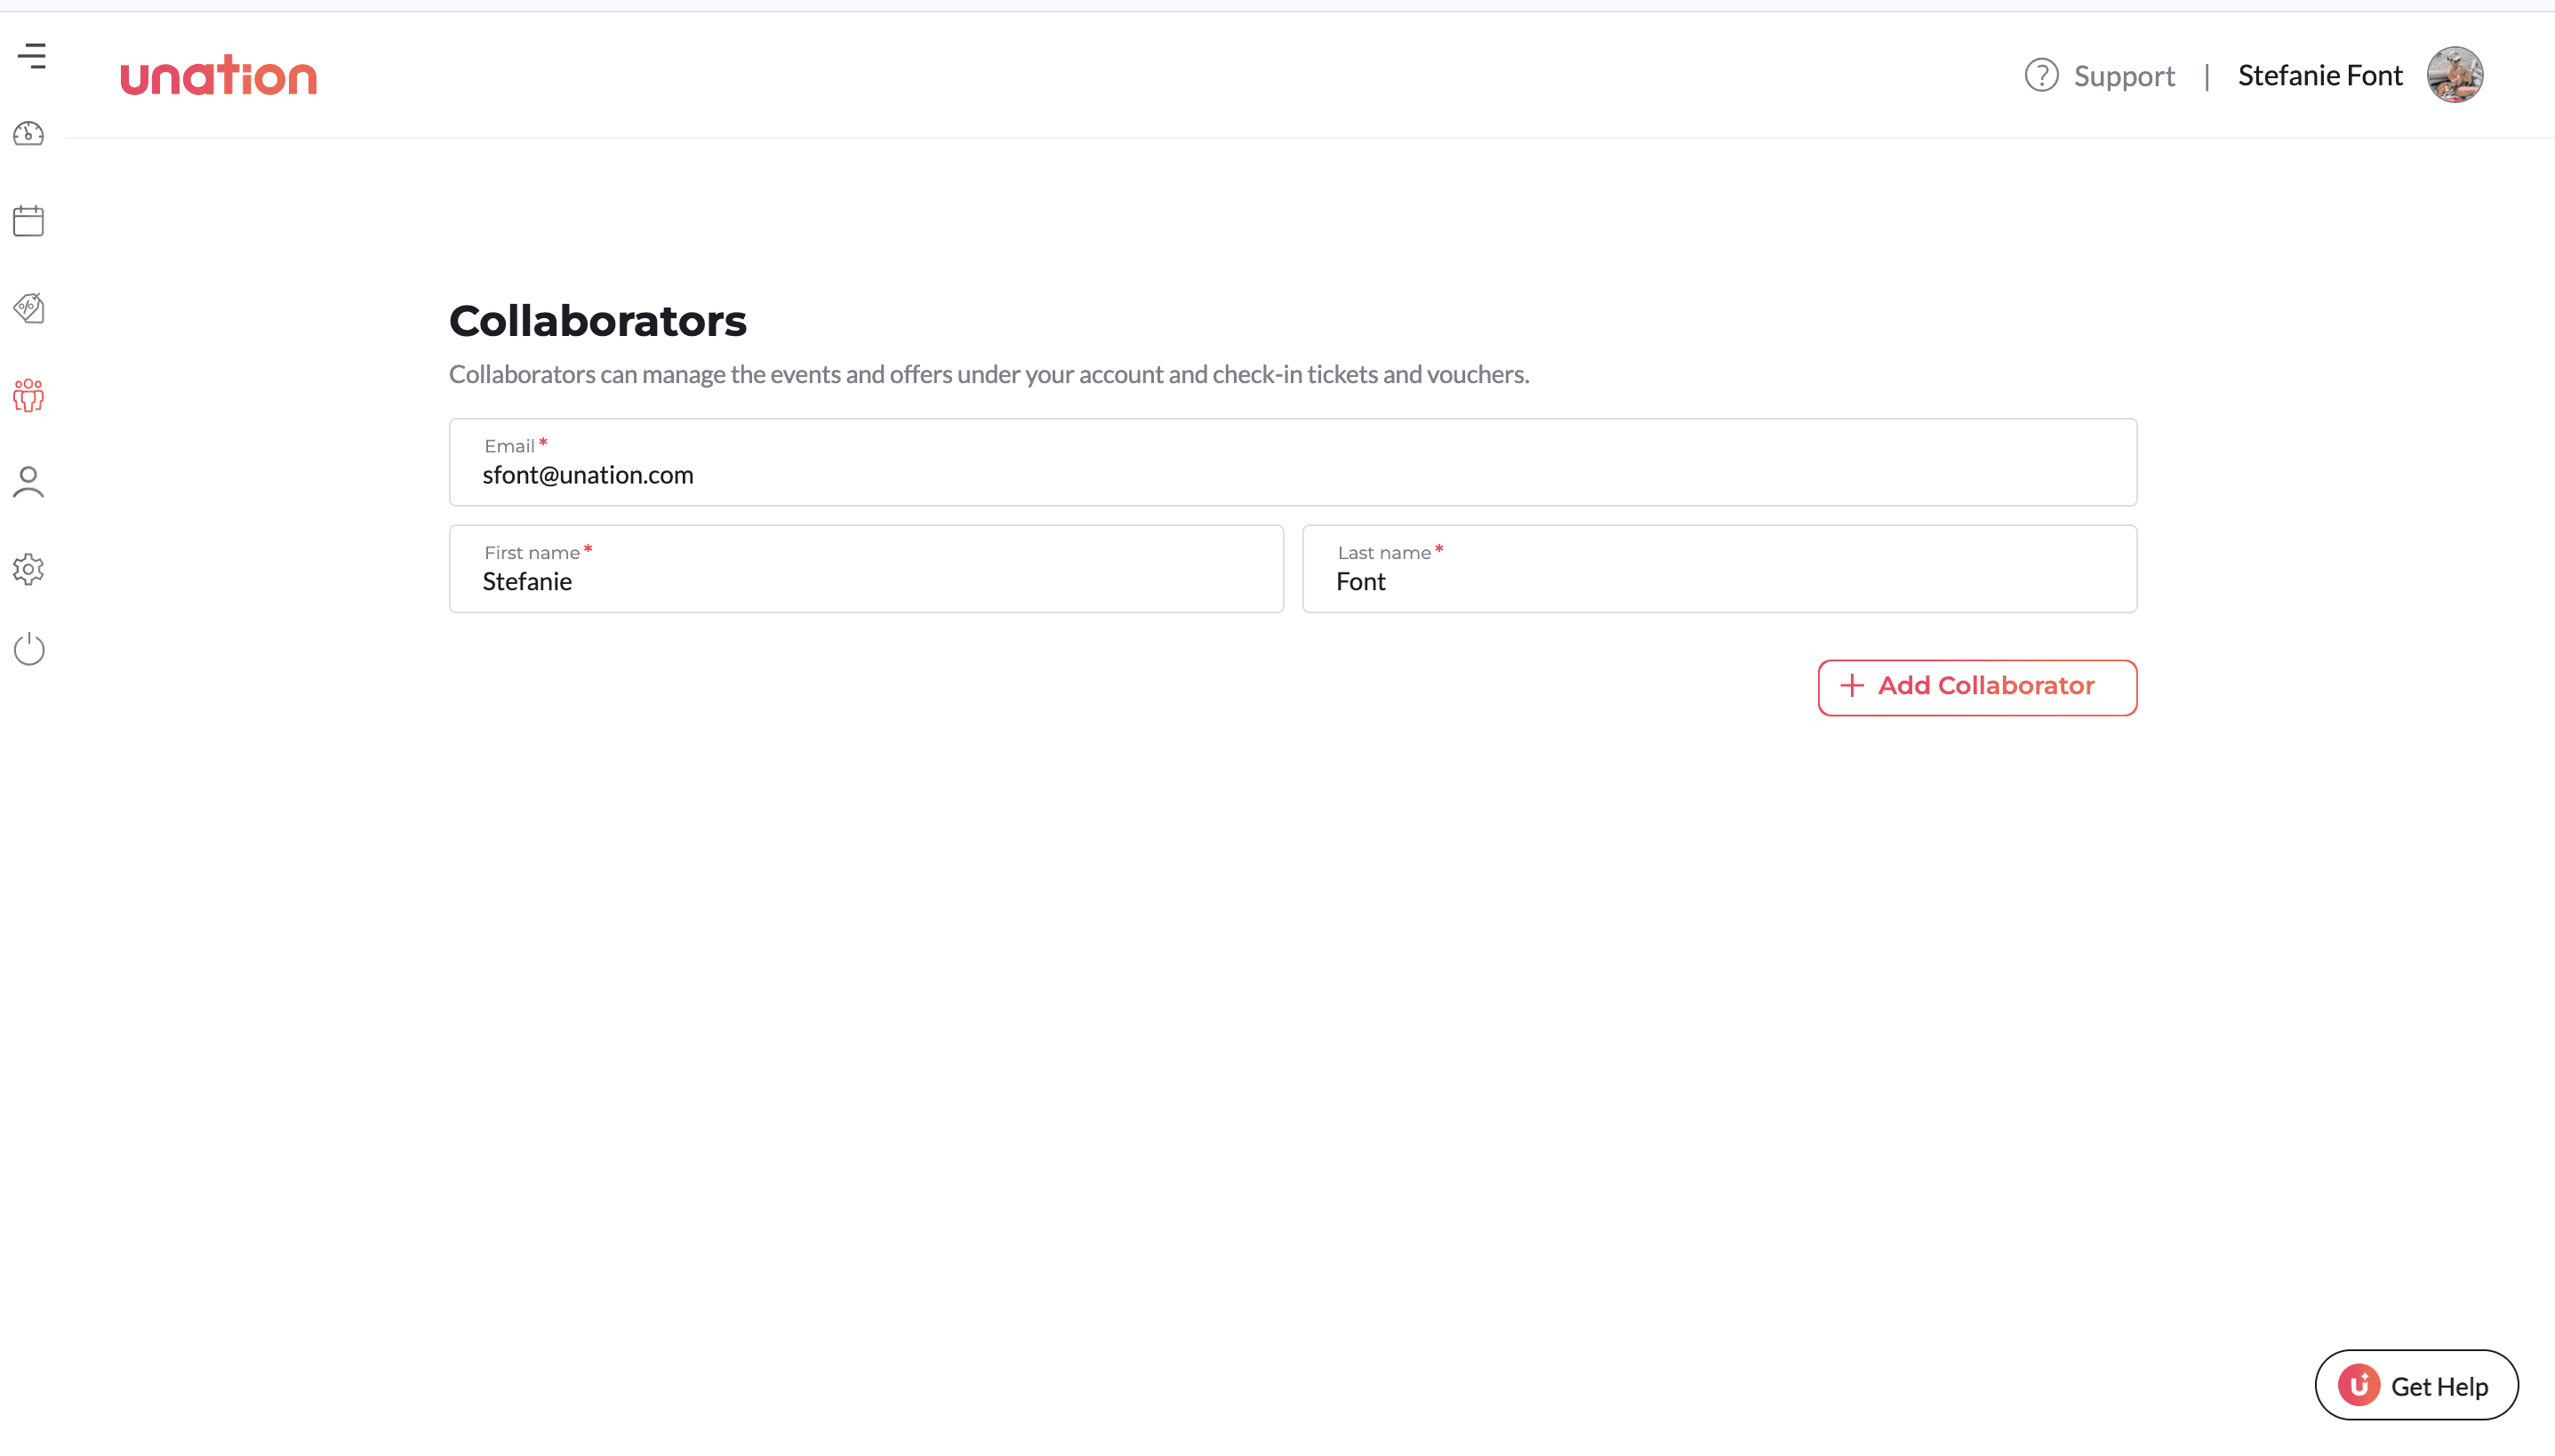
Once you're in the Collaborators page, you'll see empty fields for Email, First name, Last name, and Password. If you are adding a collaborator who does not have a UNATION account, you will need to create a password for them that they will receive in their invite email.
If the collaborator is an existing UNATION user, it will find their account and the Password field will disappear.
After you have typed in the information, you'll press the box in the bottom right titled "+ Collaborator"
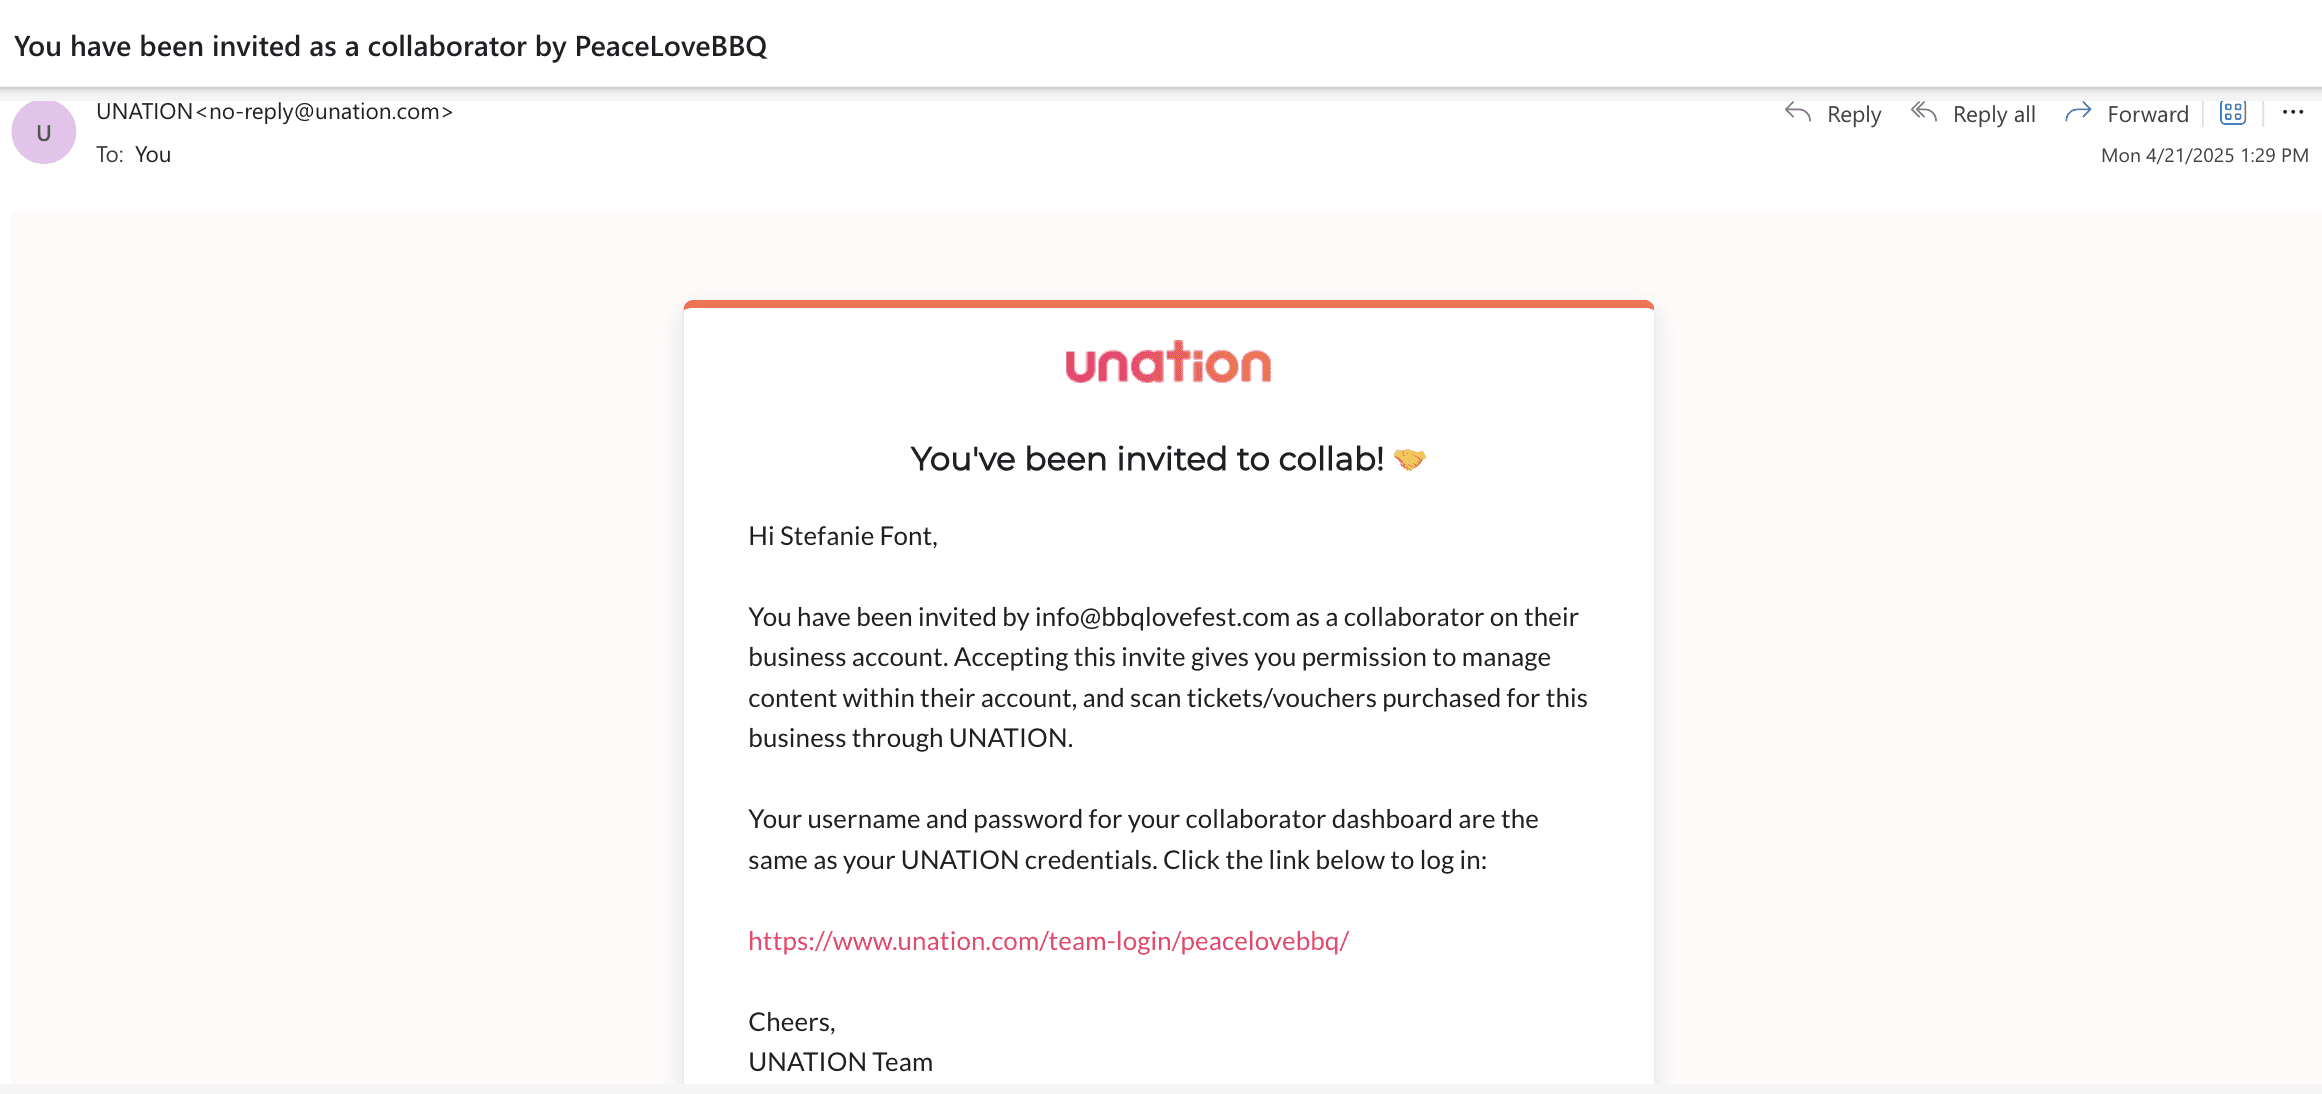
Pressing the "+ Collaborator" button will trigger an email to be sent to the collaborator letting them know they have been invited. If it's a new UNATION user, it will also include the password.
Once they click that link, they will have access to your events and Offers which, again, will give them the ability to help you check into events without comprimising your login information.
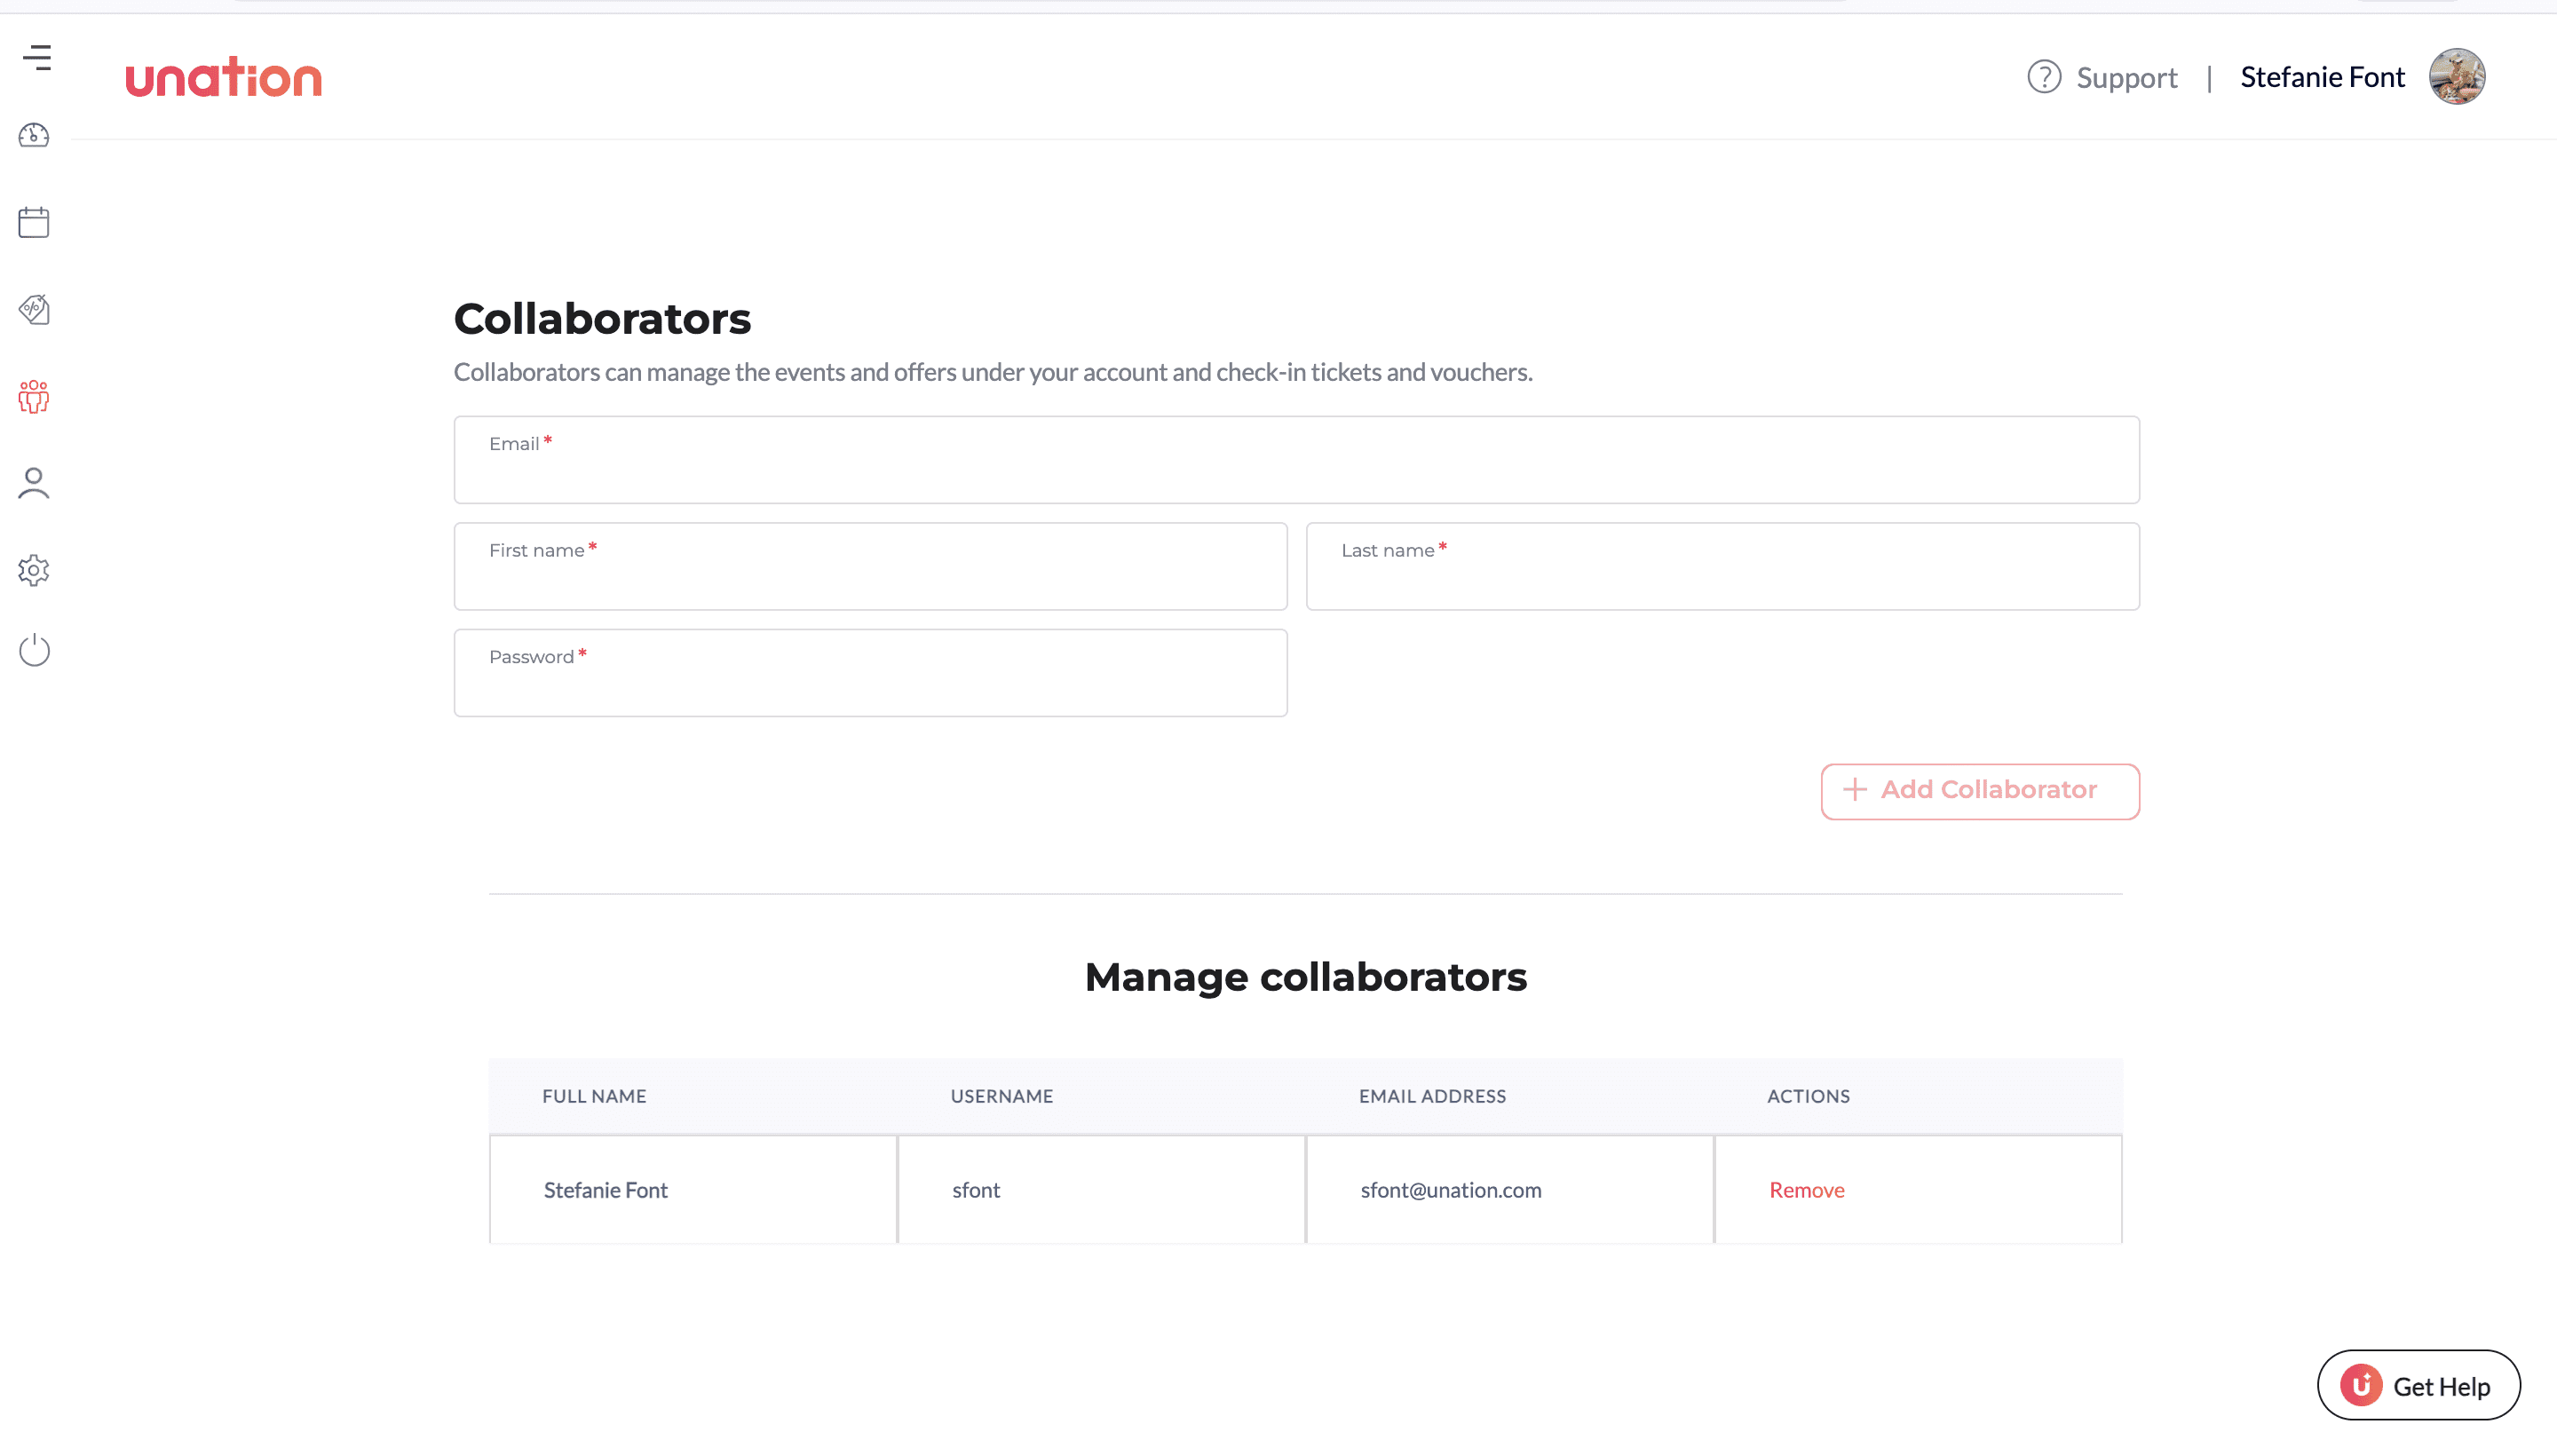
To manage collaborators, you will go to the same page where you add new ones. From here, you'll have visibility into all the collaborators on your account and can remove anyone who is no longer part of your team.
Ticketing Check-in
Aside from the ticket check in options mentioned in the "manage event" portion of this article which are ticketing check-in options within each event, there are several other ways to check guests in if you're using UNATION's ticketing platform. Please continue reading to learn the different ways and decide what method is best for you, your event, and your team.
Before getting started:
Determine if you will be using the UNATION app or desktop to check guests into your event.
Make sure your devices are charged and you have access to WiFi or Data.
Ensure you and all volunteers are logged into your UNATION account or set up as Collaborators.
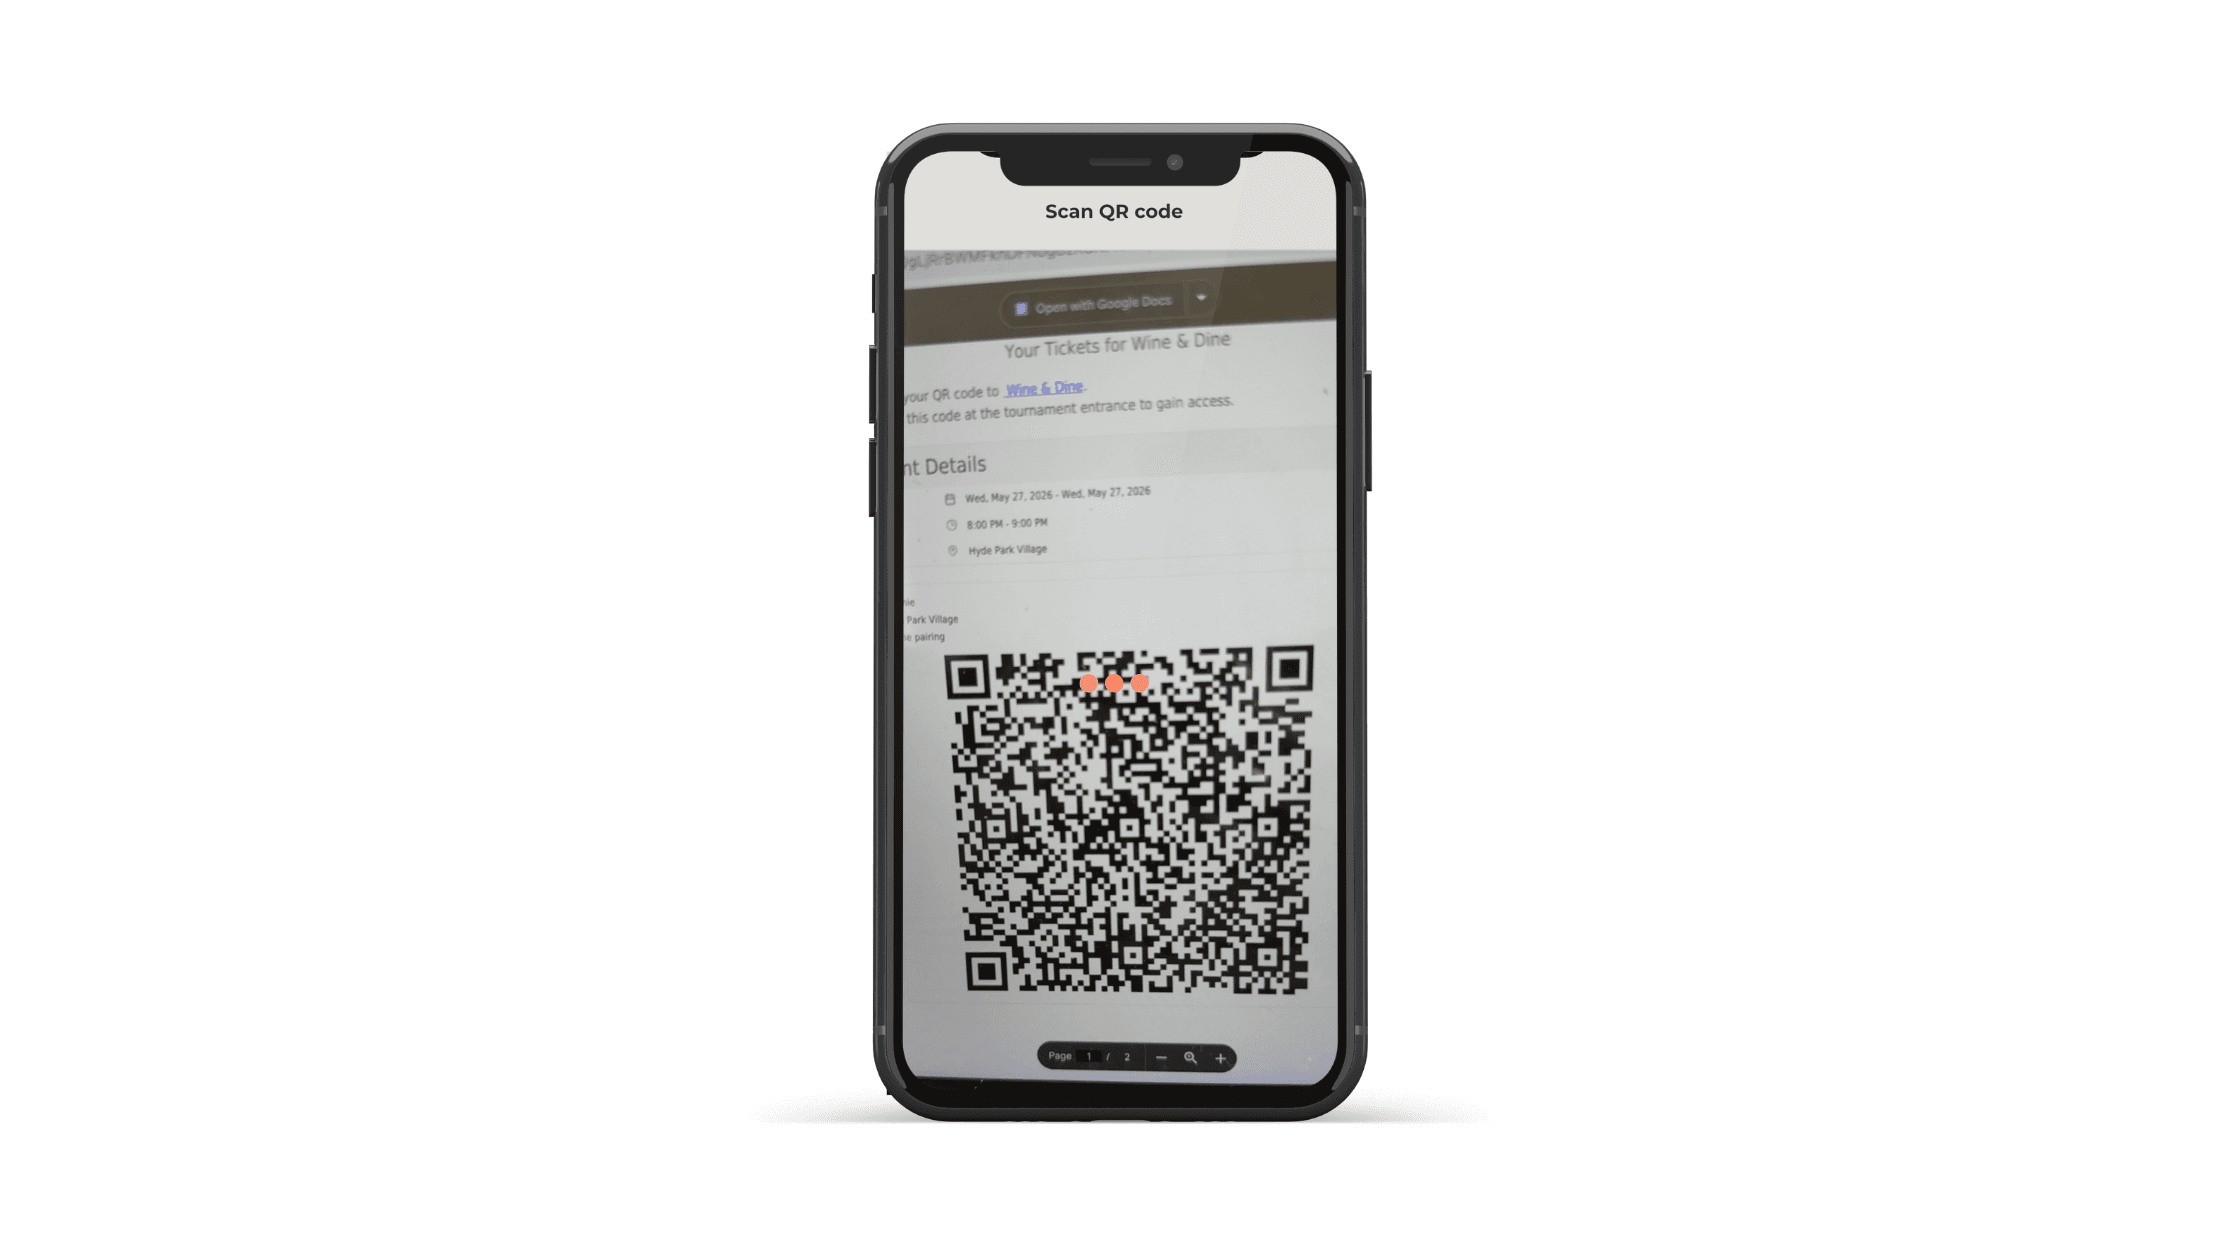
Mobile app scanning QR code
Open your UNATION app, and select the "My App" icon on the bottom menu.
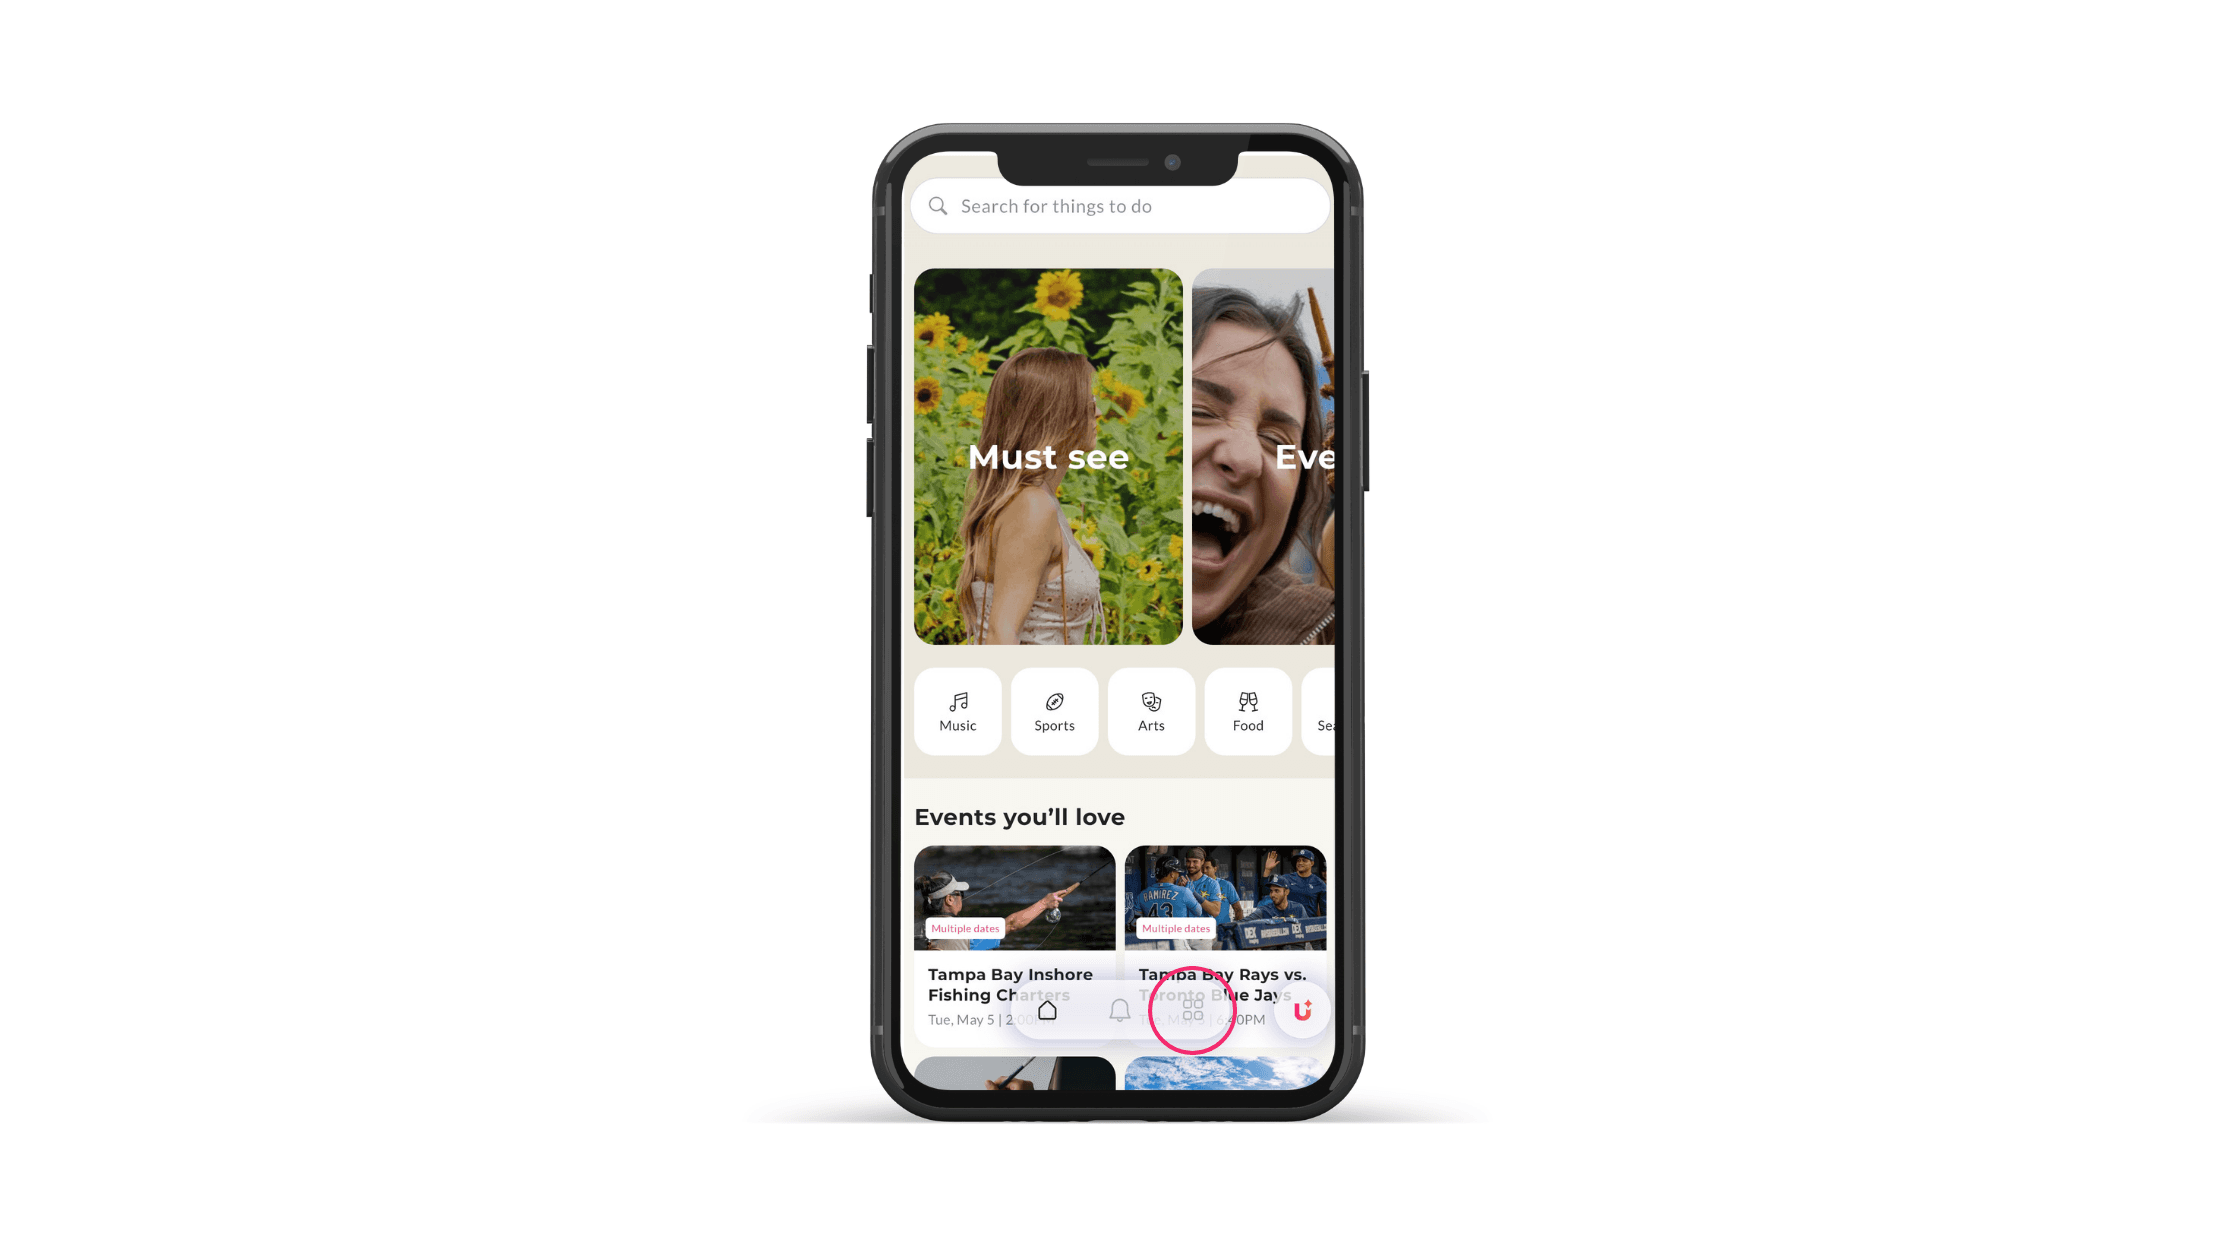
Select the "Scan QR Code" icon.

The camera will open up, and you'll simply point it at the QR code, press done, and you're all set!
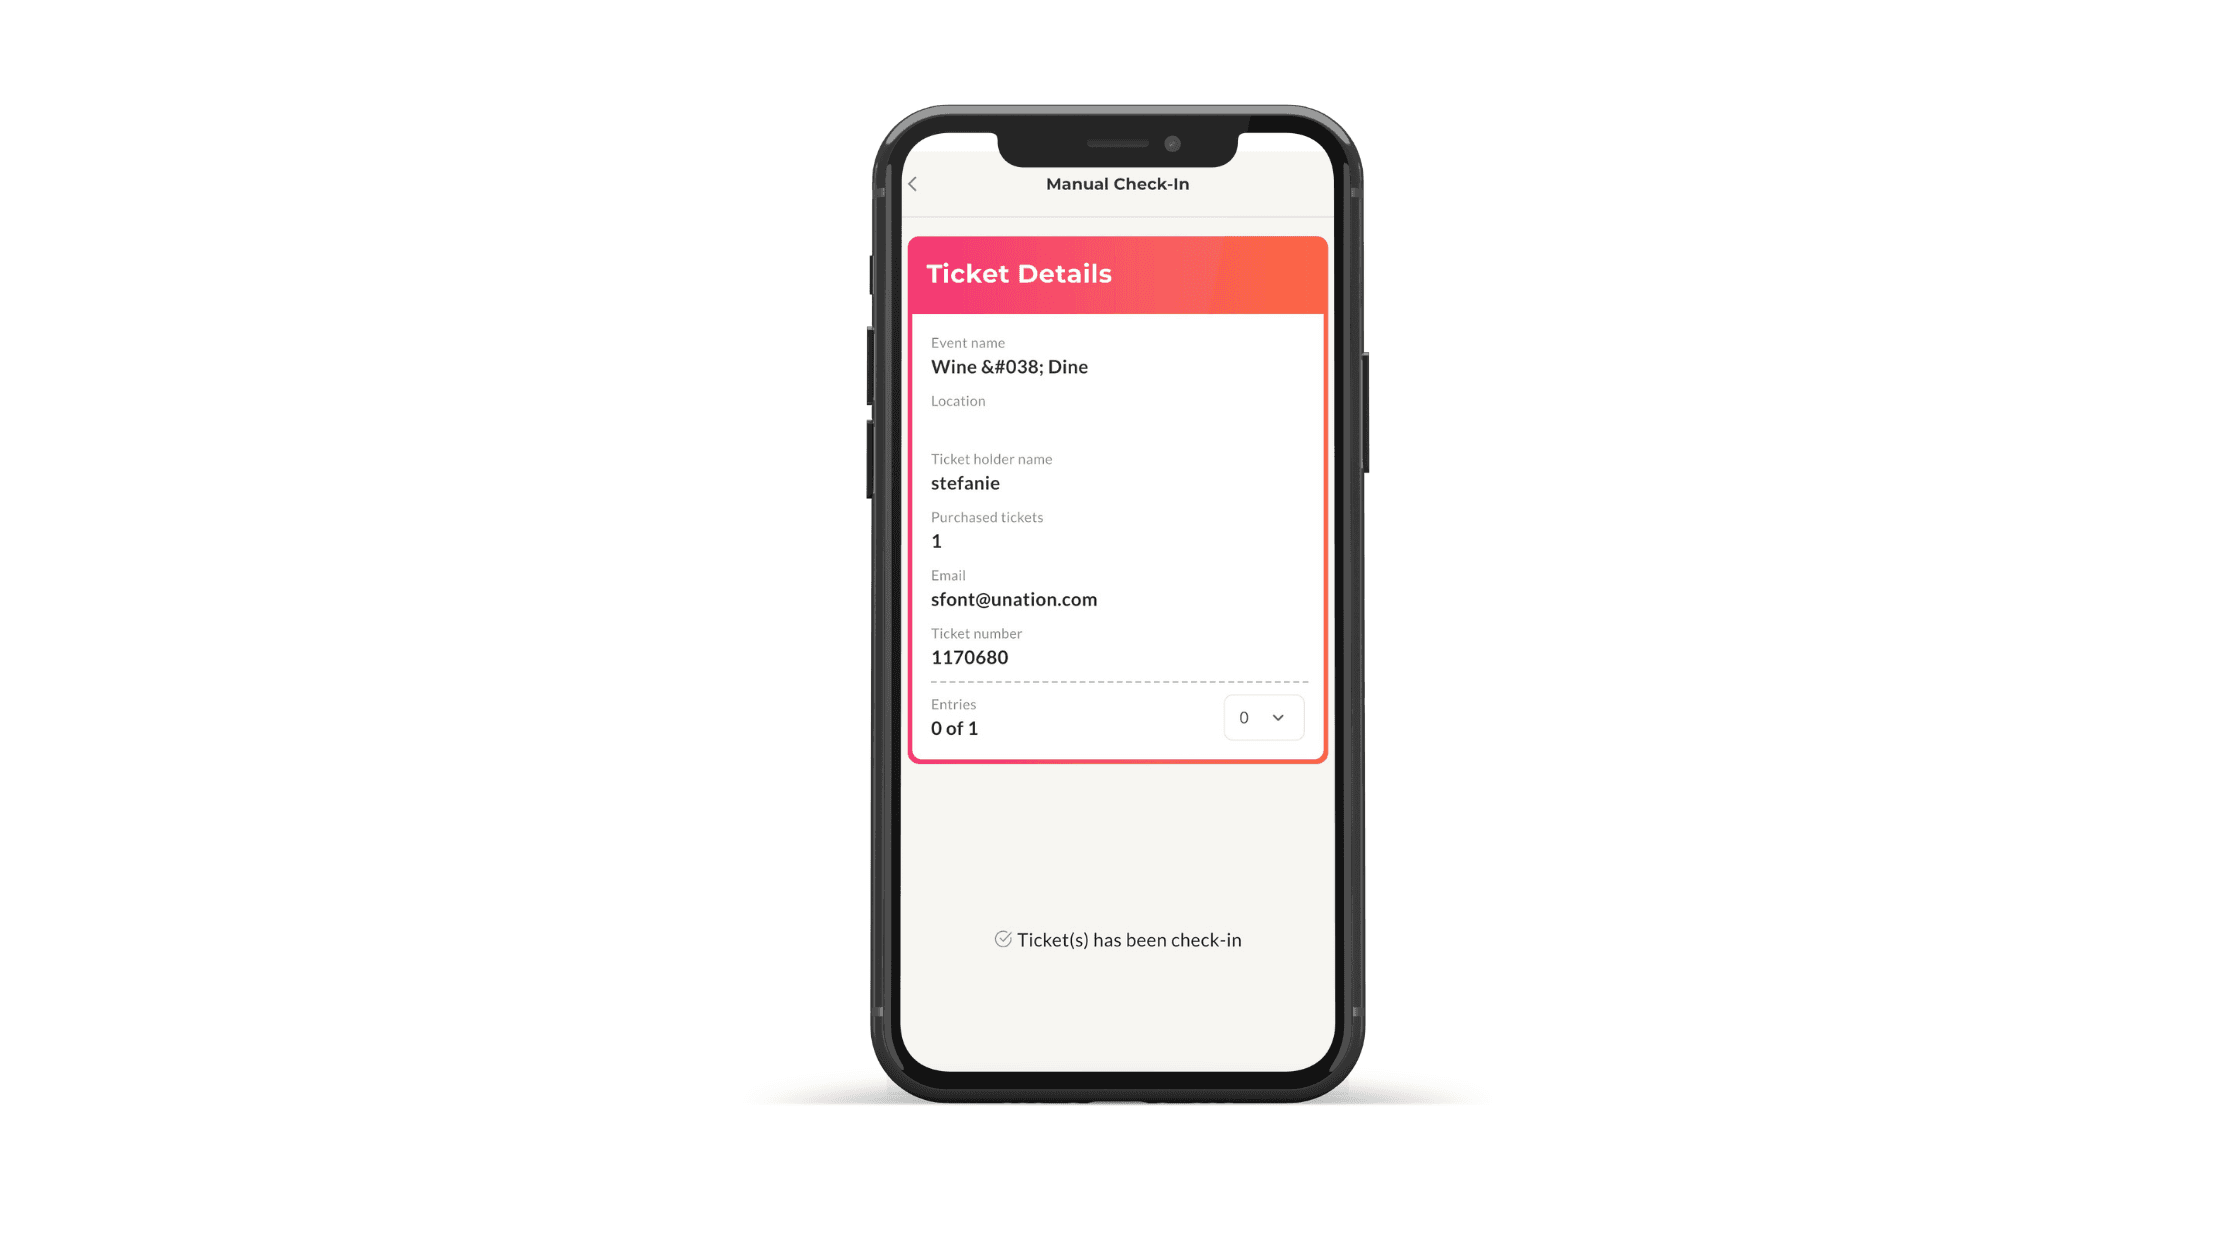
Mobile app manual check-in
Open your UNATION app, and select the "My App" icon on the bottom menu.
Select "Manual Check-In" icon.
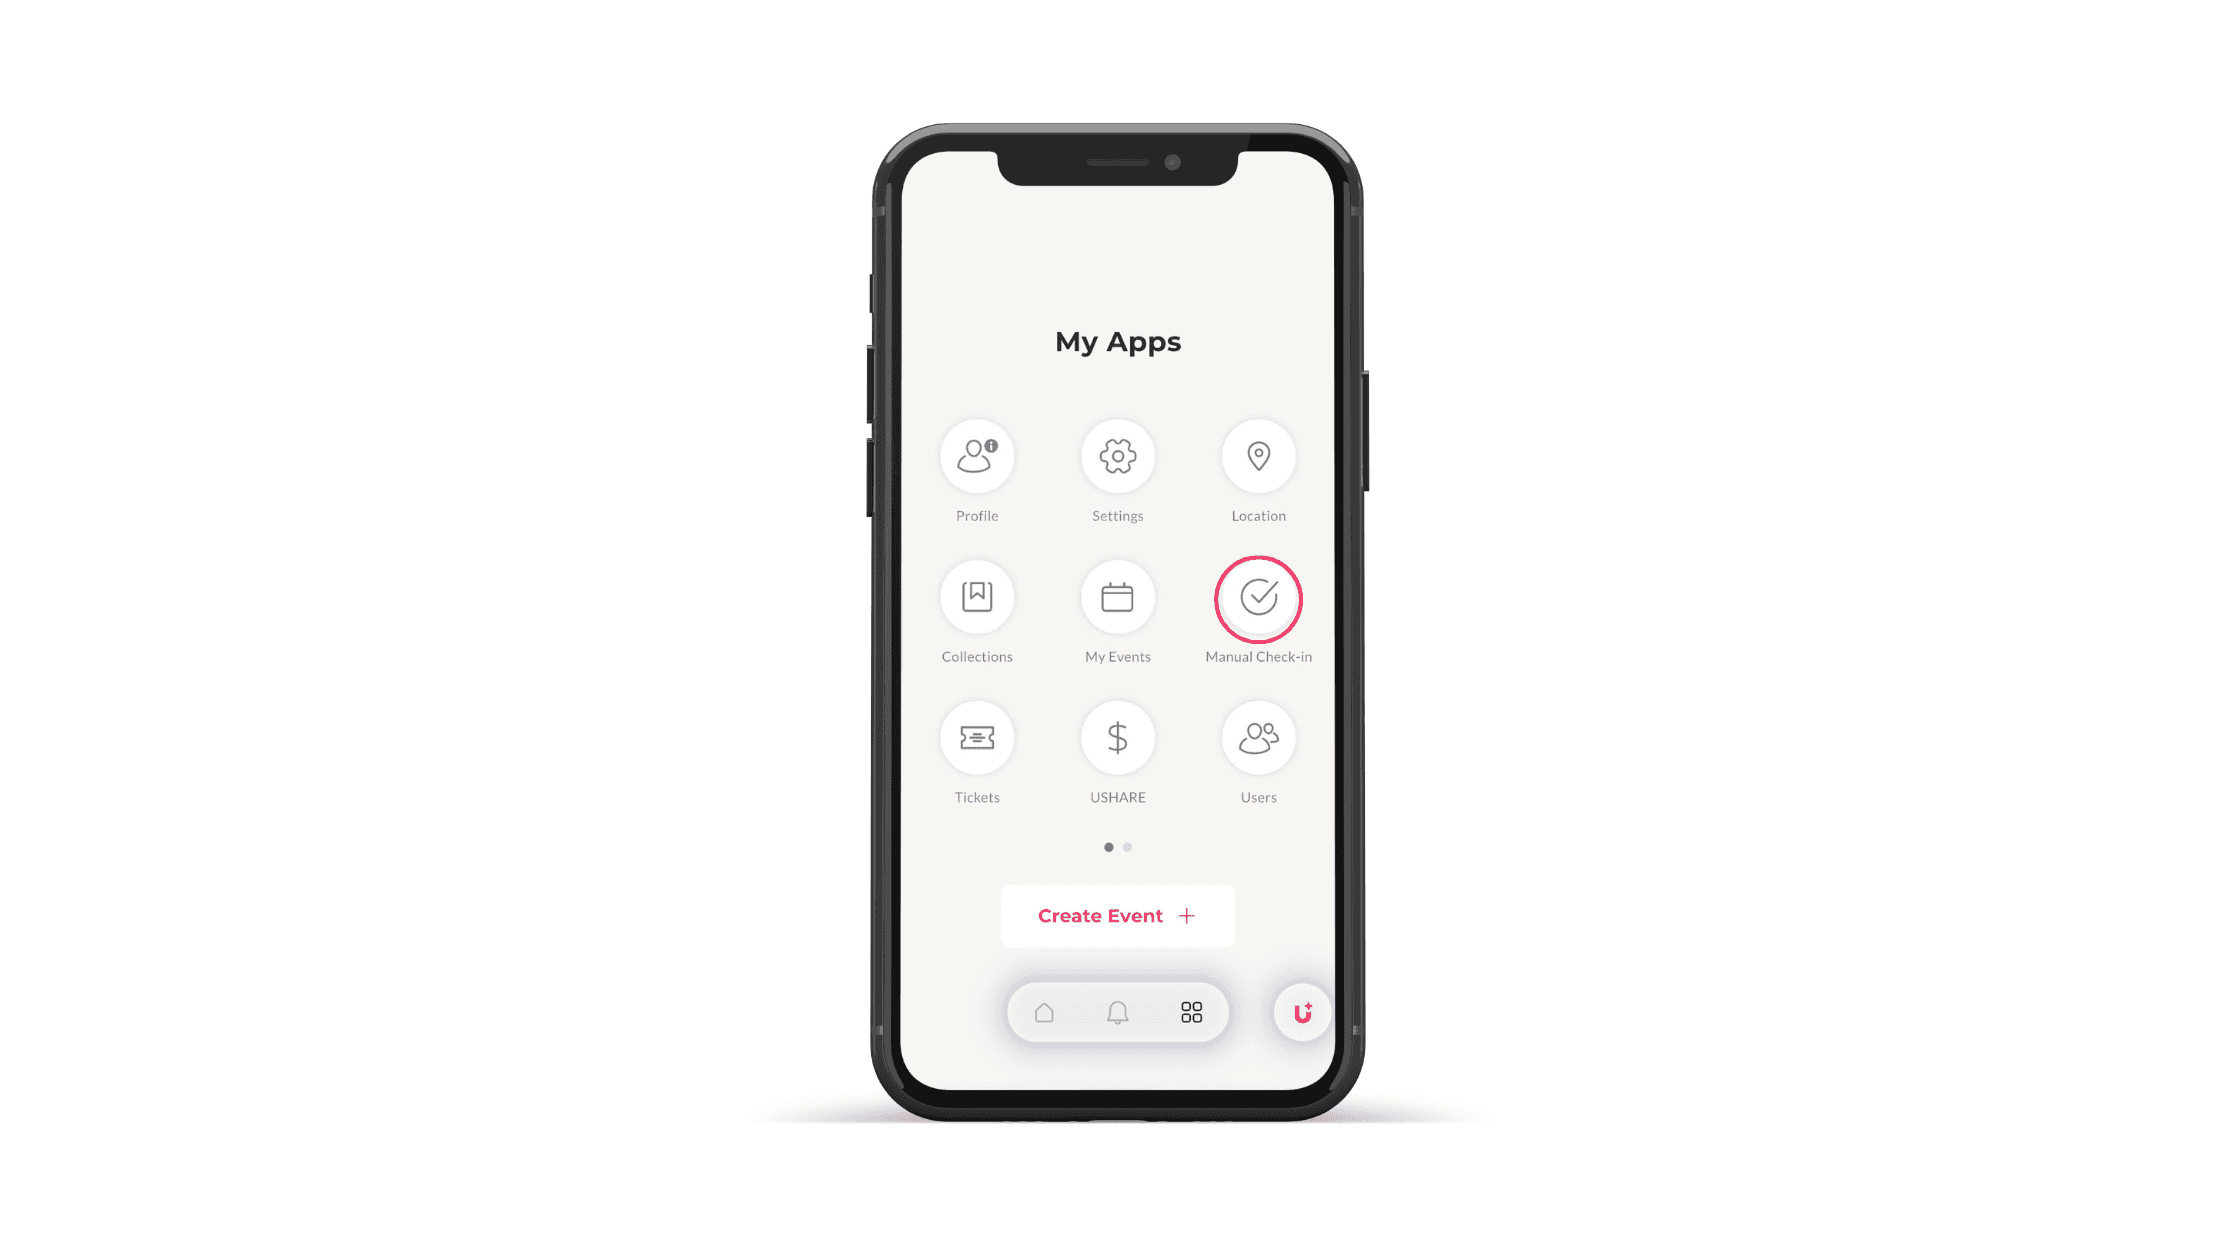
Search for the ticket by either typing in their email, name or ticket number.
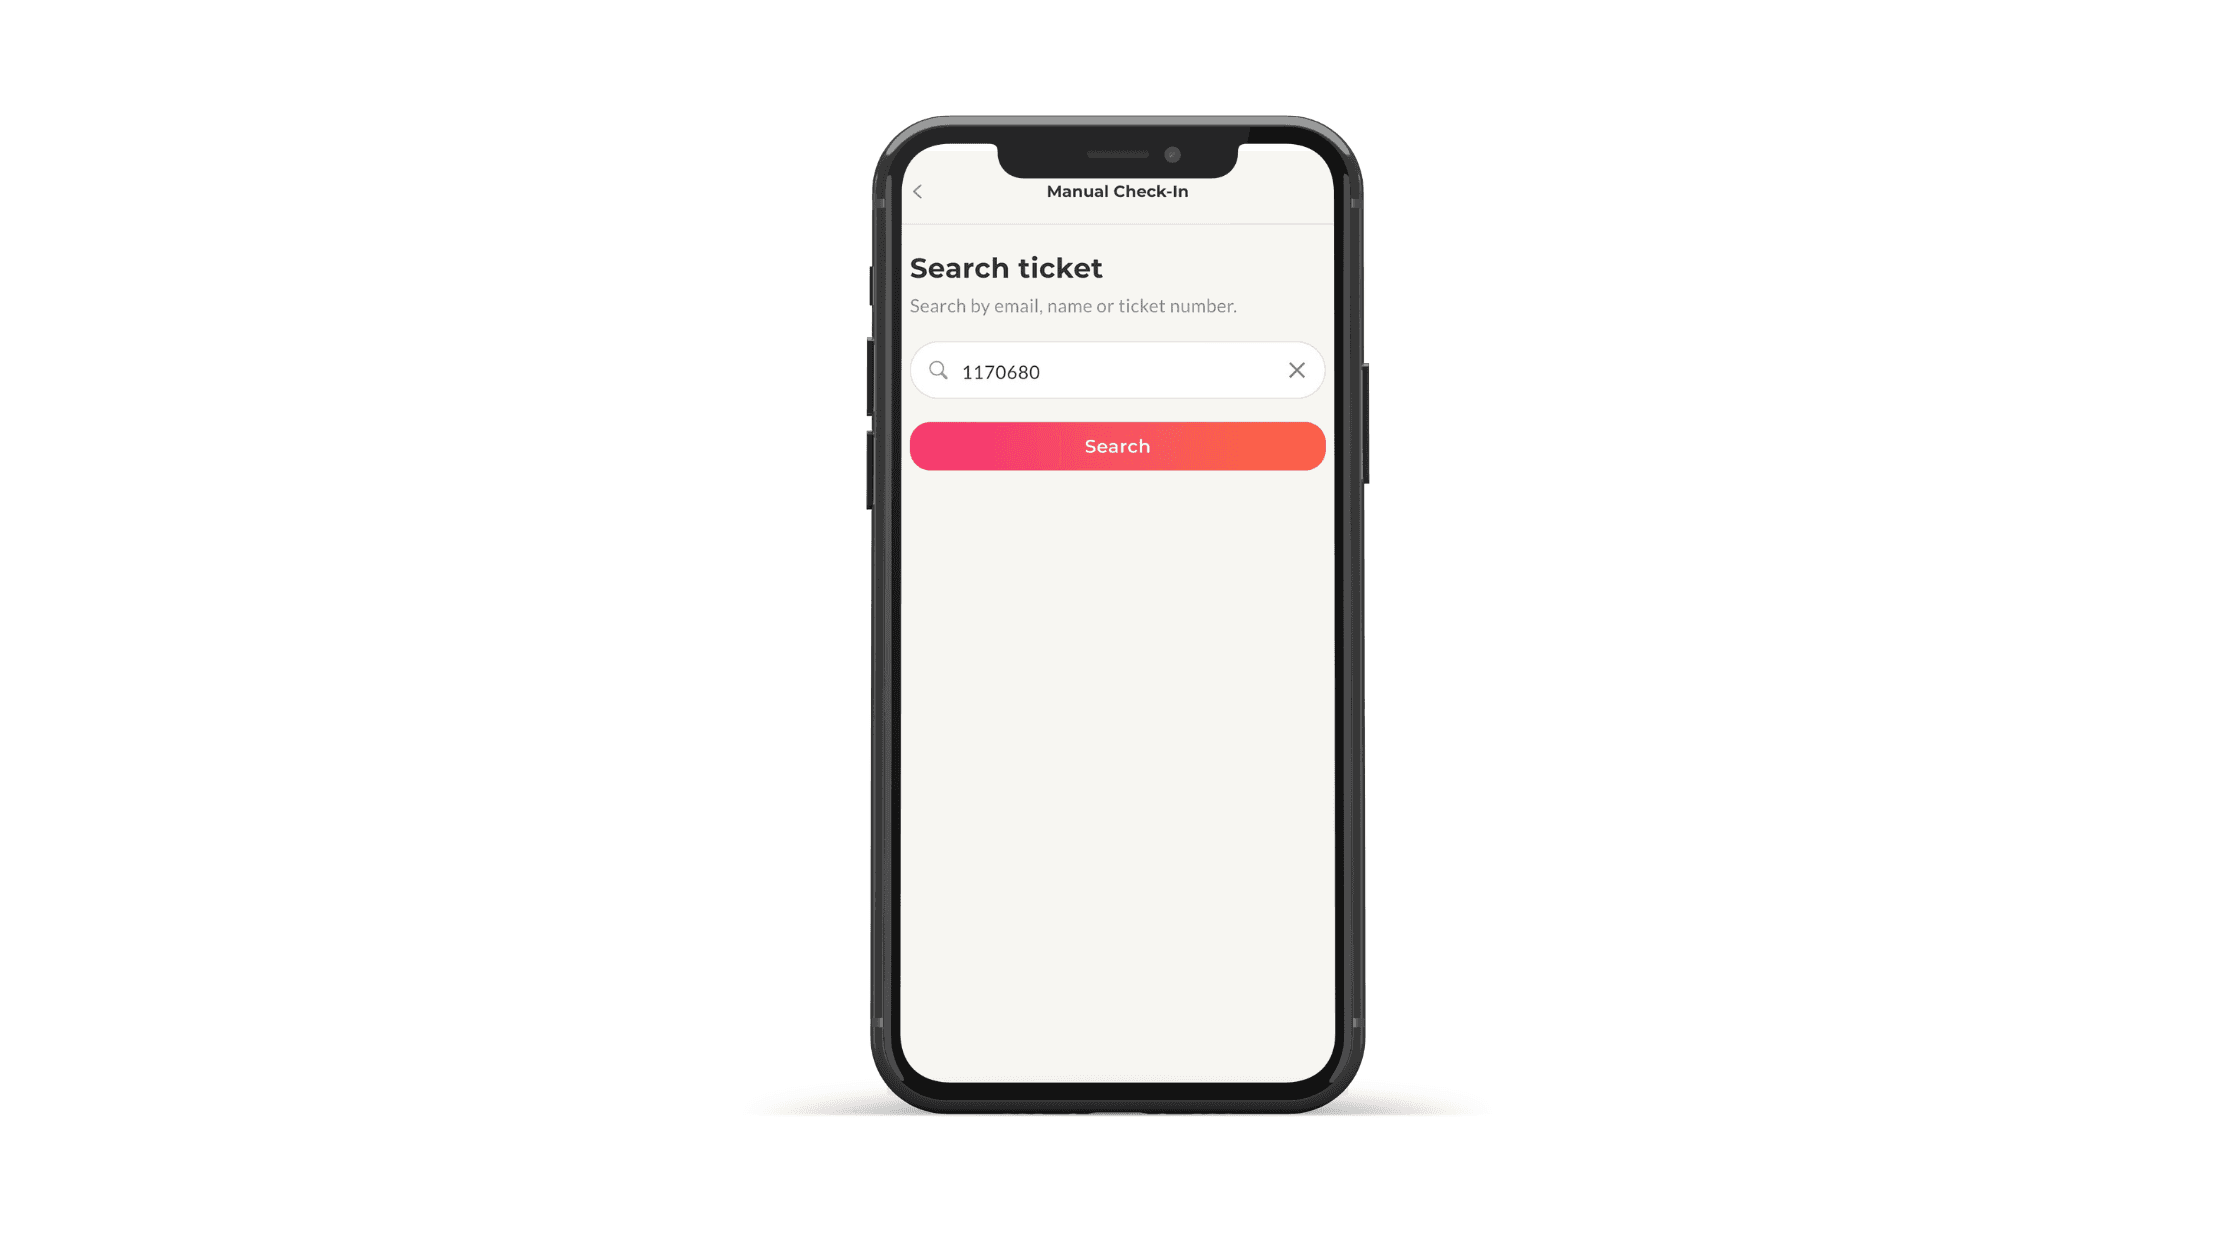
These attendees have officially been checked into the event, and you can move on to the next guests!
Desktop
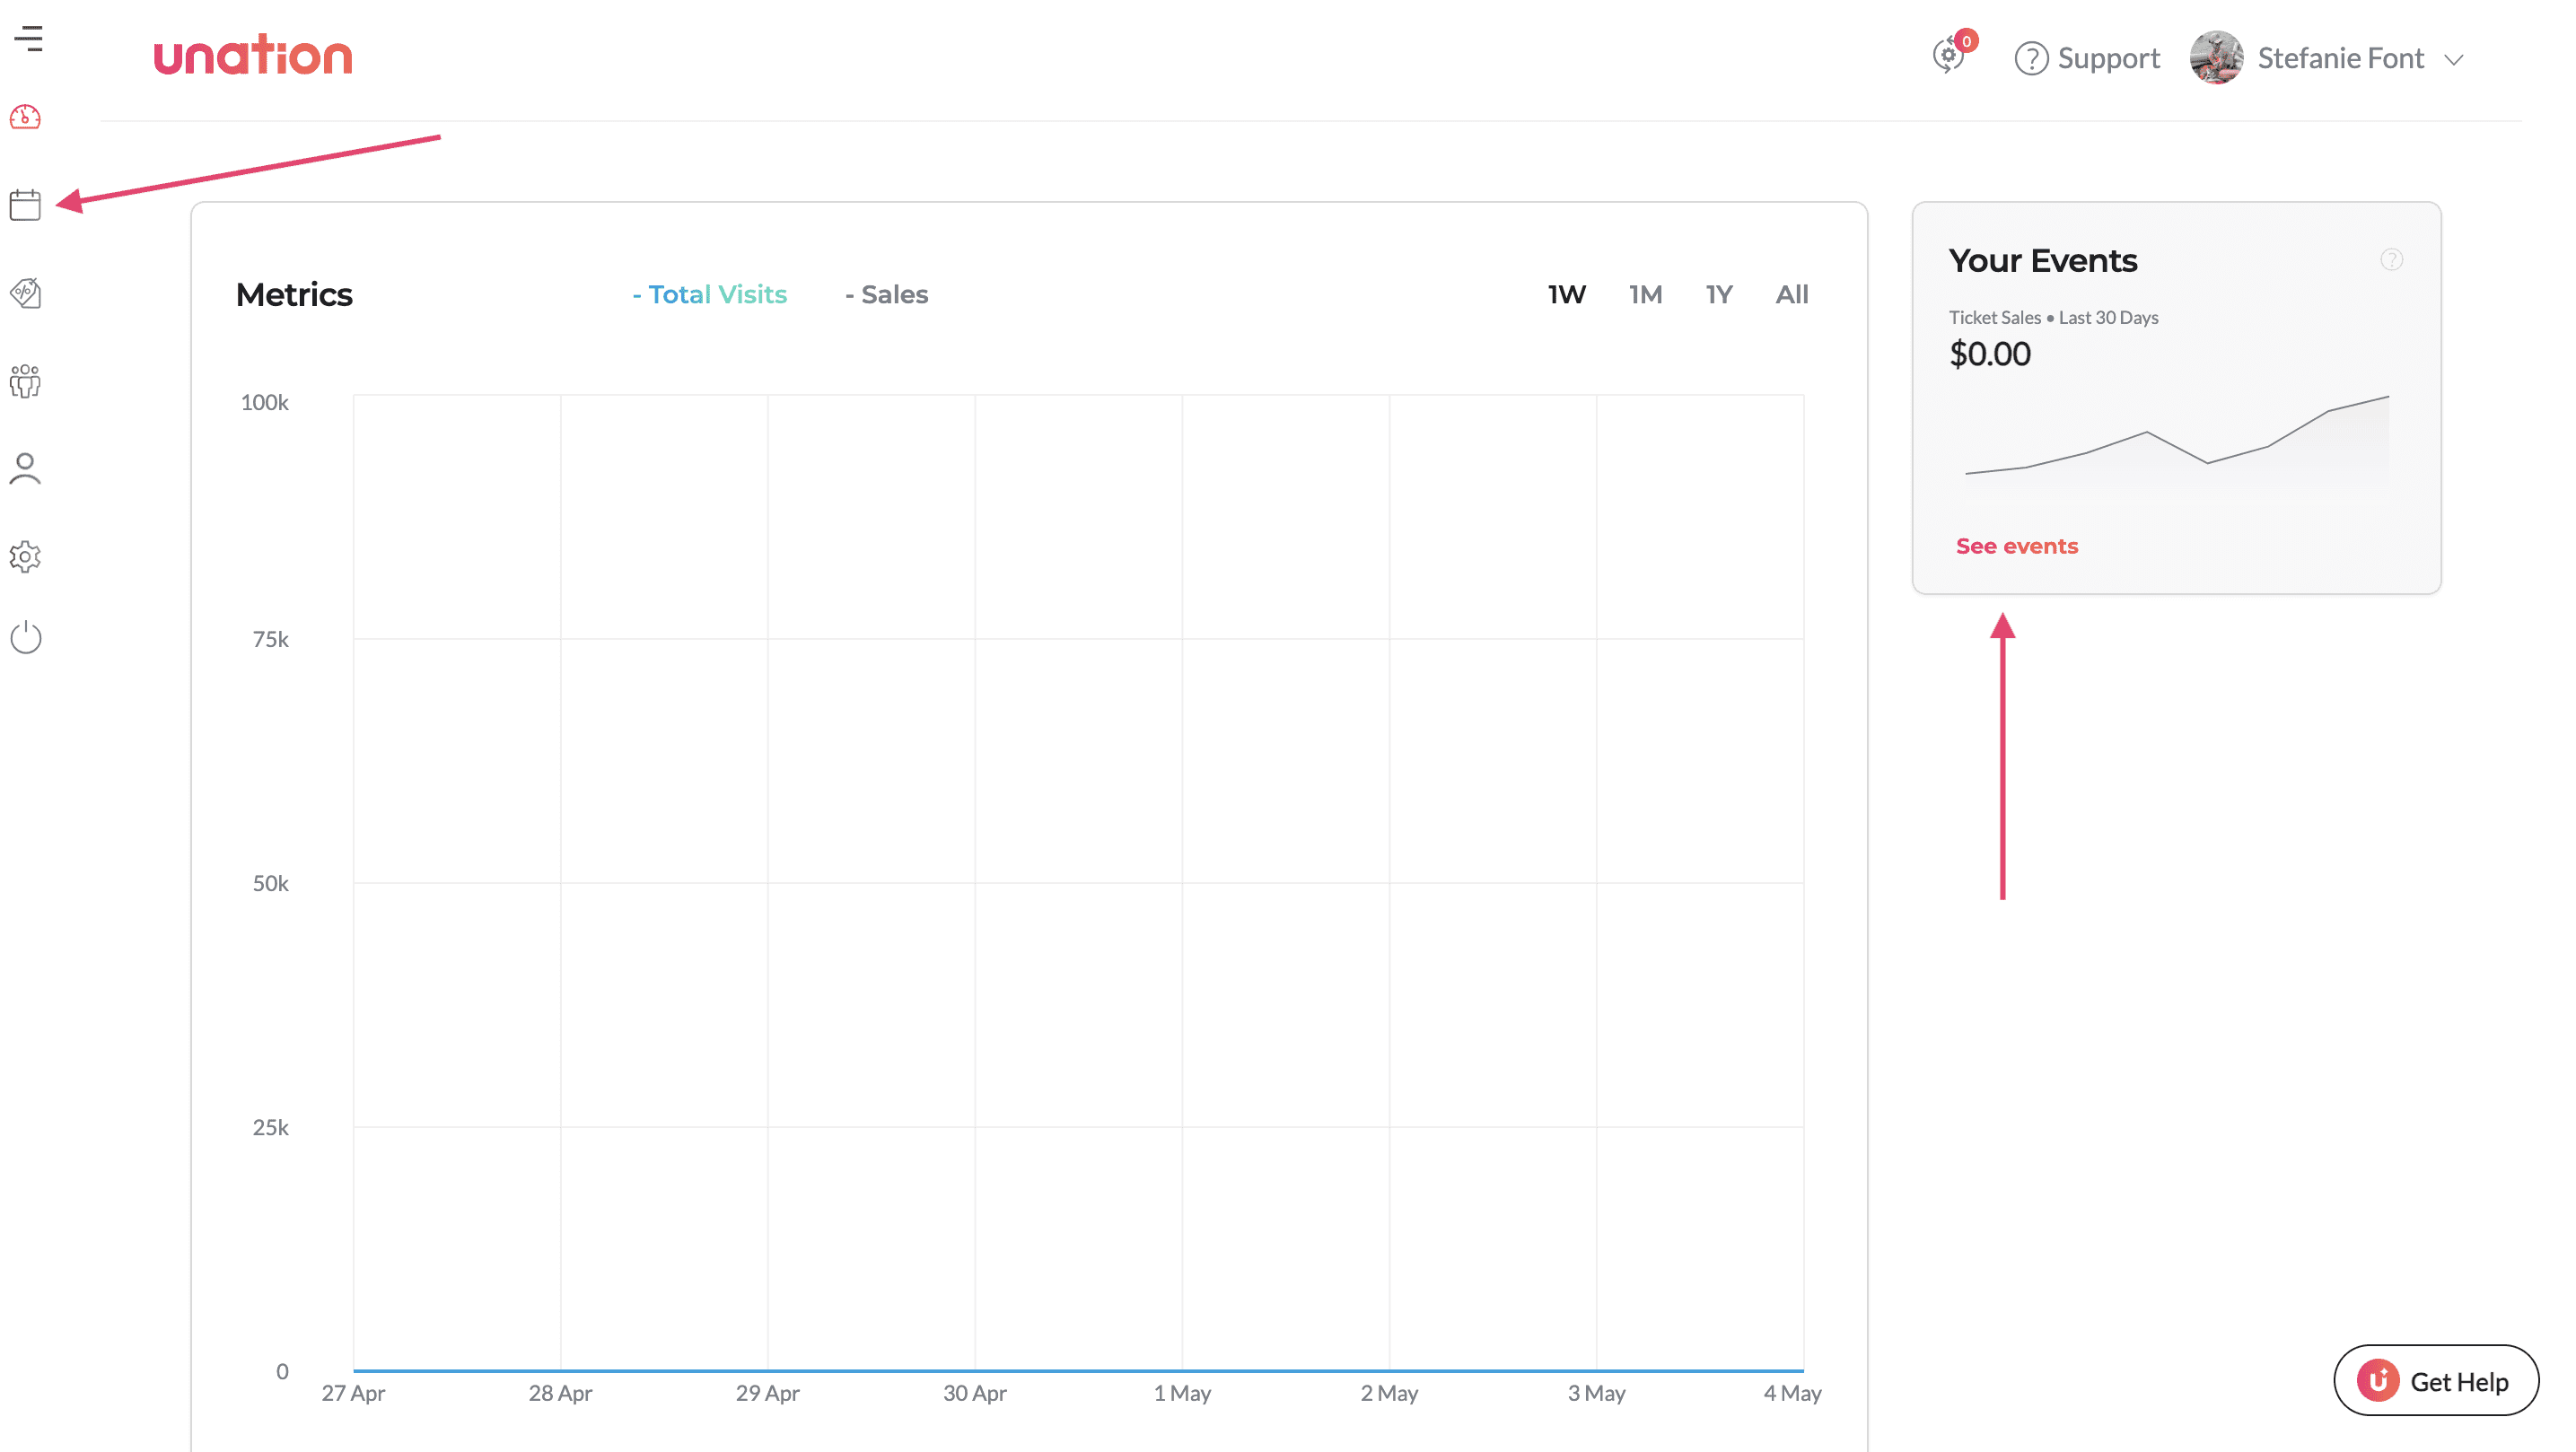
Log into your UNATION dashboard, and select "See events" on the right hand side or the "events" icon on the left hand menu
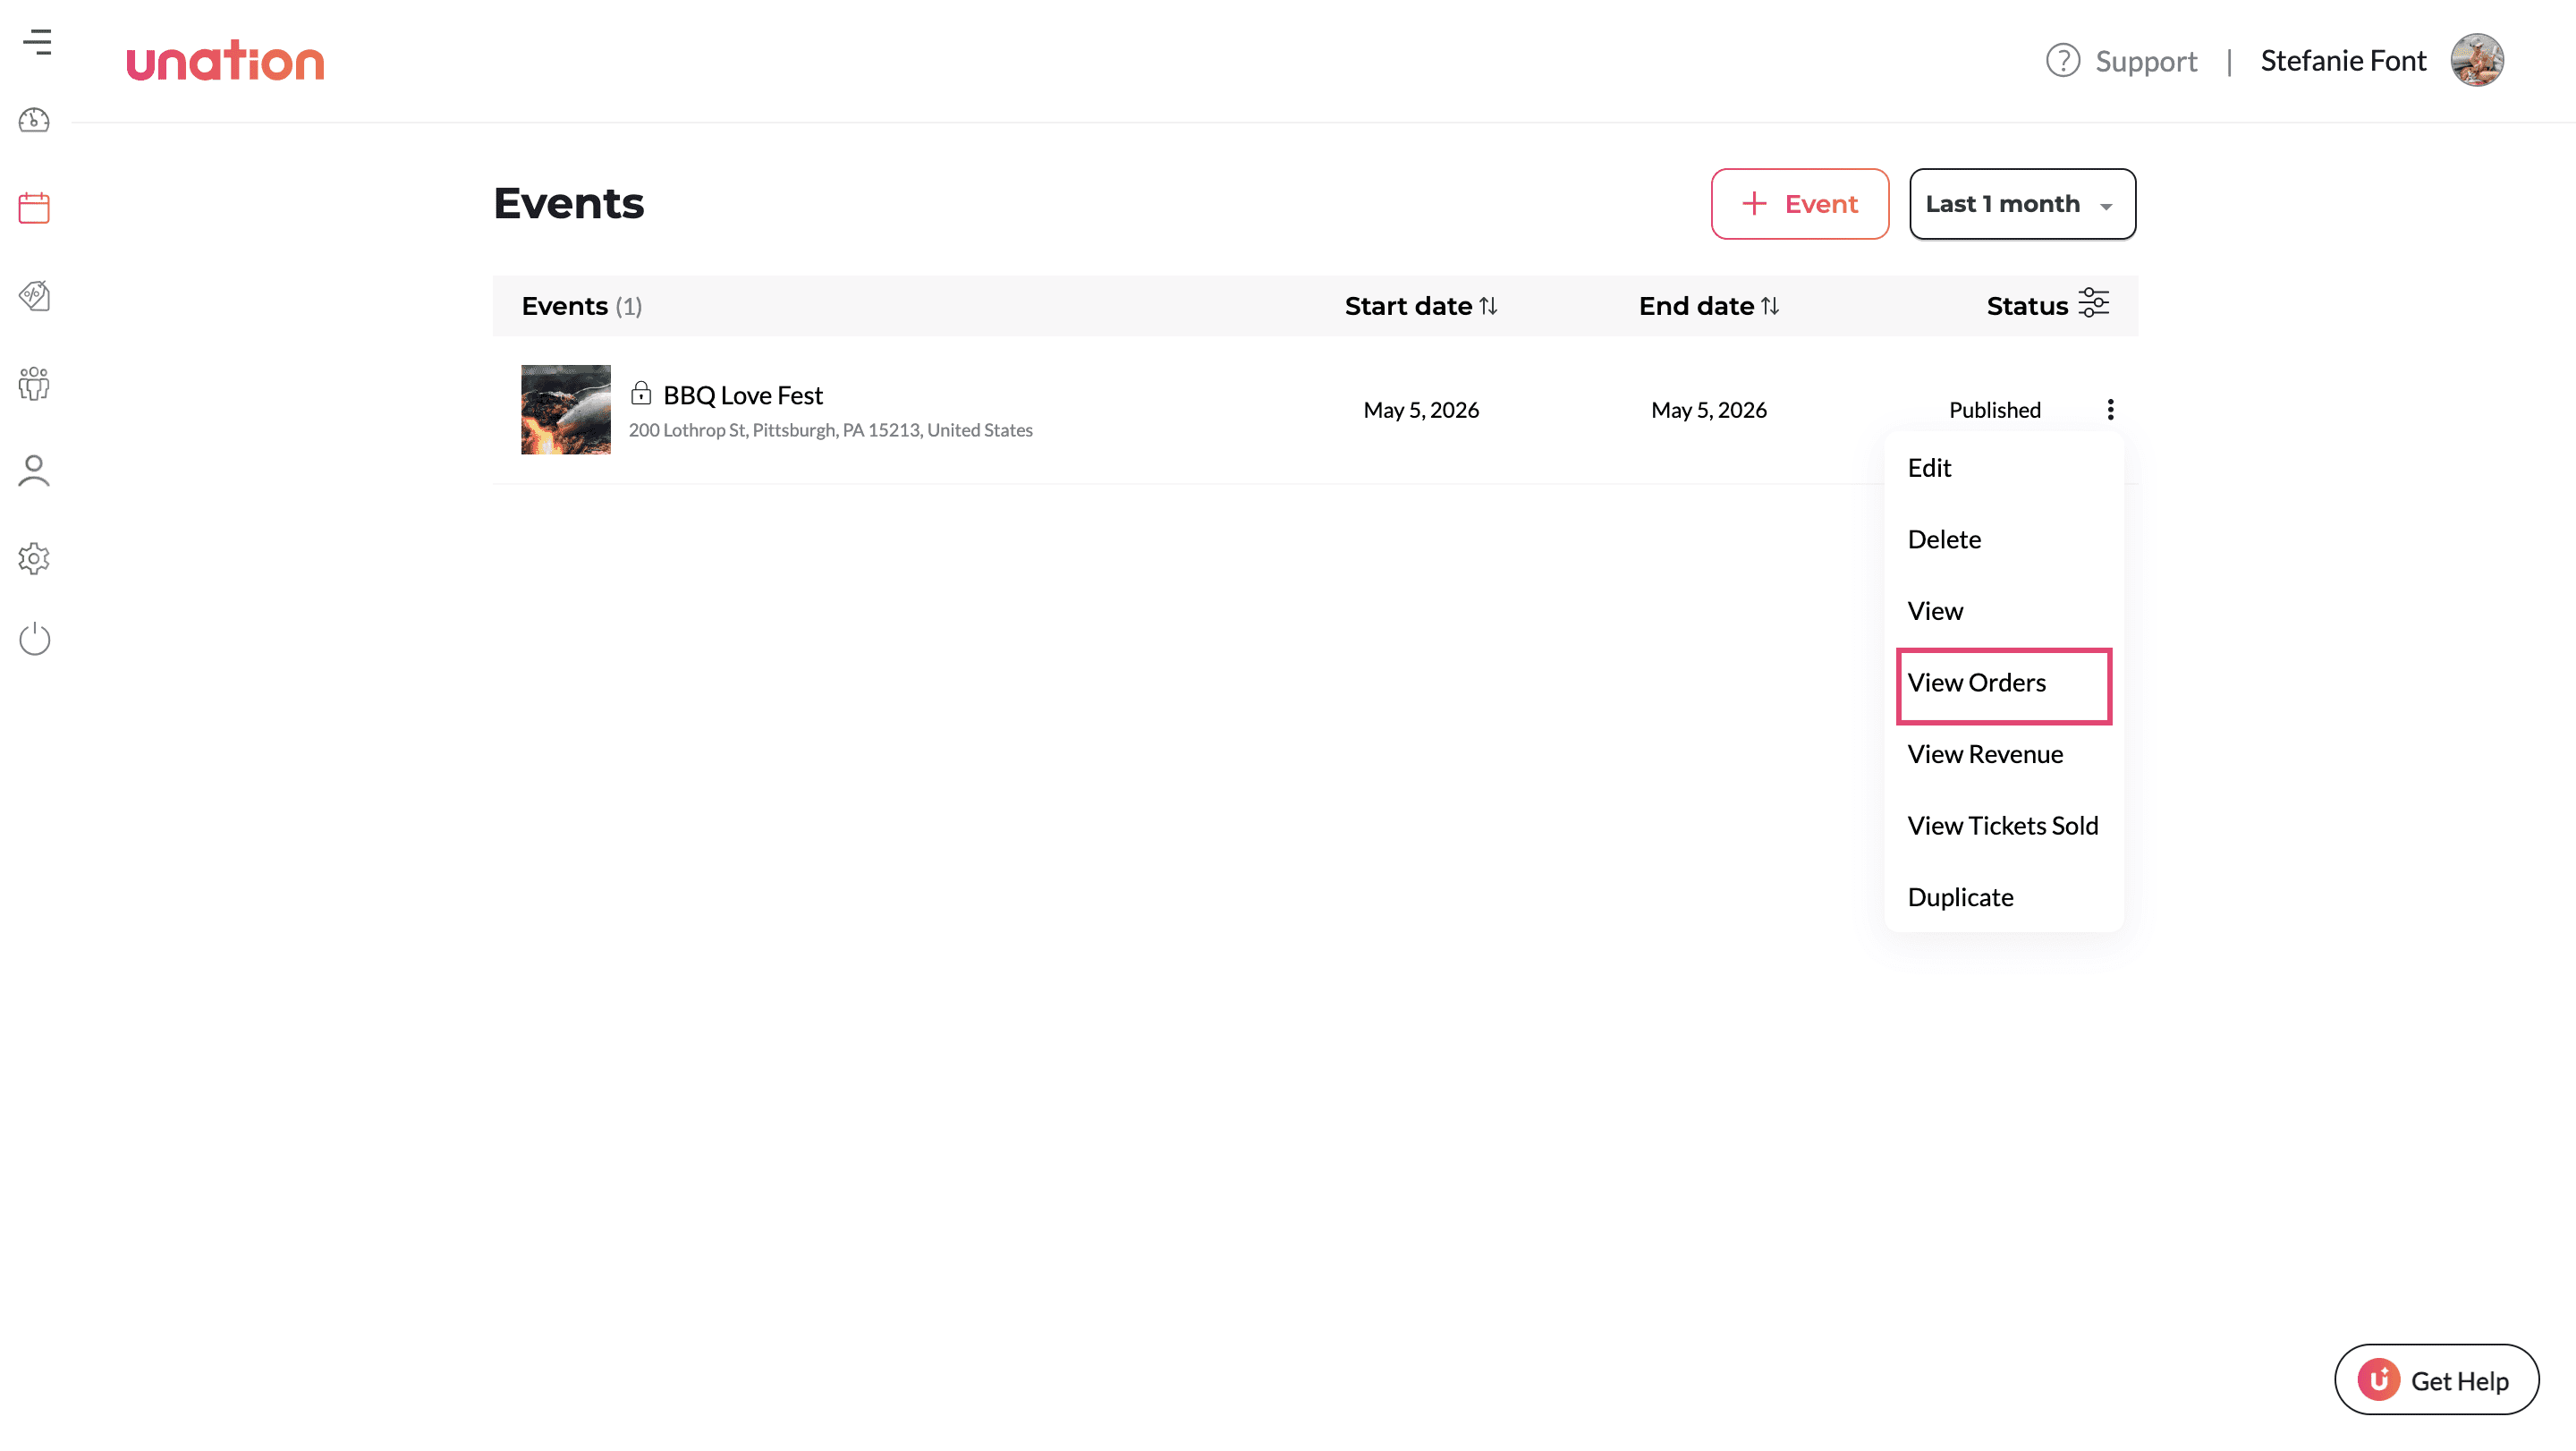
Find the event you want to check guests into.
Press the 3 dots on the right hand side.
Press "View orders".
Once you're viewing orders, you'll want to search for the attendee. You can do so by typing in their name, email or confirmation number.

After finding the attendee's order, you'll hit the 3 dots on the right hand side, and hit "check in" from the dropdown.
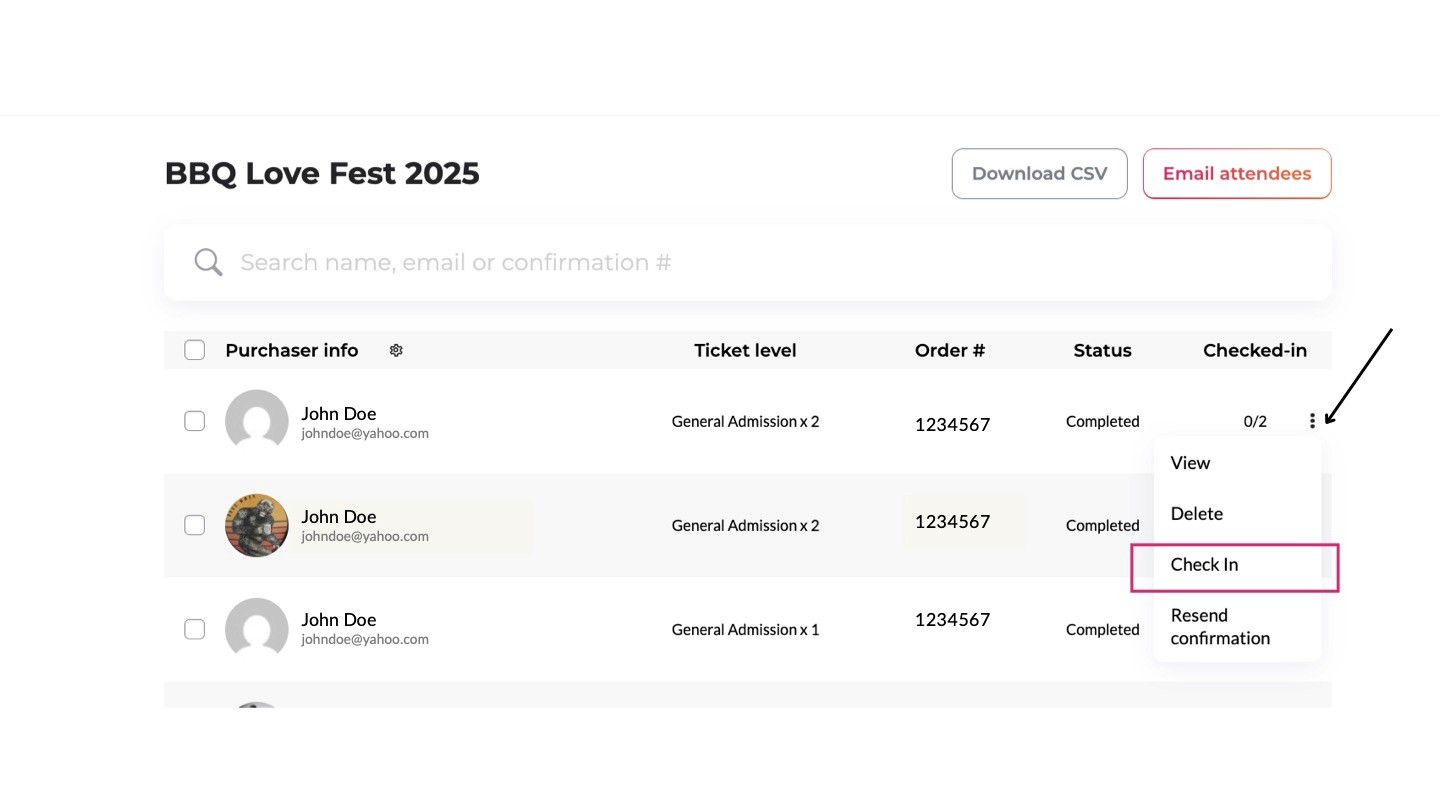
When you press "check in", you'll have the option to check in all of the tickets within that singular order, or just the ones who are currently present. Other ticket holders may show up to the event at a later time.

After pressing "check in" the attendee has been checked in, and you're ready to move on to the next guest!
Back to top