Orbweaver AI
Create a GeoFrame
To begin, go to the Left Hand Menu of your Partner Portal, click on the second icon and choose "Create Geoframe".

Once selected you will be redirected to a page with a large map of the United States. To select the location for your Geoframe, simply type your address into the address prompt until you see the address appear in the dropdown.

As your address appears, click on the desired audience in the dropdown. Once you select the audience, the map will reorient to your exact location and the address will appear in the screen. You can use the +/- actions on the top left of the map to either zoom in and or zoom out.

From there, once you see the location that you would like to draw a Geoframe around, you do it with a series of mouse clicks. First, find the one corner and click your mouse once. Second without letting go of mouse, move to the second corner and click your mouse once. Third, again without letting go of mouse, move to the third corner and click your mouse once. Lastly, move your mouse to final corner without letting go of mouse and Double Tap. Once you double tap you will see the location Geoframe turn blue, at that point you have created your Geoframe. On the top right of screen, above the map, you will see options to select data range as well as name your Geoframe.


Once you save the Geoframe, it will live in the in the first option on the Left Hand Menu under "Create Geoframe Audience."

After selecting "Create Geoframe Audience" you will see your GEO Frame on the top of the list. From there, select the check box of the desired audience and fill out official name, tags, etc on the right hand side of your screen and select "Save Audience".


Once saved, the Geoframe Audience will live in your Audience Library, where you can perform other desired actions. You access the Audience Library as the first selection on the top of the Left Hand Menu.

Once you enter the Audience Library, you will see your audience as the first option.

Audience Library
After creating an audience, it will appear in your "Audience Library," which is accessible as the first option on the Left Hand Menu

In your Audience Library there are a number of ways to search, filter and merge content. To search, you can type an audience title or keyword into the search bar. To filter to your type of download, you can tap into the dropdown of "Audience Type." And if interested in merging content, you can select up to five separate audiences by checking the select box, at which point you can merge multiple audiences into one new audience


Additionally, you can tap into the snowman menu on the far right of your selected audience to choose more options

Create Geoframe Audience
Create Predicted Mover Audience
Create an audience based on historical behavior patterns to identify MAIDs that are likely to move to a new home address. Choose the "Predicted Mover" option in Left Hand Menu. From there, you can choose as many zip codes as desired, name your audience and select the months that those unique MAIDs are expected to move.


Create Demographics Audience
Building a demographic audience and attaching MAIDs is simple on OrbweaverAI Partner Portal. First, choose the demographic option on the Left Hand Menu

Next, you can select as many options as you like from location, interests, purchase propensity, demographics, income level, credit score, etc.

As you make your selections, you will see the options build on the right of your screen in tag form.

At any time you can select the "get count" option and you'll see how many devices OrbweaverAI has stored in those categories. Once ready, you can create an audience, which will then appear in your Audience Library

Create Quick Select Audience
The Quick Select audience feature on OrbweaverAI is meant to save you time. We have thousands of businesses saved in the database to make it easy for you to build complex audiences in seconds. First step is to choose the Quick Select Audience feature on the Left Hand Menu.

From there, you can search for the name of a popular business. In this example, I have chosen Starbucks.

In searching the database, you will notice that I get a message stating that there are over 10,000 locations, and would I like to narrow my search.

On the left hand side of screen, I can begin to filter down by State, Metro, time frame if so desired. Every action begins to narrow my search parameter. I can also name my Audience.


Once done, I will get a notification asking if I want to create that audience. If so, I choose yes.

From there, you will see that audience in your Audience Library under the name you titled when creating. In this example, you can see that I created an audience of over 1.8M unique MAIDs who visited a Starbucks in Jacksonville, Florida over the last 12 months

Cloning Audience
Your selected audience will stay active for 12 months. After 12 months if you would like to refresh or "clone" your audience, you can tap into the snowman menu and select "clone." From there, you can name your audience and choose a new date range. This is a great way to save time instead of building a new Geo Frame or uploading another file. You can also use this feature when wanting to drill down on specific date ranges in your audience


A Trade Area Audience is a great way to build hyper local audiences around your selected Geo Frame audience. To create a Trade Area Audience you will first need to create a Geo Frame around a specific location. Next, you can tap into the snowman menu, and select "Trade Area." From there, you can choose 1, 2, 5 or 10 miles. Also, you can filter down to residents or businesses only if you so choose.
Edit Audience Name
To edit your audience name, simply tap into the snowman menu on the far right our selected audience.


To publish your audience to a desired ad network, simply tap into the snowman menu on the far right of your selection and choose publish.
Household extensions = any other unique mobile IDs living in the same house
Social extensions = any other unique mobile ID who regularly attends the same events or frequents the same establishments at the same time

In choosing Facebook, you will need to first authenticate your Facebook or Meta ad account.


To select and connect a DSP like The Trade Desk or Amazon, you can first choose OpenX and then choose your desired DSP in the secondary dropdown


If to select the OrbweaverAI DSP (Recommended), you can tap that option and connect your account. If selecting the OrbweaverAI option, we automatically make your audiences available.

To select TikTok, you must first connect your ad account

Residential Address Audience
Let's start with the basics.
Create a captivating title that will appeal to your ideal audience. Be sure it includes the type of discount you're offering.
Type the name of the location, and then select the desired address from the auto-populated list in the Street address field. This will make it easier for our users to find you!
If it's hard to find parking at your business or event, toggle on parking info and add details.
Commercial Address Audience
Let's start with the basics.
Create a captivating title that will appeal to your ideal audience. Be sure it includes the type of discount you're offering.
Type the name of the location, and then select the desired address from the auto-populated list in the Street address field. This will make it easier for our users to find you!
If it's hard to find parking at your business or event, toggle on parking info and add details.
Lat/Long Audience
Let's start with the basics.
Create a captivating title that will appeal to your ideal audience. Be sure it includes the type of discount you're offering.
Type the name of the location, and then select the desired address from the auto-populated list in the Street address field. This will make it easier for our users to find you!
If it's hard to find parking at your business or event, toggle on parking info and add details.
Rapid Geoframe Builder
Let's start with the basics.
Create a captivating title that will appeal to your ideal audience. Be sure it includes the type of discount you're offering.
Type the name of the location, and then select the desired address from the auto-populated list in the Street address field. This will make it easier for our users to find you!
If it's hard to find parking at your business or event, toggle on parking info and add details.
Audience Import
Let's start with the basics.
Create a captivating title that will appeal to your ideal audience. Be sure it includes the type of discount you're offering.
Type the name of the location, and then select the desired address from the auto-populated list in the Street address field. This will make it easier for our users to find you!
If it's hard to find parking at your business or event, toggle on parking info and add details.
Geoframe Import
Let's start with the basics.
Create a captivating title that will appeal to your ideal audience. Be sure it includes the type of discount you're offering.
Type the name of the location, and then select the desired address from the auto-populated list in the Street address field. This will make it easier for our users to find you!
If it's hard to find parking at your business or event, toggle on parking info and add details.
Attribution Report Library
Let's start with the basics.
Create a captivating title that will appeal to your ideal audience. Be sure it includes the type of discount you're offering.
Type the name of the location, and then select the desired address from the auto-populated list in the Street address field. This will make it easier for our users to find you!
If it's hard to find parking at your business or event, toggle on parking info and add details.
Create Attribution Report
To generate and share reports for your clients, or for specific insights, tap into the snowman menu and select "generate/share reports." A pop up will appear and you can select the type of report you are interested. You can select multiple options. Once selected, your reports will run in the background and may take up to 5-20 minutes. Once complete, you can tap on the snowman menu again and select "generate/share reports" again and your pop up will now show selection boxes. Check the ones you are interested in (can choose multiple) and select "done." Your reports will open in another tab with a unique URL that you can share with your team or client


If your account has the necessary permissions, you'll find the option to run attribution reports in the left-hand menu

From there, tap on "Create Attribution Report." On the Attribution Report page, start by choosing an existing audience from your library. This could be an audience you've targeted for a specific campaign, a demographic group, or any segment you wish to analyze further.


Once you select your desired audience, you can move on to the next step to select your destination audience.

In this example, I chose as my target audience all of those who live within 2 miles of the history museum. And for my destination audience I chose the History Museum. My intent is to understand how many of the people who live 2 miles from the History Museum actually visit the museum.
Next, I will name my Report

Once the blue dots on the report are green your report is complete.

Schedule Attribution Reports
Let's start with the basics.
Create a captivating title that will appeal to your ideal audience. Be sure it includes the type of discount you're offering.
Type the name of the location, and then select the desired address from the auto-populated list in the Street address field. This will make it easier for our users to find you!
If it's hard to find parking at your business or event, toggle on parking info and add details.
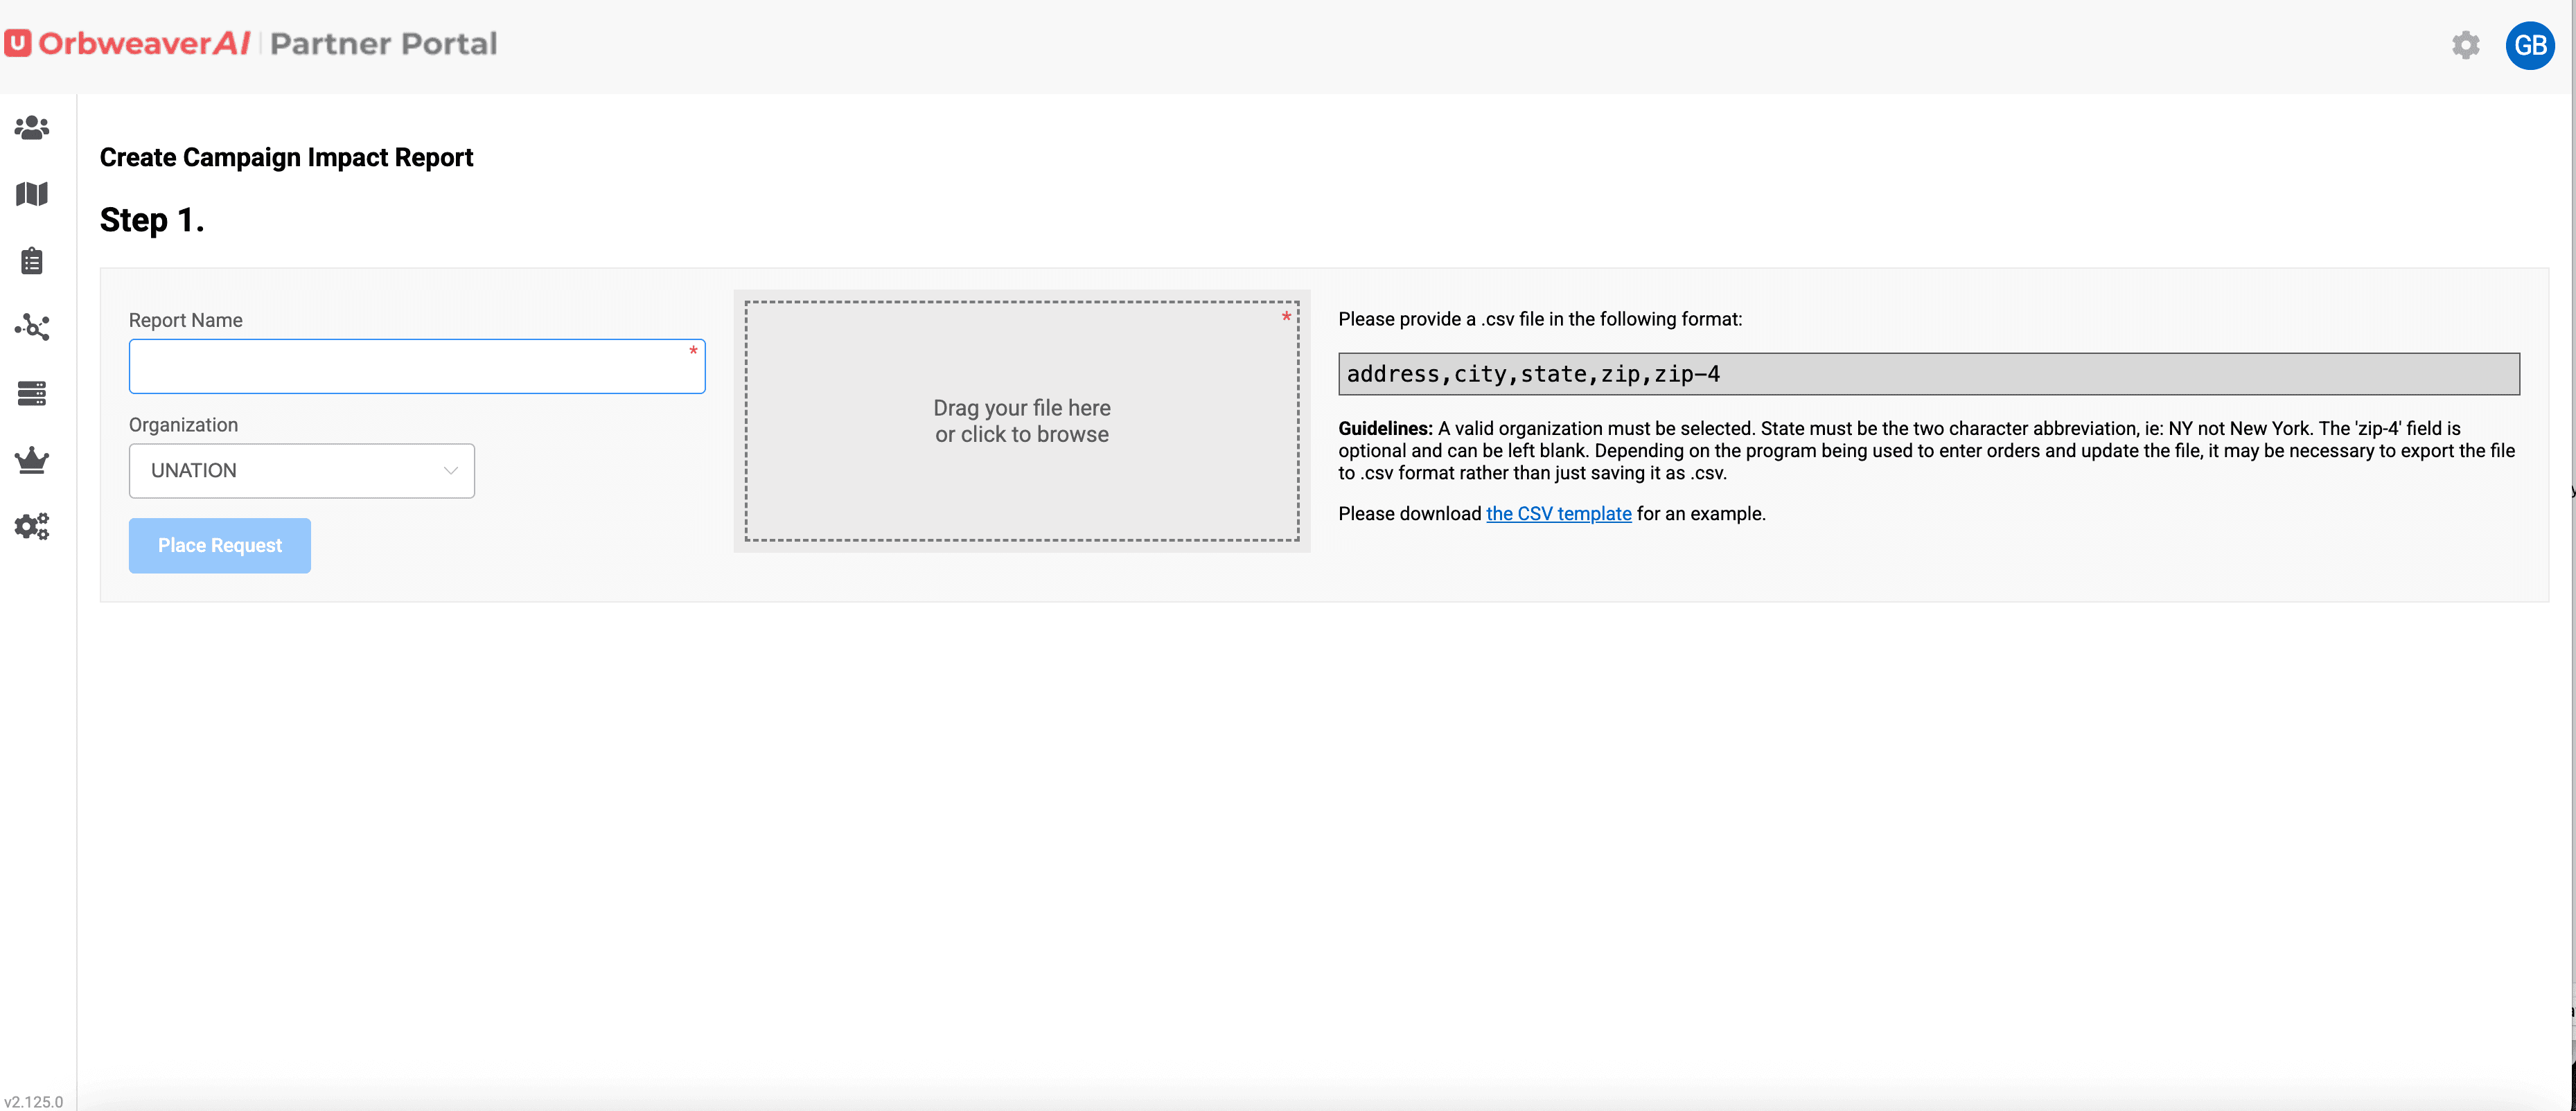
Create Campaign Impact Report
On the Left Hand Menu, choose the 4th icon and select "Create Campaign Impact Report"

From there, click on Name Your Report and follow instructions to ensure that your CSV upload is formatted properly. Here, you can upload your sales data. You only need address, city, state and zip. OrbweaverAI will match the addresses of the original Target Audience of the campaign with those in the uploaded sales data
Creating Web Pixel
On the Left Hand Menu, choose the 5th icon and select "Web Pixels"
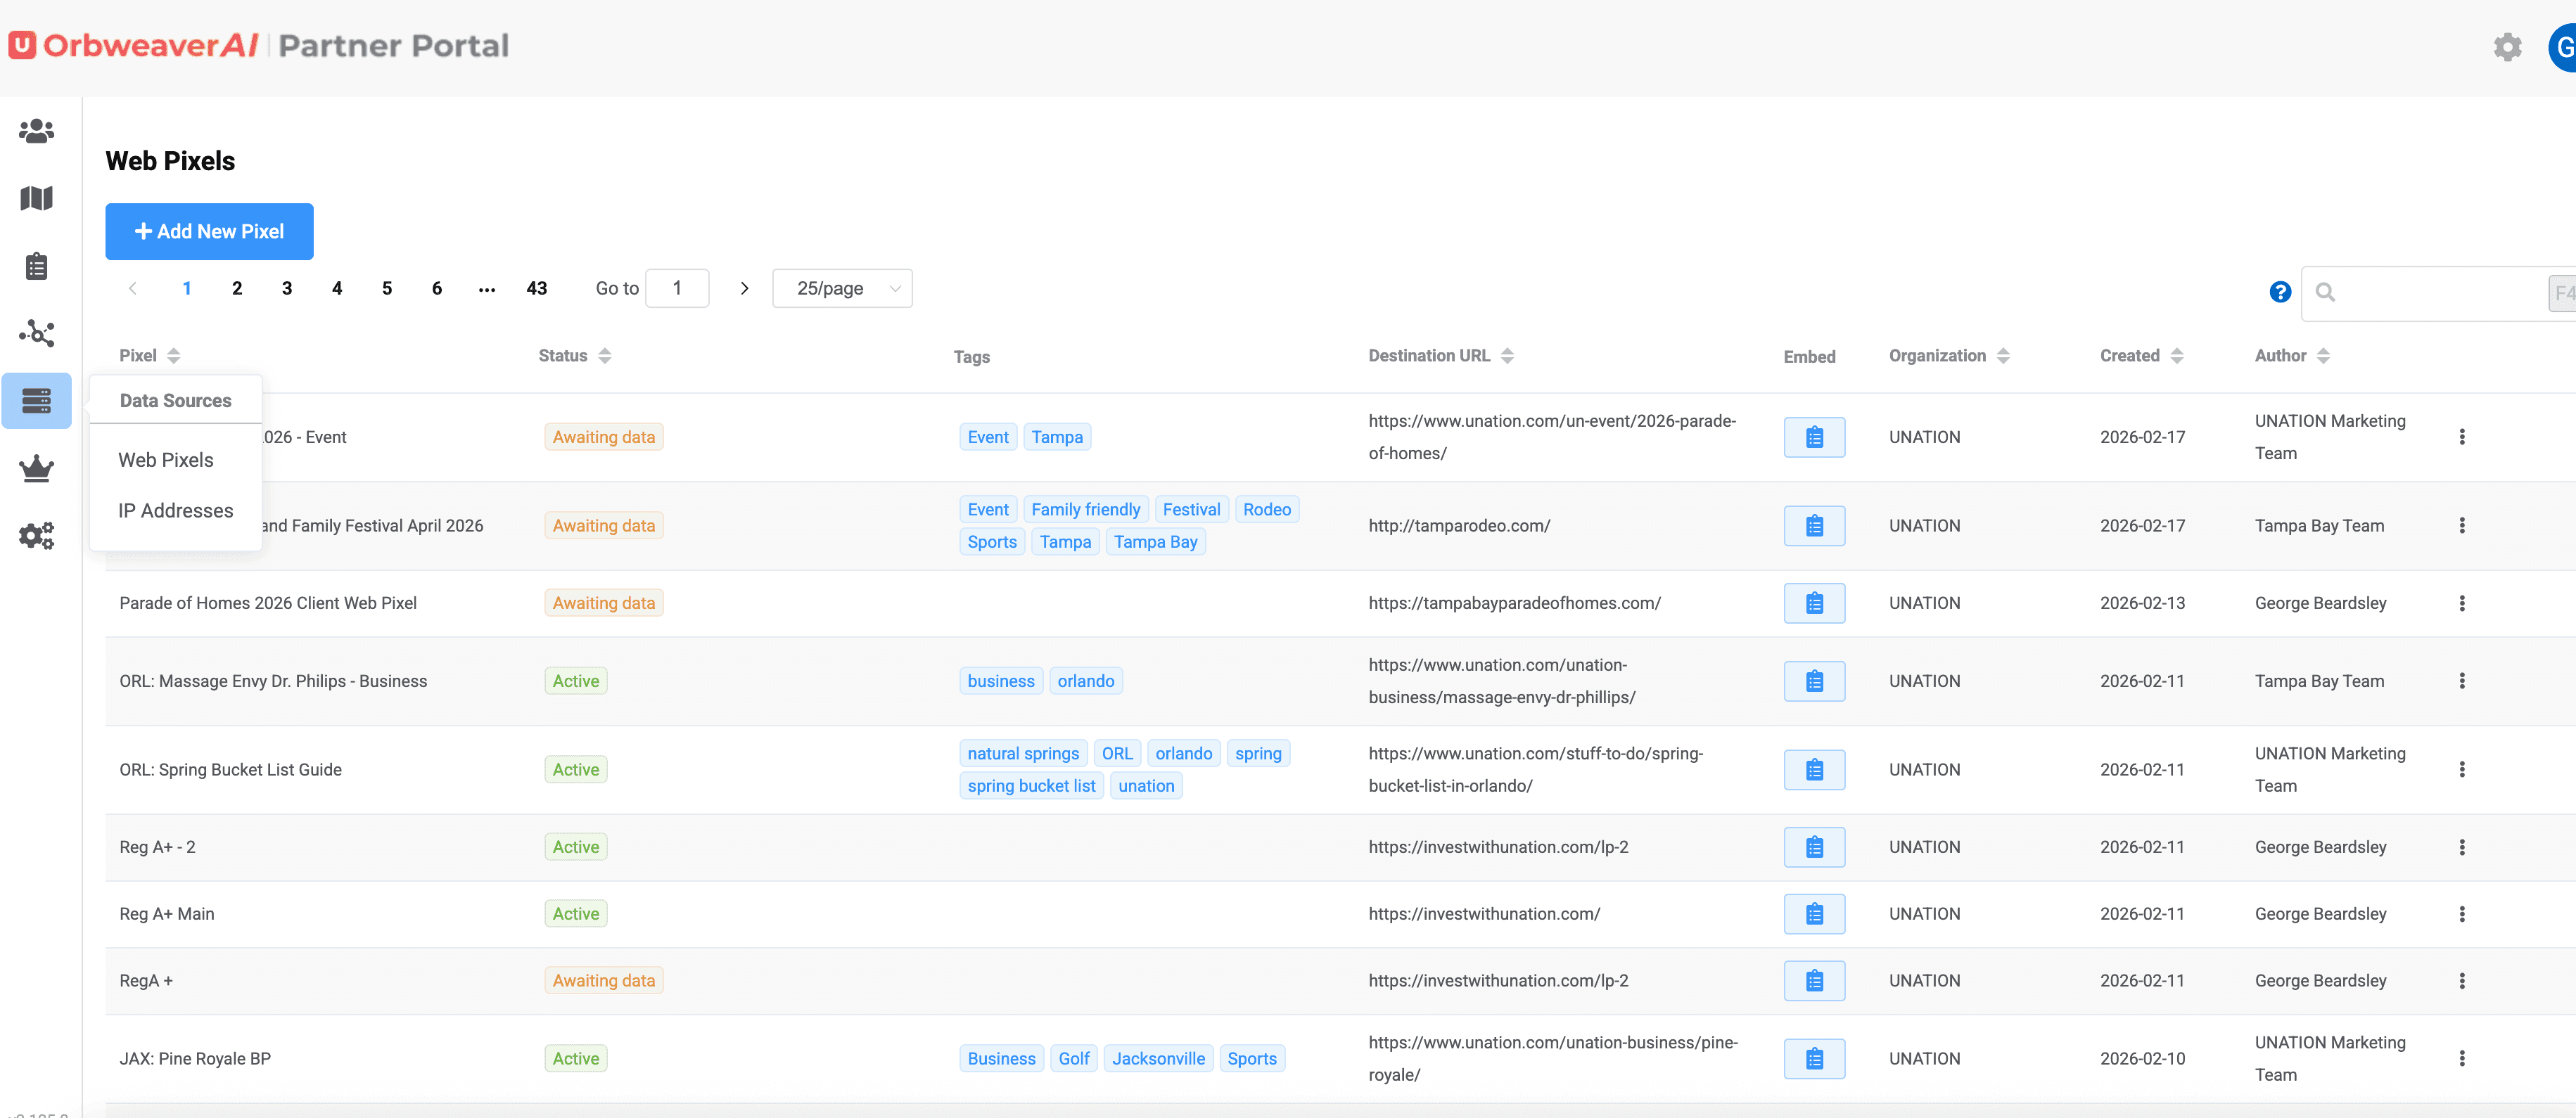
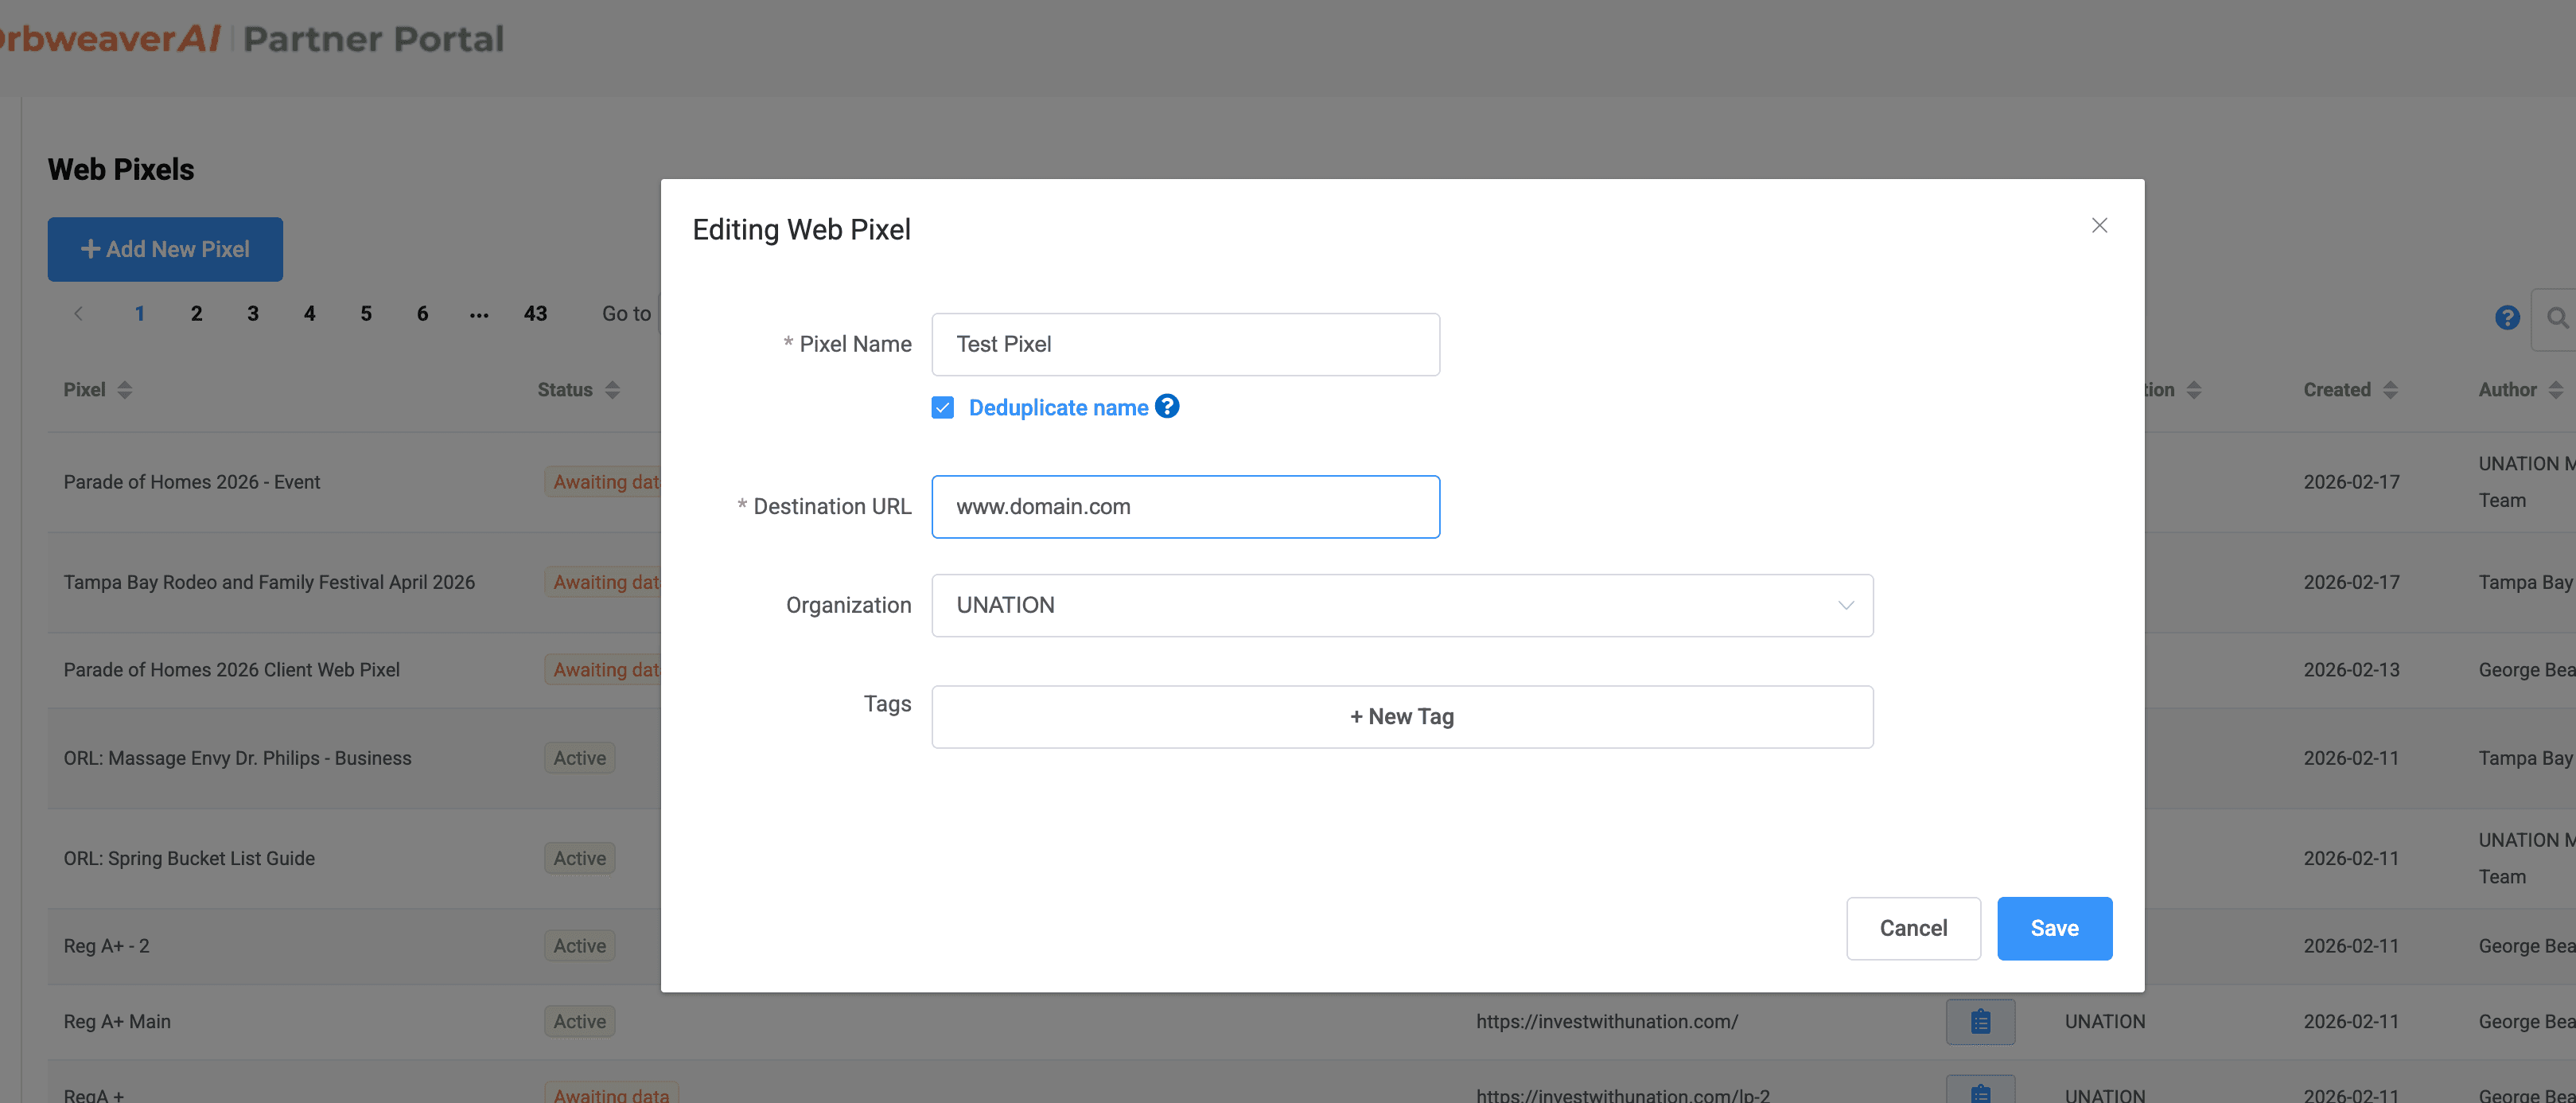
From there, click "+ Add New Pixel." A pop-up will appear that allows you to name your pixel and add the URL of the website or page that would like to track
Using Web Pixels
Below are two quick installation options. Your developer can complete either method in under two minutes.
Option 1 - Via Google Tag Manager (Recommended)
This is the safest and most flexible approach.
Create a New Tag
In your GTM container, go to Tags > New.Tag Configuration
Select Custom HTML as the Tag Type.Paste the Code
Paste the provided UDATA pixel code into the HTML field.Triggering
Set the trigger to Initialization - All Pages (preferred) or All Pages so it loads site-wide.Save & Publish
Click Save, then Submit and Publish to push live.
Use this method if you are not using GTM and have access to your website’s code.
Access the Global Header File
Open your site’s main header file (typically header.php, theme.liquid, or equivalent).Locate the Closing Head Tag
Find the </head> tag.Paste the Code
Insert the pixel code directly above the closing </head> tag.Save & Deploy
Save your changes and deploy.
Quick Verification
After publishing:
Refresh your homepage.
Open your browser’s Developer Tools.
Go to the Network tab.
Search for px.xfer123.com.
If you see the 1x1 image request firing, the pixel is successfully installed.
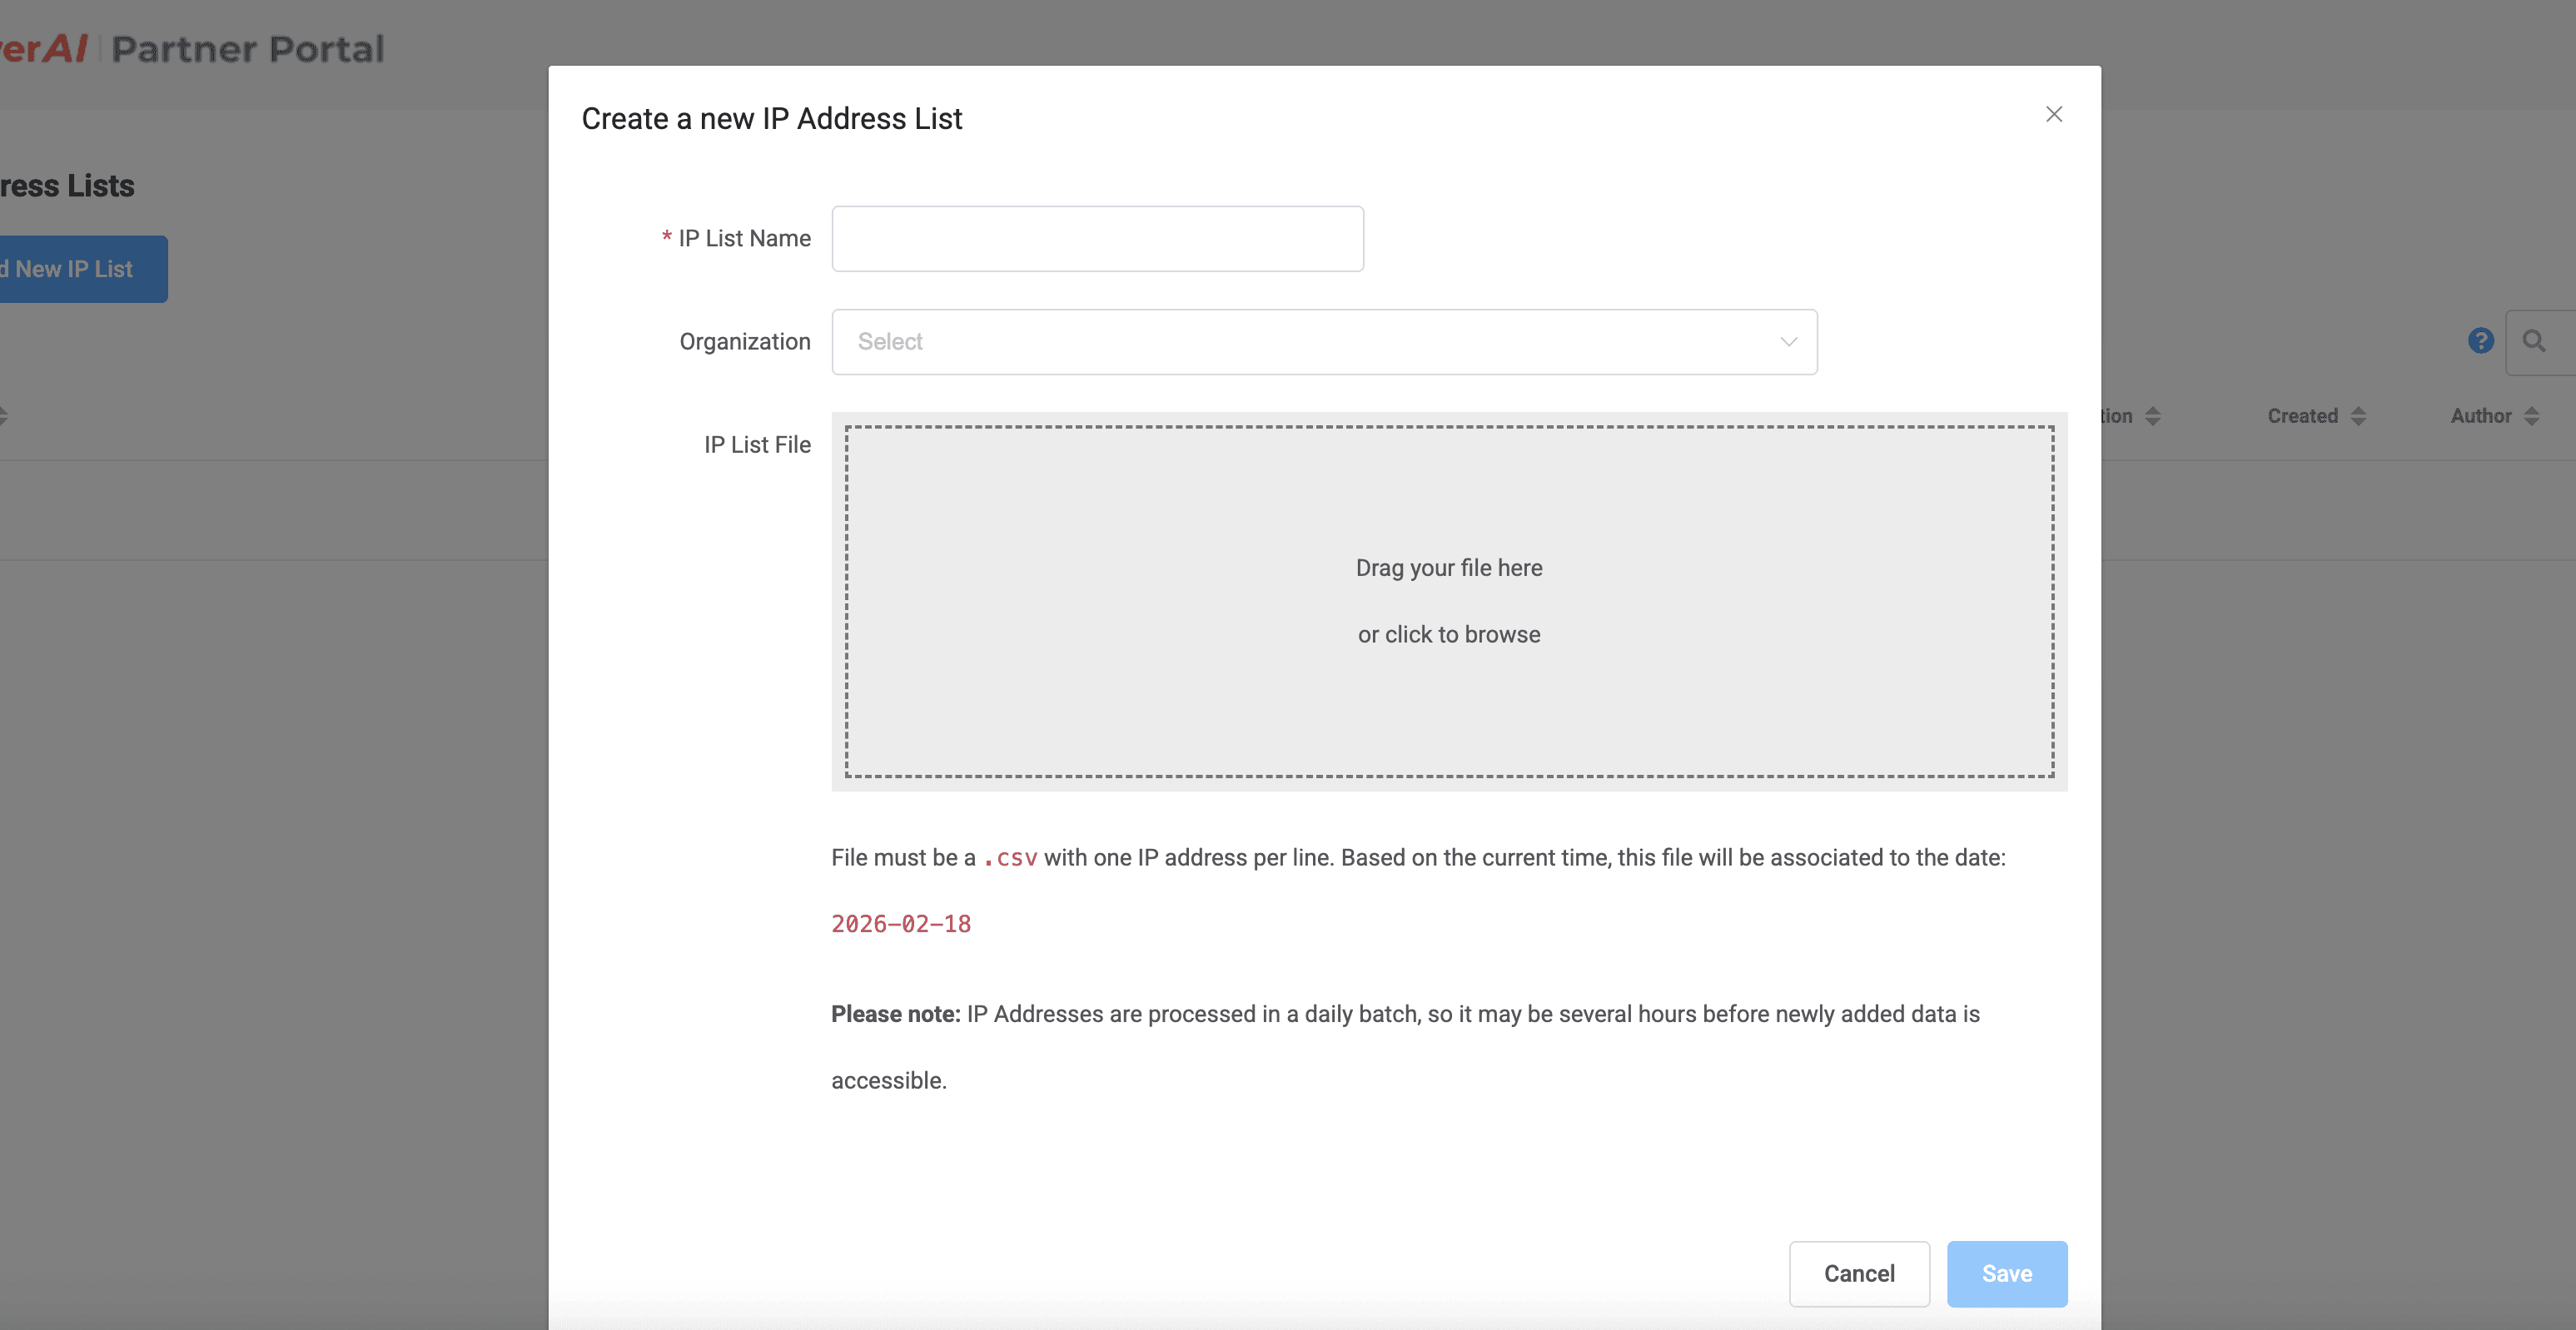
IP Addresses
On the Left Hand Menu, choose the 5th icon and select "IP Addresses"

Click on "+ Add New IP List." Please follow instructions to import your IP Addresses. Once imported, OrbweaverAI will create MAID audiences of phones living at those residences